4 Wiring Proline Prowirl 72 FOUNDATION Fieldbus
26 Endress + Hauser
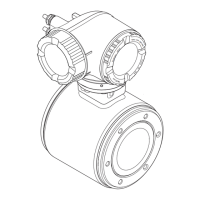
Procedure for connecting the transmitter, Ex d/XP version (Fig. 17)
1. Release the securing clamp (a) of the connection compartment cover.
2. Screw the connection compartment cover (b) off the transmitter housing.
3. Push the power supply/fieldbus cable through the cable gland (c).
4. Tighten the cable glands (c) (see also Page 28).
5. Pull the terminal connector (d) out of the transmitter housing and connect the power
supply/fieldbus cable (Fig. 18).
! Note!
The terminal connector (d) is pluggable, i.e. it can be plugged out of the transmitter housing
to connect the cable.
6. Plug the terminal connector (d) into the transmitter housing.
7. Secure the ground cable to the ground terminal (e).
! Note!
Between the stripped fieldbus cable and the ground terminal, the cable shielding should not
exceed a length of 5 mm (0.20 in).
8. Only remote version:
Secure ground cable to the ground terminal (Fig. 18, B).
9. Screw the connection compartment cover (b) onto the transmitter housing.
10. Tighten the securing clamp (a) of the connection compartment cover.
A0003783
Fig. 17: Procedure for connecting the transmitter Ex d/XP version
a Clamp securing the cover of the connection compartment
b Cover of connection compartment
c Cable gland
d Terminal connector
e Ground terminal
Wiring diagram
A0003784
Fig. 18: Connecting the transmitter
A Fieldbus cable (FOUNDATION Fieldbus)
B Ground terminal (between the stripped fieldbus cable and the ground terminal, the cable shielding should not
exceed a length of 5 mm (0.20 in).
C Terminal connector (1 = FF+; 2 = FF–)
D Ground terminal (external, only relevant for remote version)
a
a
a
a
a
a
a
a
a
a
a
a
a
a
a
a
a
a
a
a
a
a
a
a
a
a
a
a
a
a
a
a
a
a
a
a
a
a
a
a
a
a
a
a
a
a
a
a
a
a
a
a
a
a
a
a
a
a
a
a
a
a
a
a
a
a
a
a
a
a
a
a
a
a
a
a
a
a
a
a
a
a
a
a
a
a
a
a
a
a
a
a
a
a
a
a
a
a
a
a
a
a
a
a
a
a
a
a
a
a
a
a
a
a
a
a
a
a
a
a
a
a
a
a
a
a
a
a
a
a
a
a
a
a
a
a
a
a
a
a
a
a
a
a
a
a
a
a
a
a
a
a
a
a
a
a
a
a
a
a
a
a
a
a
a
a
a
a
a
a
a
a
a
a
a
a
a
a
a
a
a
a
a
a
a
a
a
a
a
a
a
a
a
a
a
a
a
a
a
a
a
a
a
a
a
a
a
a
a
a
a
a
a
a
a
a
a
a
a
a
a
a
a
a
a
a
a
a
a
a
a
a
a
a
a
a
a
a
a
a
a
a
a
a
a
a
a
a
a
a
a
a
a
a
a
a
a
a
a
a
a
a
a
a
a
a
a
a
a
a
a
a
a
a
a
a
a
a
a
a
a
a
a
a
a
a
a
a
a
a
a
a
a
a
a
a
a
a
a
a
a
a
a
a
a
a
a
a
a
a
a
a
a
a
a
a
a
a
a
a
a
a
a
a
a
a
a
a
a
a
a
a
a
a
a
a
a
a
a
a
a
a
a
a
a
a
a
a
a
a
a
a
a
a
a
a
a
a
a
a
a
a
a
a
a
a
a
a
a
a
a
a
a
a
a
a
a
a
a
a
a
a
a
a
a
a
a
a
a
a
a
a
a
a
a
a
a
a
a
a
a
a
a
a
a
a
a
a
a
a
a
a
a
a
a
a
a
a
a
a
a
a
a
a
a
a
a
a
a
a
a
a
a
a
a
a
a
a
a
a
a
a
a
a
a
a
a
a
a
a
a
a
a
a
a
a
a
a
a
a
a
a
a
a
a
a
a
a
a
a
a
a
a
a
a
a
a
a
a
a
a
a
a
a
a
a
a
a
a
a
a
a
a
a
a
a
a
a
a
a
a
a
a
a
 Loading...