Waterpilot FMX21 Installation
Endress+Hauser 19
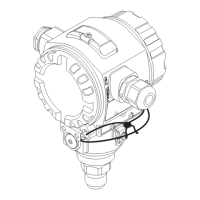
5.5 Mounting the Waterpilot with a cable mounting
screw
A0018794
1 Extension cable
2 Cover for cable mounting screw
3 Sealing ring
4 Clamping sleeves
5 Adapter for cable mounting screw
6 Top edge of clamping sleeve
7 Desired length of extension cable and Waterpilot probe prior to assembly
8 After assembly, item 7 is located next to the mounting screw with G 1½" thread: height of sealing surface of
the adapter or NPT 1½" thread height of thread run-out of adapter
Engineering unit mm (in). Illustrated with G 1½" thread
If you want to lower the level probe to a certain depth, position the top edge of the
clamping sleeve 40 mm (4.57 in) higher than the required depth. Then push the
extension cable and the clamping sleeve into the adapter as described in Step 6 in the
following section.
5.5.1 Mount cable mounting screw with G 1½" or NPT 1½" thread:
1. Mark the desired length of extension cable on the extension cable
2. Insert the probe through the measuring aperture and carefully lower on the
extension cable. Fix the extension cable to prevent it from slipping.
3. Push the adapter (item 5) over the extension cable and screw it tightly into the
measuring aperture.
4. Push the sealing ring (item 3) and cover (item 2) onto the cable from above. Press
the sealing ring into the cover.
5. Place clamping sleeves (item 4) around the extension cable (item 1) at the marked
position as illustrated in the diagram.
6. Push the extension cable with the clamping sleeves (item 4) into the adapter (item 5)
7. Slide the cover (item 2) with sealing ring (item 3) onto the adapter (item 5) and
screw tightly to the adapter.
To remove the cable mounting screw, perform this sequence of steps in reverse.
L
CAUTION
Risk of injury!
‣
Use only in unpressurized vessels.

 Loading...