17 18
®
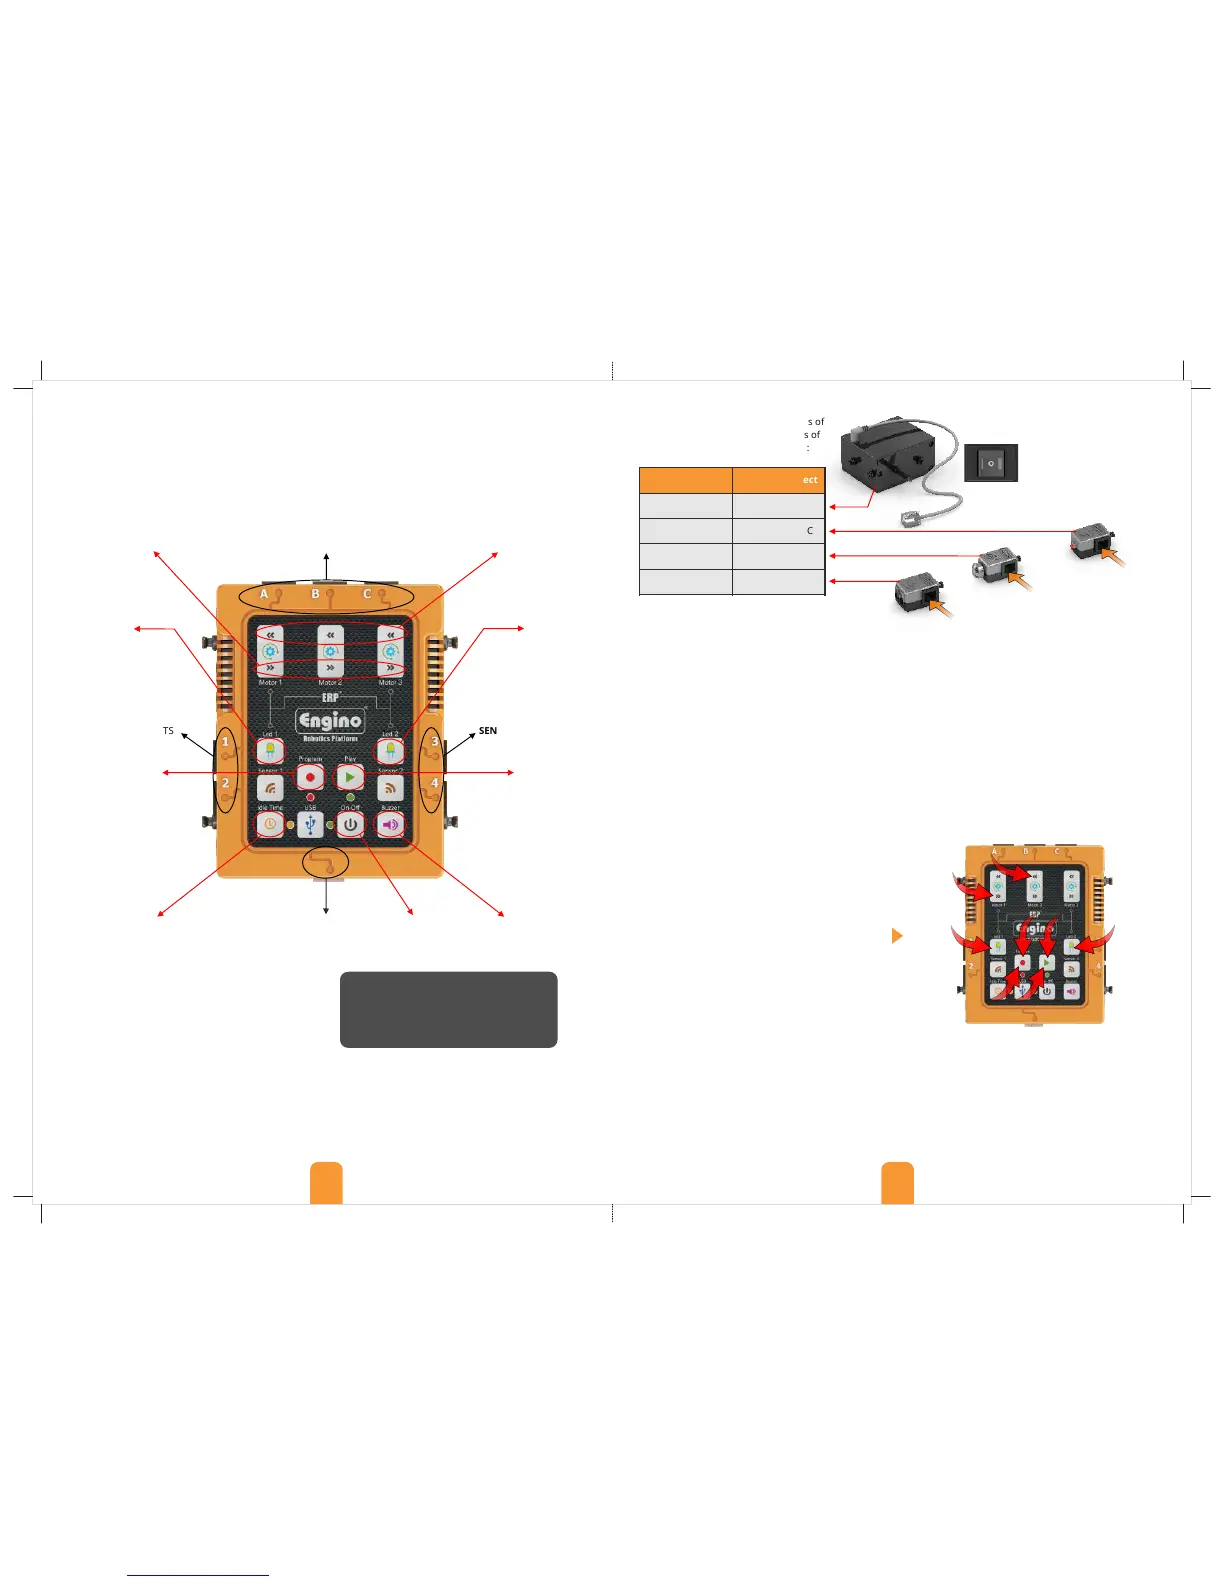
The Engino Robotics Platform (ERP) is a robotic system consisting of a main controller with different buttons and
indicators, able to connect with various peripherals: motors, lights and sensors. The ERP is a powerful and flexible
tool that is easy to use and can connect with the rest of the Engino parts! In this manual you can find all the
necessary information about: how to program your robots with illustrated examples, the main features of the ERP
controller, how to install the ERP software, how to update the firmware, safety guidelines, tips and much more. But
first, see below the various buttons, ports and peripherals of the ERP.
Batteries: To turn on the controller you need to install
6 new AA batteries (it works also with 3 batteries
placed continuously up or down). You will need a
cross-head screw driver. Unscrew the battery cap at
the back of the controller. Place the batteries carefully
making sure that the + and - signs match those
indicated in each battery position. After you place the
batteries, screw the cap back in position if you want.
ERP controller
Manual ERP programming
MOTOR OR LED PORTS
USB PORT
for computer
connection
ON/OFF
BUTTON
IDLE TIME BUTTON
Press these buttons
to turn the motors
clockwise.
SENSOR OR LED PORTS SENSOR OR LED PORTS
LED BUTTON LED BUTTON
BUZZER BUTTON
MOTOR BUTTONS
Press this button
to light up the
connected LED.
Press this button
to light up the
connected LED.
Press this button to
play a buzzer sound.
Peripherals and ports: different types of
peripherals work only in specific ports of
the ERP controller, as indicated below:
7
2
4
3
5
6
8
1
Connect RJ
cable here
Connect RJ
cable here
Connect RJ
cable here
Safety guidelines: Do not mix alkaline, standard or
rechargeable batteries. Non-rechargeable batteries
are not to be re-charged. Do not mix old with new
batteries. Remove dead or old batteries from the ERP
if they will not be used for a long time. Never dispose
off batteries in fire. Supply terminals are not to be
short circuited.
Instructions:
1. Press the “Program” button to begin recording (a
flashing red light should be on).
2. Hold pressed the clockwise button of the motor 1 in
port A for 3 seconds.
3. Hold pressed the button of the LED 1 in port 1 for 5
seconds.
4. Hold pressed the anti-clockwise button of the motor
2 in port B for 3 seconds.
5. Hold pressed button of the LED 2 in port 3 for 5 sec.
6. Press the “Program” button once to save the
program in memory.
7. Press the “Play” button to run the program.
8. After the program finishes you can repeat it
continuously in a loop if you hold pressed the “Play”
button for 3 seconds.
Note that the delay time between button pressing
is not recorded. While the program is in play mode
each command follows the other without any time
delay. If we want to have a time delay between steps
then we can use the “Idle Time” button. For as long as
the “Idle Time” button is pressed, interval time is
recorded between steps.
Press these buttons
to turn the motors
anti-clockwise.
MOTOR BUTTONS
PROGRAM BUTTON PLAY BUTTON
Only for manual
programming. Press this
button to start recording.
Once the red light starts
blinking the controller goes
in record mode. When you
finish, press the same button
again to store in memory.
Press the button once to
start the program. Press
and hold the button for
3 seconds to repeat the
program in a loop.
Bluetooth must be turned off in order to
turn off the device smoothly. Also, make
sure that the USB cable is not connected.
The ERP, once switched ON, can be operated manually by pressing the various buttons in real time. To begin manual
recording press the “Program” button once. The red flashing light indicates that the ERP is in record mode. In order
to create a programming sequence, press the buttons of the LEDs, Motors, Buzzer or Idle Time at any desired order,
either separately or simultaneously. Each step is recorded for a period of time that the button is being pressed.
When the programming procedure is finished, press again the “Program” button to save the program in the
controller’s memory. Press “play” to start the program; if you hold it for 3 seconds the program will repeat in a loop.
Note that the device can save only one program in its memory. You can also operate the ERP without setting it
in record mode; just press the buttons and it will work as a controller in order to see how the various outputs work.
Recording example 2: The ERP also allows many
commands to play simultaneously. For example you
can press two or more buttons at the same time and
they will play together. Repeat the same sequence as
in example 1, but this time follow commands 2 and 3
simultaneously. Then press and hold the “Buzzer” for 2
seconds; then press the “Idle Time” for 5 seconds and
carry out commands 4 and 5 simultaneously. Finally,
save and play (commands 6, 7 and 8).
ATTENTION:
This button has two functions:
- it adds idle time during manual programming;
- press once to activate the Bluetooth when the
controller is switched on (but not in recording or
play mode). Open the EnginoRobot BT app,
find the ERP Bluetooth network and connect.
Note that if the ERP is not connected with any
Bluetooth device within 1 minute, it will turn off
to save energy.
Recording example 1: Connect 2 motors in each of the ports A and B and 2 LED lights on ports 1 and 3. The
peripherals will run for as long as their buttons are pressed. You can try to press the Buzzer as well. For the
program, the motor in port A should move clockwise for 3 seconds, the LED in port 1 to light up for 5 seconds, the
motor in port B to turn anti-clockwise for 3 seconds and the LED in port 3 to light up for 5 seconds.
The motor does not work if
the switch is on position O. In
position II the motor works in
the direction of the ERP
controller. In position I the
direction is reversed. Motors
do not need extra batteries to
work.
 Loading...