REV.-A
3.2.3 Removing the Circuit Boards
This section describes how to remove the main board
(C060
MAIN board), the drive board
(C060
DRV
board), the power supply board
(C060
PSB/PSE
board), and the control panel board
(C060
PNL board).
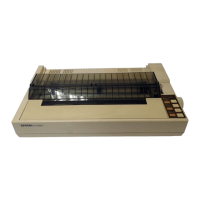
3.2.3.1 Removing the Drive Board
(C060
DRV
Board)
1. Remove the upper case, as described in Section 3.2.2.2.
2. Remove the mechanism unit, as described in Section 3.2.4.
3. Disconnect the cable from connector CN2.3.4.5.6.7.8.9. 10.11.12 on the drive board.
4. Disconnect the cable from connector CN 1
5. Remove the four stoppers attach the main
on the power switch.
board. Remove the drive board.
Stoppers
C060
DRV
Board
Figure 3-6. Removing the Drive
3.2.3.2 Removing the Main Board
(C060
MAIN Board)
1.
2.
3.
4.
5.
6.
Board
Remove the upper case, as described in Section 3.2.2.2.
Remove the mechanism unit, as described in Section 3.2.4.
Remove the drive board, as described in Section 3.2.3.1.
Disconnect the cable from connector
CN.4.on
the PSB Board.
Remove the CB
(M3
X 12) screws that secures the the lower case.
Remove the the main board.
CBB(C)
(M3 X 12) Screws
Shield
CB(M3 X 8)
\
C060 MAIN Board
Figure 3-7. Removing the Main Board
Assembly and Adjustment Note
After replacing the main board, you must adjust the bidirectional print position again to ensure that
bidirectional printing is correctly aligned. (See Section 4.2.)
3-7
 Loading...