REV.-A
DISASSEMBLY, ASSEMBLY, AND ADJUSTMENT
4.2 DISASSEMBLY AND REASSEMBLY
This chapter details the disassembly procedures for the LQ-510. As a rule, reassembly is performed simply
by reversing the disassembly procedures. A number of special notes, however, are provided under the heading
“Notes for Reassembly.” When a disassembly or reassembly procedure requires that an adjustment be per-
formed, the adjustment is described under the heading, “Required Adjustment.” Perform these adjustments
as indicated.
Be sure that you have read Section 4.1
“General Repair Information
n
before performing disassembly
Remove paper and the ribbon cartridge before disassembly.
The disassembly procedure detailed below is completed in the following sequence: (1) removal of the print-
head, (2) removal of the cases, (3) removal of the circuit boards, (4) removal of the printer mechanism unit,
and (5) disassembly of the printer mechanism, Exploded diagrams of the LQ-510 and of the printer mechanism
are provided in Figures A-31 to A-32.
4.2.1 PRINTHEAD REMOVAL
1.
Remove the printer cover, and confirm that paper and ribbon cartridge have been removed.
2.
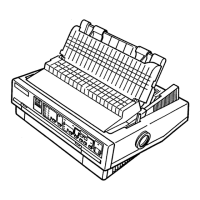
Open the cover of the paper tension unit.
Platen
Figure 4-1. Paper Tension Unit Cover
LQ-510
4-3
 Loading...