7
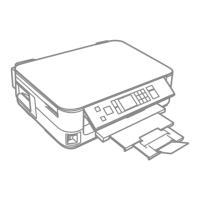
Using the LCD Screen
a b c d e
Press Copies + or - to set
the number of copies for
the selected photo.
Press l or r to set the
density.
Press u or d to select
the menu item. The
highlight moves up or
down.
Press r to open the
setting item list.
Press l or r to change
the photo displayed on
the LCD screen.
f g
The PhotoEnhance function automatically corrects color and improves the quality
of your images. You can preview the adjusted images by pressing the button and
changing View PhotoEnhance to On.
When the Fix Red-Eye setting is set to On-This Photo or On-All Photos, the icon is
displayed.
The icon is displayed on a cropped image.
When the image is cropped, an icon is displayed.
In Fax mode and Copy mode, the ADF
icon is displayed in the upper right of the
LCD screen when there is a document in
the automatic document feeder.
h
When you have more than 999 photos on your memory card, the LCD screen displays
a message to let you select a group. Images are sorted by the date they were taken.
To select and show images in a group, press u or d to select a group and then press
OK. To re-select a group or folder, select Setup, Select Location, and then select
Group Select or Folder Select.
The actual screen display may
dier slightly from those shown in
this guide.
Q

 Loading...