A
B
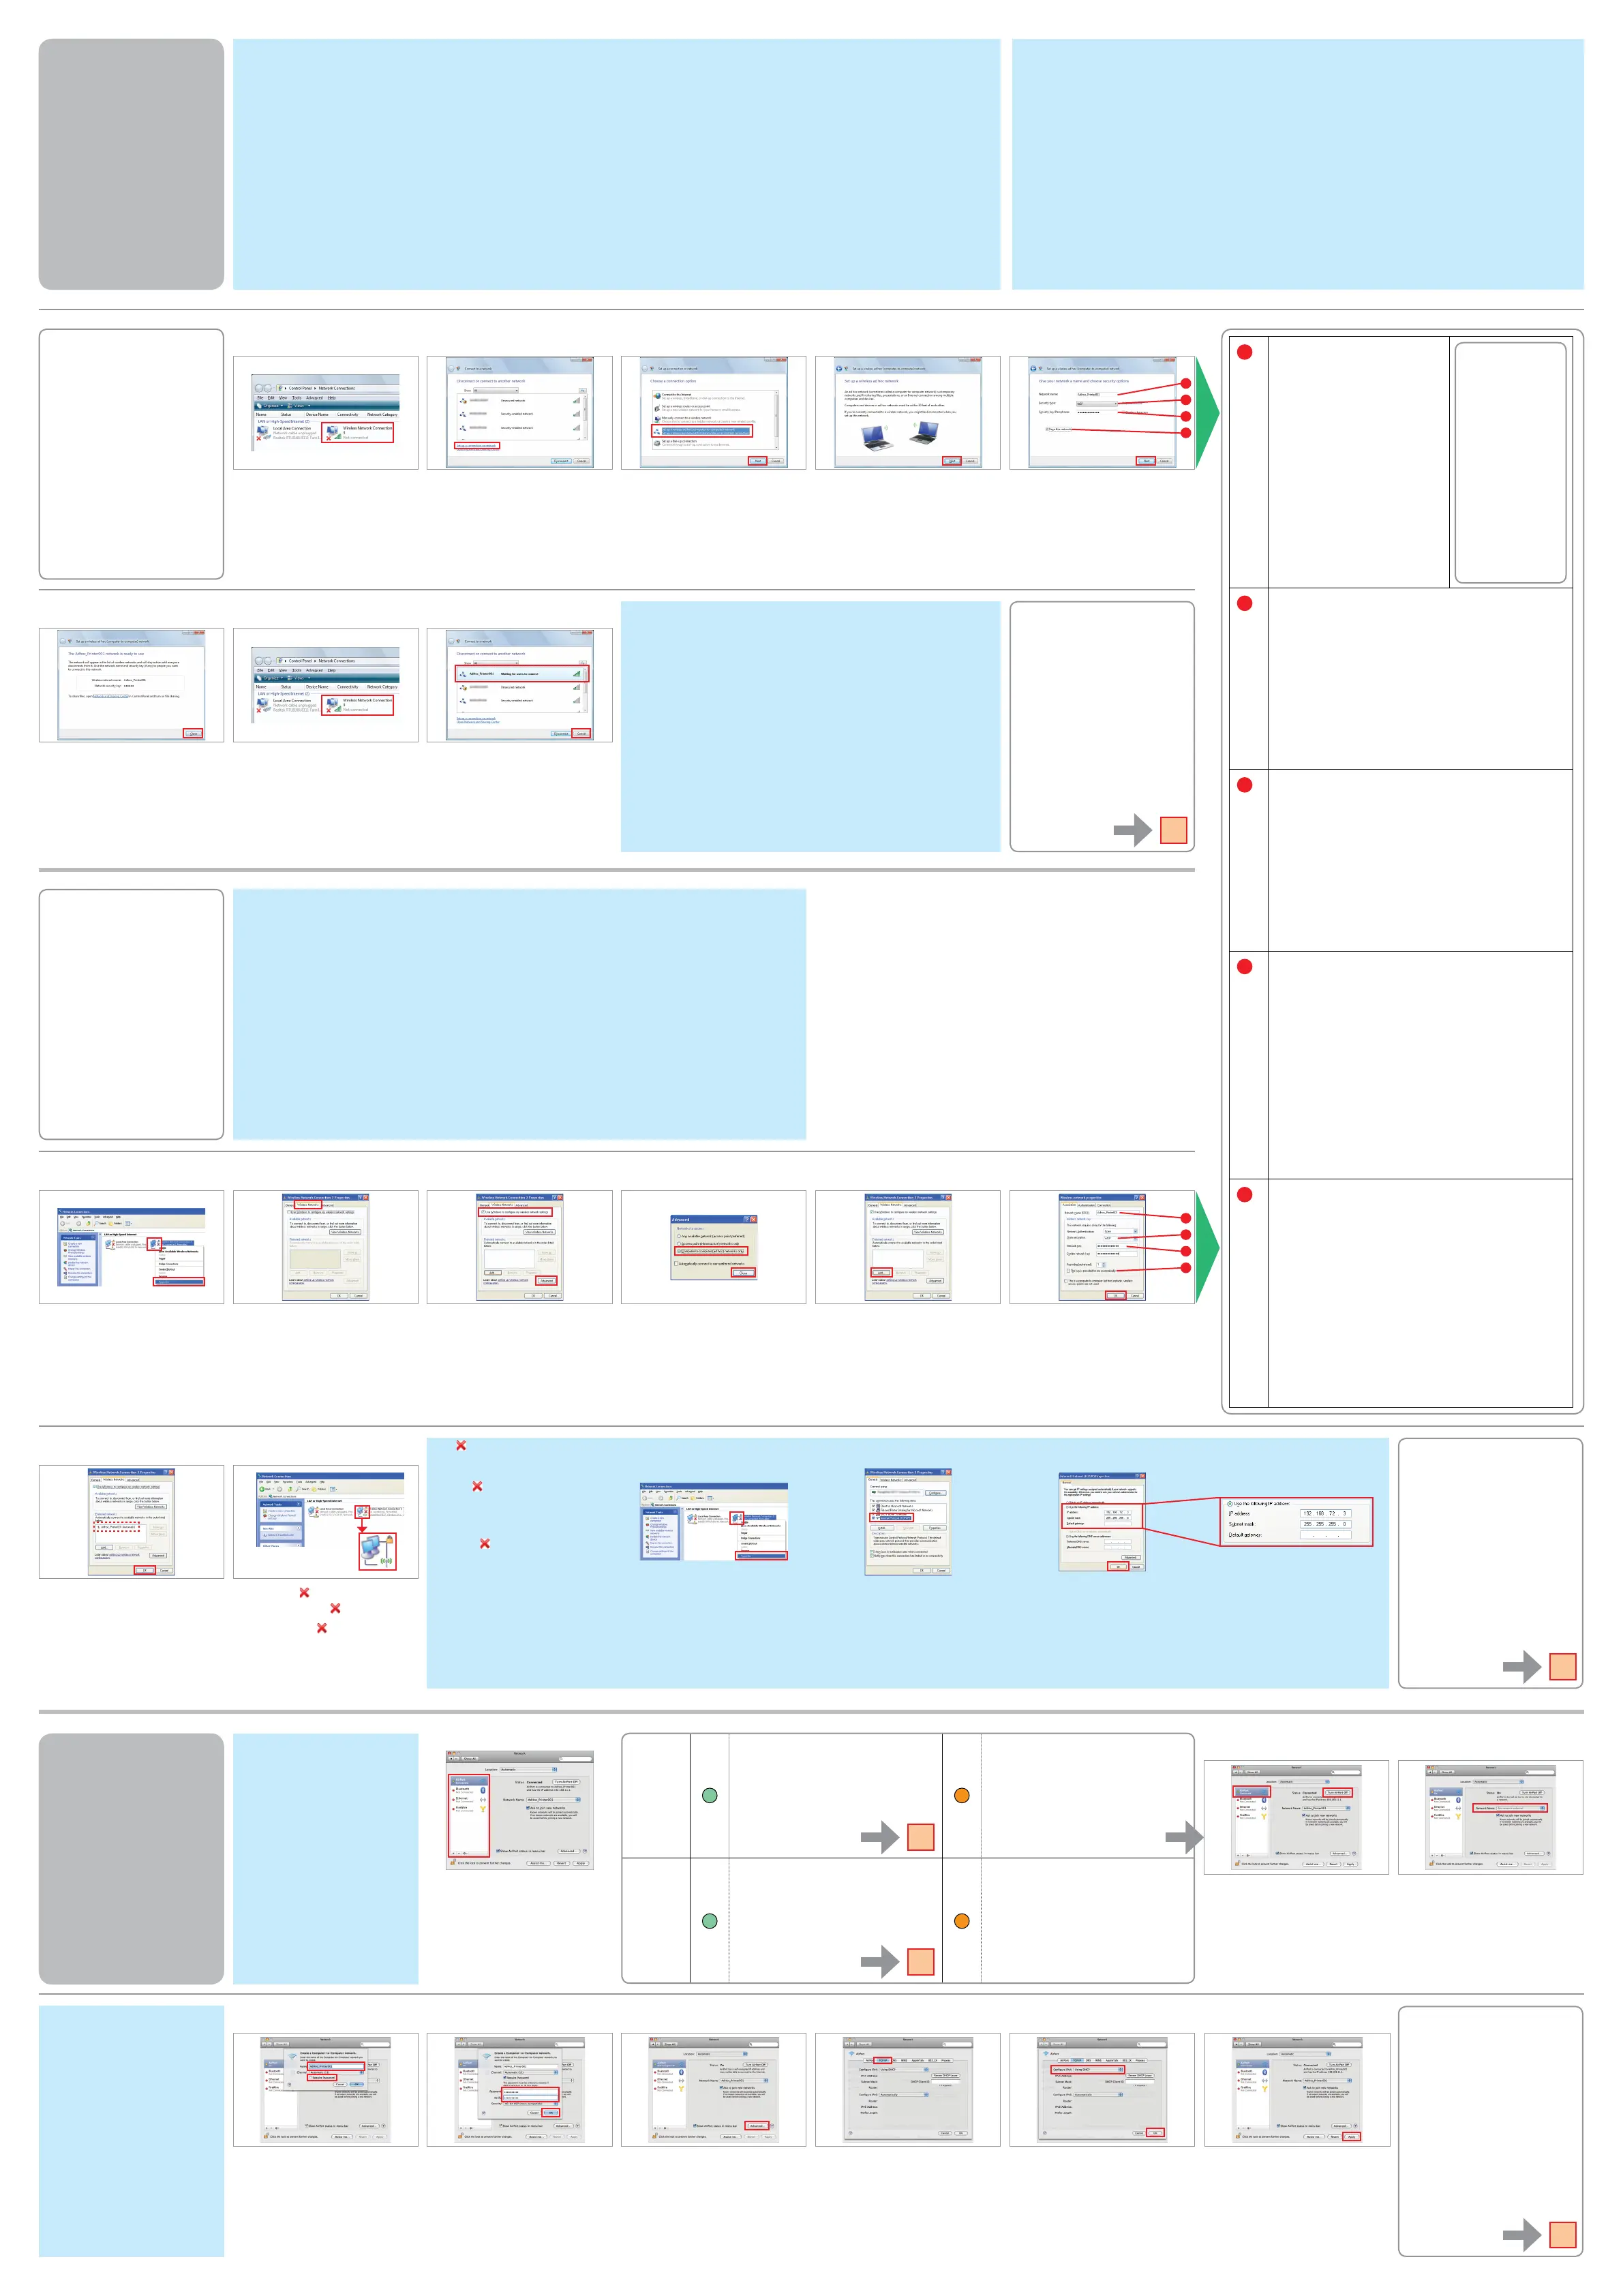
2
2
2
2
2
a
b
c
d
a
b
c
e
a
Network name: (SSID)
Enter a name using any of the
characters on the right.
Network name: (SSID)
Masukkan nama dengan karakter di
sebelah kanan.
0123456789
!”#$%&’()*+,-./:;
ABCDEFGHIJKLMN
OPQRSTUVWXYZ
abcdefghijklmn
opqrstuvwxyz
[\]^_`{|}~<=>?@
b
Security type:
Select WEP.
Security type:
Pilih WEP.
:
c
Security key:
Enter a word using 5 or 13 characters (e.g. epson).
Security key:
Masukkan kata 5 atau 13 karakter (misal epson).
:
d
(Windows Vista)
Save this network:
Select this checkbox.
Save this network:
Pilih kotak ini.
:
e
(Windows XP)
The key is provided for me automatically:
Clear this box to enter the security key.
The key is provided for me automatically:
Hapus kotak ini untuk memasukkan kunci keamanan.
:
Ad Hoc Settings on the
Computer
Pengaturan Ad Hoc pada
Komputer
A� B�
Double-click Wireless Network
Connection.
Dobel klik Wireless Network
Connection.
Click Set up a connection or network.
Klik Set up a connection or network.
C� D� E�
Click Next.
Klik Next.
Refer to the table on the right to make
settings, then click Next.
Lihat tabel di sebelah kanan untuk
melakukan pengaturan, lalu klik Next.
F� G� H�
Click Close.
Klik Close.
Double-click the Wireless Network
Connection icon.
Dobel klik ikon Wireless Network
Connection.
Make sure the Ad Hoc connection has
been registered, then click Cancel.
Pastikan koneksi Ad Hoc telah
didaftarkan, lalu klik Cancel.
If the Connect button appears when you select the network name (SSID), click
Connect.
Jika tombol Connect muncul ketoka Anda memiliki nama jaringan (SSID), klik
Connect.
B�
Click the Wireless Networks tab.
Klik tab Wireless Networks.
C� D� E� F�
G� H�
Select Use Windows to ..., then click
Advanced.
Pilih Use Windows to ..., lalu klik
Advanced.
Select Computer-to-computer..., then
click Close.
Pilih Computer-to-computer..., lalu
klik Close.
Click Add.
Klik Add.
Refer to the table on the right to make
settings, then click OK.
Lihat tabel di sebelah kanan untuk
melakukan pengaturan, lalu klik OK.
OK
Conrm, then click OK.
Konrmasikan, lalu klik OK.
OK
Wait until the icon disappears.
Tunggu hingga ikon hilang.
A�
Right-click Wireless Network
Connection, then select Properties.
Klik kanan Wireless Network
Connection, lalu pilih Properties.
If the icon does not disappear after
5 minutes, follow the steps on the right
to set a static IP address.
Jika ikon tidak hilang setelah
5 menit, ikuti langkah-langkah di
sebelah kanan untuk menentukan
alamat IP statis.
Proceed to section 2 (Front
page).
Lanjutkan ke bagian 2
(Halaman depan).
A�
Select AirPort, then click Turn AirPort
On.
Pilih AirPort, lalu klik Turn AirPort On.
B�
C� D�
From the Network Name list, select
Create Network.
Dari daftar Nama Jaringan, pilih Create
Network.
Enter a network name, then select the
Require Password checkbox.
Masukkan nama jaringan, lalu pilih
kotak Require Password.
Enter a password, then click OK.
Masukkan kata sandi, lalu klik OK.
OK
Check the connection condition and
follow the following instructions.
Periksa kondisi koneksi dan ikuti
petunjuk berikut.
For Mac OS X
Untuk Mac OS X
For later use, jot down the network
name and password.
Untuk penggunaan berikutnya,
tuliskan nama jaringan dan kata sandi.
G�
Check Using DHCP from the Congure
IPv4 list, then click OK.
Centang Using DHCP dari daftar
Congure IPv4, lalu klik OK.
OK
H�
Click Apply.
Klik Apply.
F�
Click TCP/IP.
Klik TCP/IP.
E�
Click Advanced.
Klik Advanced.
Even if you have a wireless network connection, the printer and computer may not be able to communicate in your
environment when you make the Ad Hoc settings described in this section. Set up an Ad Hoc connection only when you use
direct wireless communication between the printer and computer.
Meskipun terdapat koneksi jaringan, printer dan komputer belum tentu dapat berkomunikasi di lingkungan tersebut
ketika Anda melakukan pengaturan Ad Hoc seperti dijelaskan di bagian ini. Atur jaringan Ad Hoc jika Anda menggunakan
komunikasi nirkabel langsung antara printer dan komputer.
Select Set up a wireless ad hoc…, and
click Next.
Pilih Set up a wireless ad hoc…, dan
klik Next.
Windows XP
Proceed to section 2 (Front
page).
Lanjutkan ke bagian 2
(Halaman depan).
Air Port
Wireless LAN (Wi-Fi) connection is available.
Koneksi LAN Nirkabel (Wi-Fi) tersedia.
Wireless LAN (Ad Hoc) connection is
available.
Koneksi LAN nirkabel (Ad Hoc) tersedia.
Ethernet
Wired LAN connection is available.
Koneksi LAN kabel tersedia.
Network connection is not available. Setup
network environment for your Mac.
Koneksi jaringan tidak tersedia. Atur
lingkungan jaringan untuk Mac.
Windows Vista
The procedure to set up Ad Hoc by computer depends on your OS, computer, and the manufacturer of your wireless devices. For details, refer to the documentation of
the wireless devices or contact the manufacturer’s customer support. The following section describes setup for Windows XP or Vista standard settings.
Prosedur untuk mengatur Ad Hoc menggunakan komputer tergantung pada Sistem Operasi, komputer, dan pembuat perangkat nirkabel Anda. Selengkapnya, lihat
dokumentasi perangkat nirkabel atau hubungi dukungan pelanggan. Bagian berikut menjelaskan penyiapan untuk pengaturan standar Windows XP atau Vista.
Depending on your environment, you may not able to use the function to obtain an IP address automatically. In that case,
you need to set a static IP address. For details, refer to the documentation of your computer or wireless devices.
Tergantung lingkungan, Anda belum tentu dapat menggunakan fungsi tersebut untuk mendapatkan alamat IP secara
otomatis. Jika demikian, Anda perlu menentukan alamat IP statis. Selengkapnya, lihat dokumentasi komputer atau perangkat
nirkabel Anda.
Proceed to section 2 (Front
page).
Lanjutkan ke bagian 2
(Halaman depan).
(1) (2) (3)
Right-click Wireless Network
Connection, then select Properties.
Klik kanan Wireless Network
Connection, lalu pilih Properties.
Double-click Internet Protocol
(TCP/IP).
Dobel klik Internet Protocol (TCP/IP).
Select Use the following IP address. Enter the values above as the IP address and
Subnet mask, then click OK.
Pilih Use the following IP address. Masukkan nilai di atas sebagai alamat IP dan
Subnet mask, lalu klik OK.
OK
This section shows the case of Mac OS
X v.10.5 as an example.
Bagian ini memperlihatkan Mac OS X
v.10.5 sebagai contoh.

 Loading...