5 Tighten the rear cover screws.
6 Open the printer cover and press down on the part as shown to make
sure it is secure.
WARNING: Fully open the printer cover as shown below. Otherwise, the
cover could close, trapping your hand or fi ngers.
7 Close the printer cover.
WARNING: Be careful not to trap your hands or fi ngers when closing the
printer cover.
8 Remove the carriage lock and store it in a safe place.
Note: Do not throw the carriage lock away; you need it if you transport the
printer.
9 Attach three tube clamps to the rear cover and route the waste ink tube
through the clamps as shown.
10 Remove the outer and inner caps from the waste ink bottle and store
them in a safe place.
Note: Do not throw the caps away; you need them when disposing of the
waste ink.
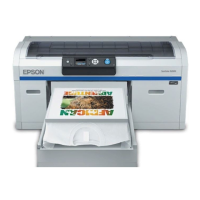
Epson
®
SureColor
®
F2270
Start Here
IMPORTANT: Before using this product, make sure you read these instructions
and the safety instructions in the online User’s Guide.
Choose a Location for the Printer
Choose a location for the printer that is near a wall outlet where the power cord
can be easily unplugged. Avoid places subject to rapid changes in temperature
and humidity. Also keep the printer away from direct sunlight, strong light, or
heat sources.
Make sure to place the printer on a flat, stable surface with enough space on
all sides (see illustrations below). The surface supporting the printer should
be wider than the space between the rubber feet on the bottom of the printer,
between 23.6 to 31.5 in. (60 to 80 cm) off the ground, and capable of
supporting approximately 242 pounds (110 kg).
21.4 in.
(54.3 cm)
26.1 in.
(66.3 cm)
Approx. 31.5 in.
(80 cm)
Approx. 57.1 in. (145 cm)*
Approx. 39.4 in.
(100 cm)
0.4 in.
(1 cm)
* Approx. 59.1 in. (150 cm) with optional L-size hanger platen.
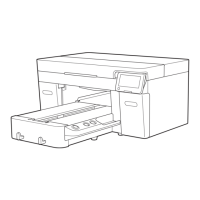
Unpack and Place Printer
1 Make sure you have these items:
Epson America, Inc. Limited Commercial Warranty
A.What Is Covered: Epson America, Inc. (“Epson rst end-user customer that the Epson®
SureColor® F2200 series printer (“Product”) covered by this limited warranty, if purchased and used
cationsandbe
free from defects in workmanship and materials for a period of one (1) year from the date of original
purchase, or for 2,280,000 carriage passes
1
rst(“WarrantyPeriod is limited
warranty is not transferable. Epson also warrants that the consumable ink included with the Product will
e limited warranty for the ink shipped with the Product
may expire before the expiration of the limited warranty for the Product.
Your printer is designed to use UltraChrome® DG2 ink and delivery systems. Any damage caused by
using other inks or ink deliverysystems, willnotbe coveredunderthislimited warranty.
islimitedwarrantycontainsimportantlegal terms and conditions, including an
arbitrationprovision.Please review carefully.
B.What Epson Will Do To Correct Problems:If your Product re quires service during the Warranty
Period, please call toll free (888) 377-6611 (United States, Canada, and Puerto Rico). Support hours are
c Time, Monday through Friday and are subject to change without
notice. When you call, be prepared to provide the Epson technician with the Product serial number, the
address where it is located, the original date of purchase, and a description of the problem. You may need
ed by the serial number. An Epson
technician will work with you to try to resolve the problem. If service is required, the on-site service
e technician will provide additional instructions about the program at the time
this service is being set up. At its sole discretion, Epson may instead elect to perform exchange service.
For more details, please see Section C, On-Site Response and Section D, Product Exchange. When
service involves the exchange of the Product or a part, the items replaced become the property of Epson.
Replacement items assume the remaining Warranty Period of the original Product. Parts or Products
exchanged may be new or remanufactured to Epson standards.
C.On-SiteResponse:If Epson determines a warranted hardware defect requires repair, Epson may elect
to use on-site service. If this is the case, and the Product is within Epson’s on-site service territory, an
Epson-trained technician will repair the Product at your facility. Epson will usually dispatch repair parts
and a technician to the Product’s location for the next business day if Epson determines repair is required
cTime,dispatchwill
usually be for the second business day. Parts shipped to remote areas may require longer delivery times.
An adult must be available to accept the shipment and be present at all times while the technician is on-
site. Epson’s shipment of parts does not imply that replacement is required.
D.Product Exchange: Epson may, at its sole discretion, elect to replace a Product that appears to require
repair due to a warranted hardware defect. Under these rare circumstances, Epson will replace the
Product with the same or a comparable product refurbished to the Epson standard of quality. Epson
will ship a replacement product, freight prepaid, as long as your address is in the United States, Canada,
e replacement product will not include promotional materials, accessories, stands,
ware, or cables.) You must be able to receive, unpack, and install the
replacement product, and prepare the defective Product for return shipment by following the procedures
described in the User’s Guide or documentation provided by Epson.
e repacked defective Product will be picked up by a carrier designated by Epson. If the defective
Product is not returned within seven (7) business days of receipt of the replacement, you will be invoiced
at the full price of the replacement printer. If the Product is returned damaged because you have not
properly packed or shipped it, you will be billed for the damage. It is your responsibility to unpack,
reinstall optional components, and set up the exchange printer at your location. Epson does not cover
damage caused by improper installation.
1
Carriage passes can be viewed on the control panel display.
English
f2270_warranty_test.indd 1 5/17/2023 1:48:26 PM
Maintenance kit
Limited
warranty
Medium platen
and hoop
Waste ink
bottle holder
Rear cover
Waste ink bottle
Ink labels
Grip pad tool
Ink packs/maintenance liquid
Tube/cable clamps
Printer
Ink charging unit
Waste ink tube
Grip pad
Note: See the online User's Guide for information on installing the grip pad,
using the grip pad tool, and using the maintenance kit and tweezers.
2 Remove all the packaging materials and tape. Check carefully for all the
tape inside and outside the printer and platen.
WARNING: The printer requires four people to lift and move it. Make sure to
grip the printer where indicated by the gray stickers and * marks as shown
in the illustration. The * marks denote non-slip pads under the printer where
hands should be placed. All four people should lift simultaneously to avoid
tilting the printer and trapping their hands.
Assemble the Printer
1 Make sure any protective material is removed from the back of the
printer.
2 Holding a wipe to the waste ink outlets, remove the plugs on the back
of the printer and then wipe the waste ink outlets as shown.
Note: Do not throw the plugs away; you need them if you transport the
printer.
3 Connect the waste ink tube. Make sure that the longer end of the tube
is connected to the waste ink outlet on the left side and the shorter end
is connected to the waste ink outlet on the right side.
4 Attach the rear cover as shown.
11 Position the waste ink bottle beneath the right side
of the printer. The bottle and holder should be
placed in an area lower than the printer so that the
waste ink can flow straight down.
Note: Make sure the waste ink tube is not pinched anywhere or ink
could leak inside or around the printer.
12 Open the clip at the top of the waste ink bottle holder.
13 Place the tube next to the waste ink tube holder to check the length.
Cut the tube about 0.4 inch (1 cm) below the bottom of the tube holder
as shown.
14 Fasten zip ties to the waste ink tube as shown. They should sit above and
below the clip.
0.4 in.
(1 cm)
Tweezers
Power cordZip tiesCaution labelWipes