Installing the Lock
H
G
F
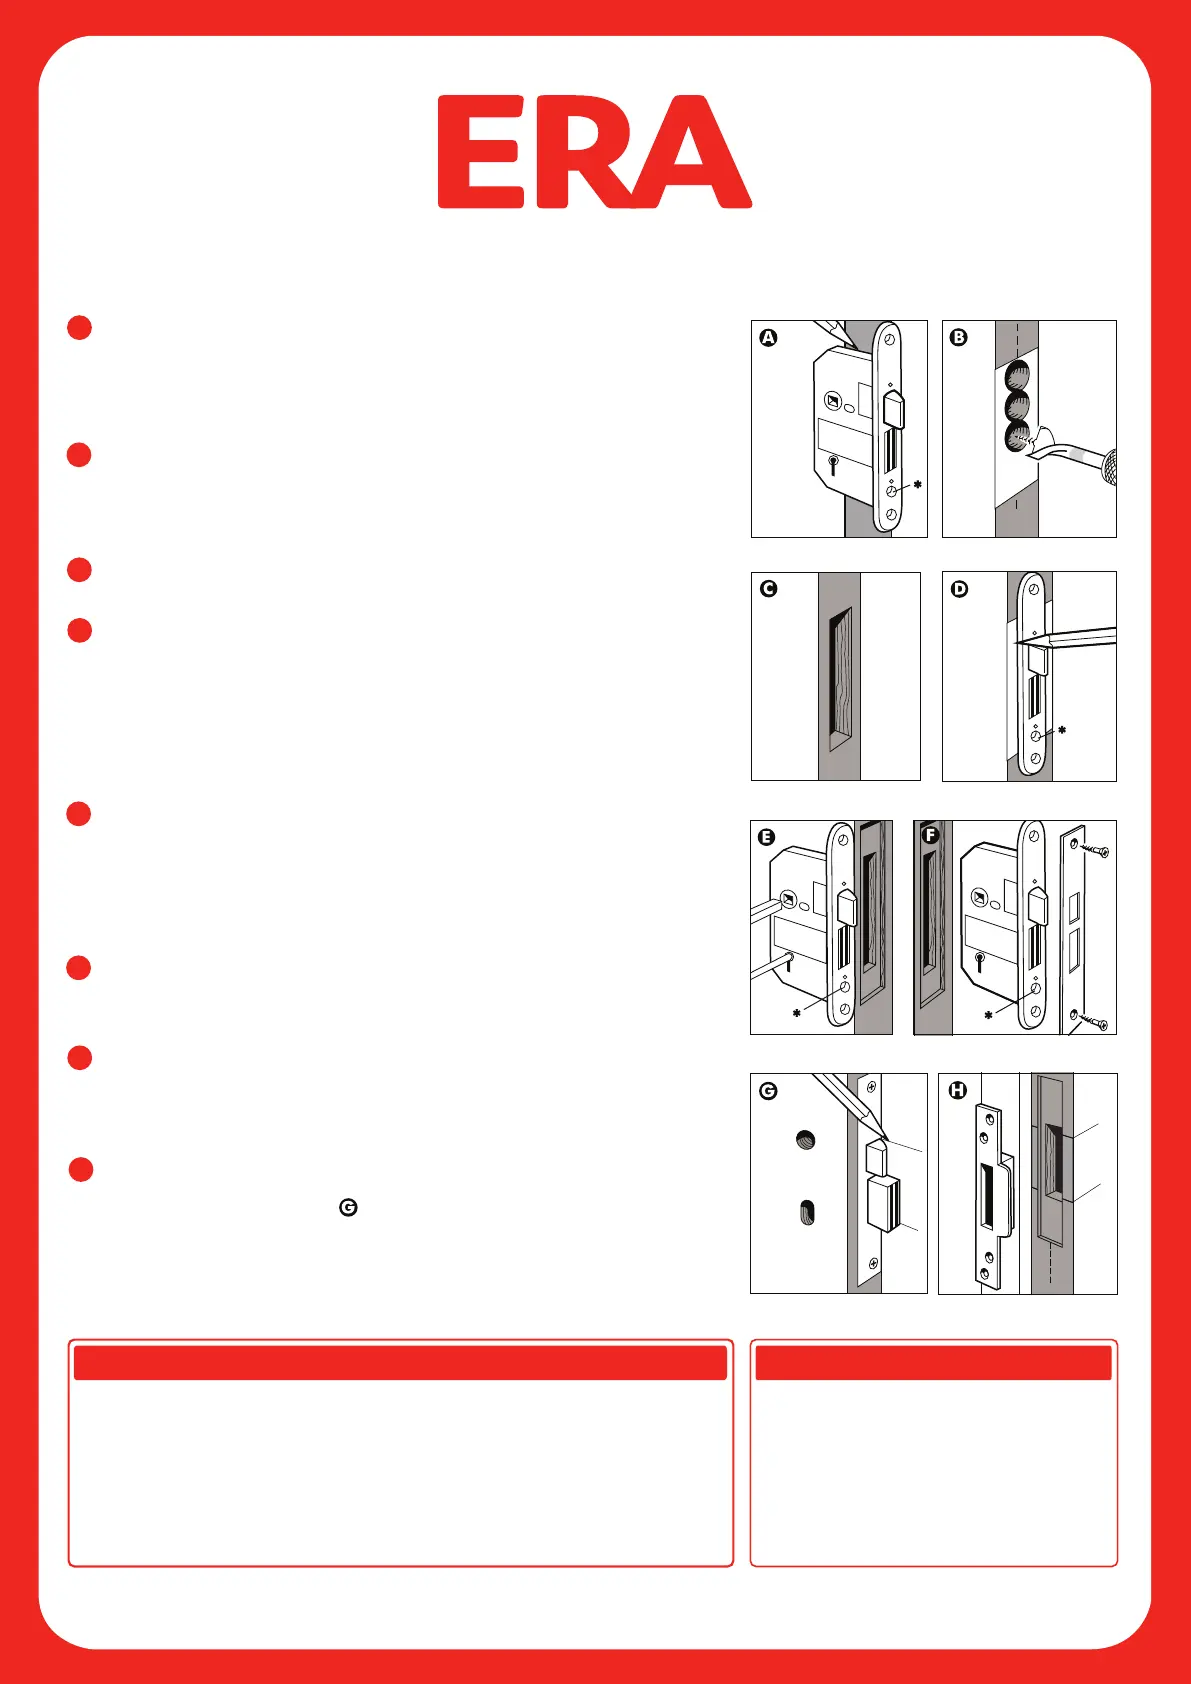
Position lock body as near to the mid-height of the door as possible. Place
lock body against the door edge and mark top and bottom of the lock body
on the door edge, avoiding joints of cross members in the door. Note: The
hole in the lock end face (marked *) is only used with Cylinder Mortice Door
Locks.
Between these two lines mark the central vertical position (dotted line). Along
this vertical line drill a series of overlapping holes in the lock depth. In order to
drill to the correct depth apply adhesive tape to the drill bit to the measured
lock depth (including forend and faceplate depth).
Carefully chisel out remaining wood to make a rectangular hole (mortice) to
accommodate lock body.
With lock body inserted, draw around forend on door edge - remember to add
removable faceplate before tracing outline. Remove lock and chisel recess to
accommodate lock faceplate. Place lock in door and ensure a good fit with
faceplate flush with door edge. Note: With lock fitted into door, check that
the sashbolt is suitable for your door opening. Gently close door. The curved
edge of the sashbolt (latch) must be facing the door frame, if not, the
sashbolt must be reversed (see first page for instructions).
With the lock held against the door face ensuring faceplate is flush with door
edge and in line with lock recess, mark position of the key hole (and spindle)
Drill and cut holes on both sides of the door for the key (and spindle). Fit lock
flat into door making sure that the key (and spindle) pass freely into the lock.
Note: When fitting the Euro sashlock, insert the cylinder retaining screw
through the lock end face before fitting the faceplate in position
With faceplate in position secure the lock into the door with screws provided
Fit escutcheons and/or door handles with spindle cut to suit. Test for easy
working operation.
With the door open and the bolt in the locked position, close the door gently
against the doorframe. Mark positions of bottom bolt and top of the latch-
bolt. Between these two lines mark a central vertical line (dotted line) on the
door frame.
Hold box striker up to door frame, ensuring the box section is in line with
previous markings. Draw around box section of the box striker on the door
frame. Along the vertical line , drill a series of overlapping holes to the box
depth. Hold box striker up to frame and draw around the edge. Remove the
box striker and chisel out so that box striker sits flush in door frame. Secure
the box striker using screws in the central or elongated holes only. Test lock
for working operation, and adjust position of the box striker if required. When
aligned correctly, fit the two remaining screws.
E
D
C
B
A
Maintenance
Wipe the surface periodically with a soft cloth to
remove excess grease or moisture. All moving parts
should be lightly lubricated using a light non-acidic
mineral oil (e.g. “3 in 1”) at least twice per year. The
product may need to be adjusted and fixings
tightened to ensure a satisfactory operation.
To download the CPR Declaration of Performance,
please visit erahomesecurity.com
ERA Home Security - For more information call 01922 490 000 or visit erahomesecurity.com
UK Address - ERA Home Security, Valiant Way, Wolverhampton WV9 5GB
EU Address - SchlegelGiesse, Giesse S.p.A. Via Tubertini G,1, 40054 Budrio, Bologna 295136 Italy
Mark position of lock Drill hole for mortice
Adhesive
tape
Sashlock
illustration
shown also
applies to
Deadlock
Chisel out mortice Mark and chisel recess
Mark and drill holes Fit lock
Mark position Fit box striker
Important
Fire doors: If stated on the data sheet, this product has been fire tested in combination with a
specific intumescent kit/ material to the requirements of BS EN 1634-1. This intumescent kit is
critical to the product’ fire test evidence and UKCA/ CE / Certifire certification. Failure to supply/ fit
the exact material and similar design of kit will invalidate all fire test evidence and certification. ERA
accept no responsibility or liability for incorrectly specified intumescent material.
Dangerous substances: the materials used in this device do not contain any dangerous substances
in excess of the maximum levels specified in existing European material standards or any national
regulations.
 Loading...