EN
Made by ETT Distribution GmbH, Schmalbachstraße 16, 38112 Braunschweig
www.ett-online.de | Tel. +49 531 58 11 00 | service@ett-online.de
Reprinting or reproduction only with express permission.
Item number: 1975063
Status: 09/2023
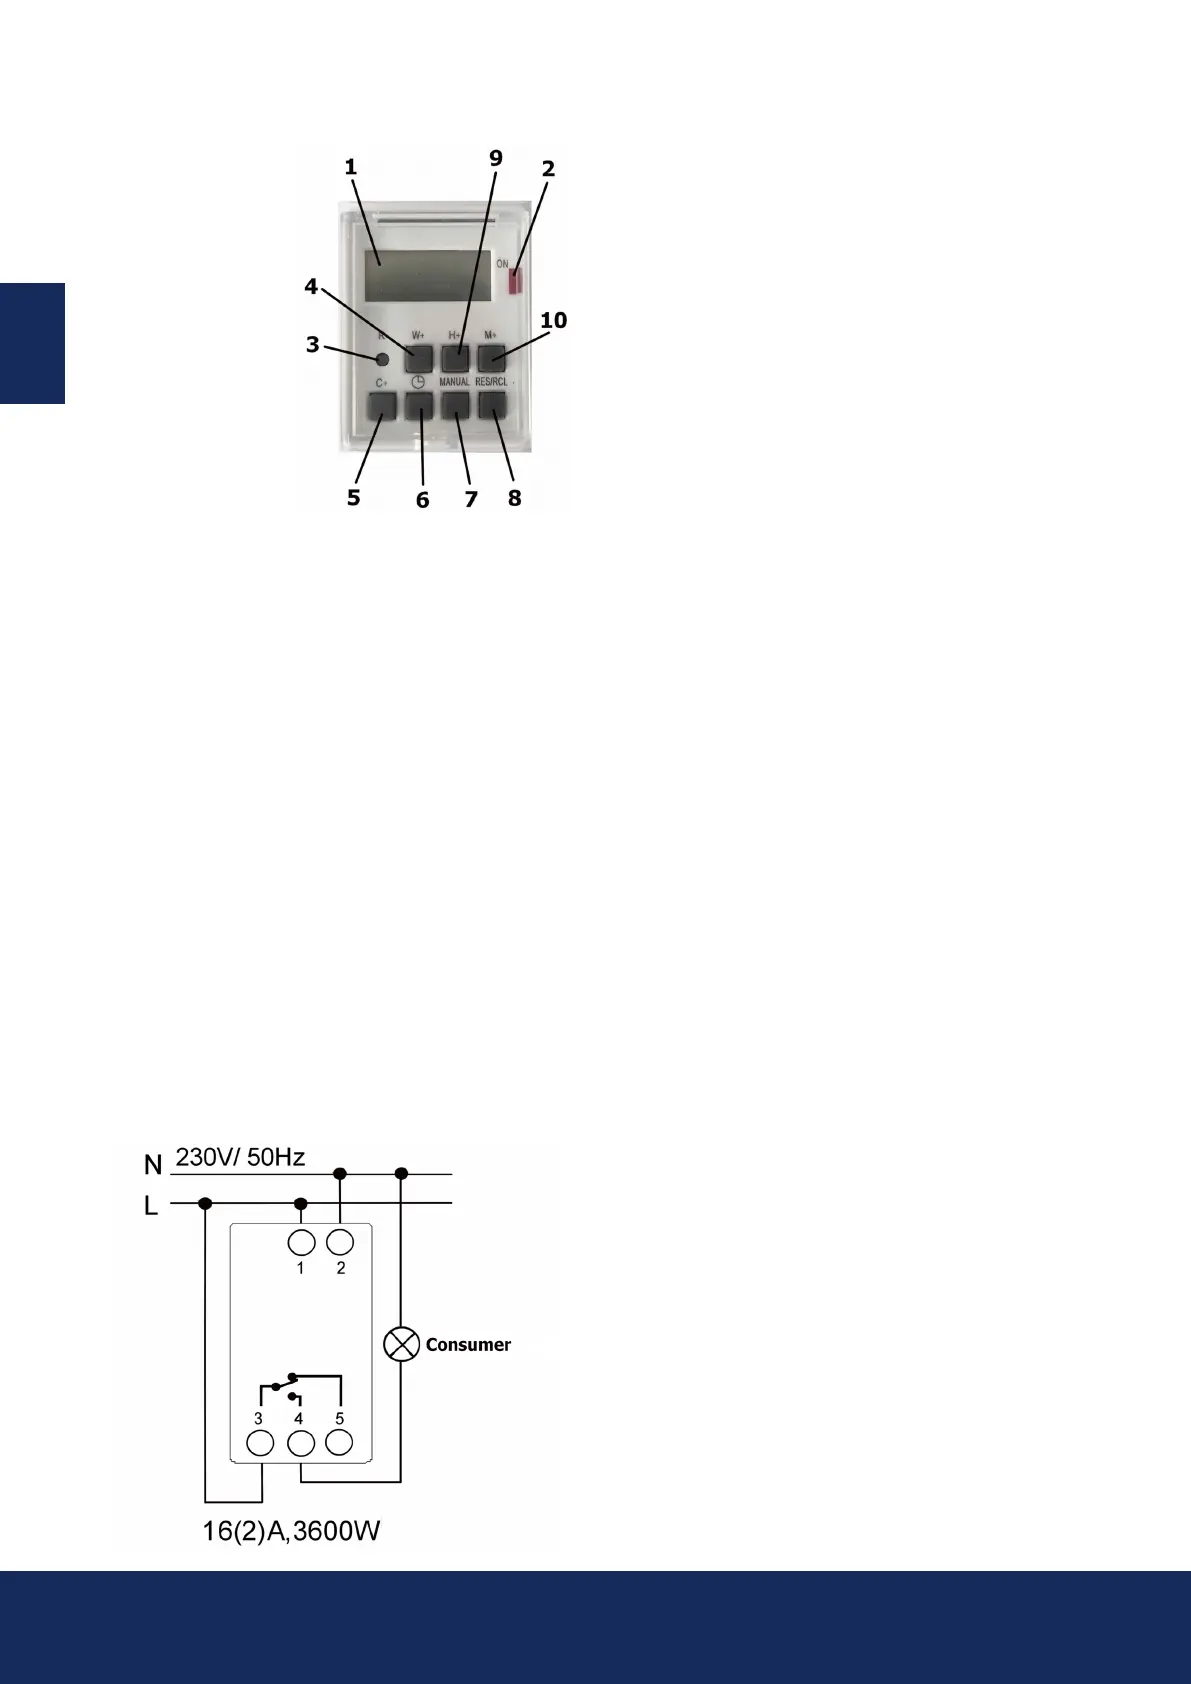
CONTROLS
1. Display
2. Schaltanzeige
3. Reset-Taste
4. W+ -Taste
5. C+ -Taste
6. Timer-Taste
7. Manual-Taste
8. RES/CL-Taste
9. H+ -Taste
10. M+ Taste
CONNECTION INSTRUCTIONS
• It is best to leave the installation to a professional!
• Please check whether the connection lines of the
network are voltage-free!
• Mount the timer on the DIN rail in the household
distribution control box.
• Connect PHASE (L) and Neutral (N) to terminals 1+2!
• Connect the load between contact 4 and Neutral (N).
• Create a connection between Phase (L) and contact 3.
• The switching contact between contact 3 and 4 is a
potential-free normally closed contact.
• Connections are made using screw terminals.
Terminal designation
1 – 2
4 – 5
5 – 3
Contakt
Power supply
230 – 250 V ~ 50 – 60 Hz
Normally open contact
Switching capacity
240 V ~ 16(1) A
NC contact
Switching capacity
240 V ~ 16(1) A
SUMMER- AND WINTERTIME
• To set the timer to summer time, press the „Manual“ and
„Clock“ keys simultaneously.
An „S“ for summer time appears in the display.
• Pressing the „Manual“ and „Clock“ keys again causes
the „S“ to disappear from the display. (Winter time active)
OPERATION
• Set the current time by simultaneously pressing
the C+ and H+ buttons to adjust the hour,
C+ and M+ buttons to adjust the minutes
and C+ and W+ buttons to set the weekday.
Now you can program the weekly timer according
to your needs.
• Press the „Timer“ button, and on the display, directly
above the number on the left (number 1-8 for different
switching times), „ON“ will appear to set
the switch-on time!
• Press the W+ button to set the weekday. It is possible to
set a switching time over several days
(e.g., Monday 12:00 AM ON until Wednesday 9:00 PM OFF).
• Next, please set the hours and minutes using
„H+“ and „M+“.
• Press the „Timer“ button, and on the display, directly above
the number on the left (number 1-8 for different switching
times), „OFF“ will appear to set the switch-off time!
• The switch-off time is set analogously to the desired
switching time.
• Pressing the „Timer“ button will save your inputs.
• With these settings, you can establish 8 different
programs for the timer.
• Press the „C+“ button to exit the programming mode
(or wait for 20 seconds)!
• All settings are only „ACTIVE“ when the „AUTO“ mode is
selected with the „Manual“ button.
Other modes here are ON and OFF.
• For changes, select the corresponding program (1-8)
with the „Timer“ button.
• All desired changes to the switching times are
made by „overwriting“ the set times.
• All desired deletions of switching times are made
by pressing the „RCL“ button!
• You can program multiple weekdays simultaneously;
simply follow the above instructions in programming
mode, using the „W+“ button for individual weekdays
or the predened day combinations. Press the
„Manual“ button to switch to „Manual mode.“
• By repeatedly pressing it, you can select the modes ON
(always on), AUTO (programs active), or OFF (always off).
• To reset all settings, please press the Reset button.
 Loading...