DAYBRIGHT
ReAKT & PELOTON MODE (TRACER ReAKT ONLY)
OMS: TRACE & TRACER
OMS LINK & LINK+
OPTIMISED MODE SELECTOR (OMS)
OMS allows you to select a runtime tailored to your needs, the longer the runtime the lower the
lumen output, if you double runtime, you halve lumen output.
Additional brackets, silicone bands and a saddle rail bracket are available from exposurelights.com
The Trace & TraceR have three programs with different intensities and run times:
To select a program, start with the light off. Hold the Function Button down and wait for the light to
emit regular ashes. Then for example, if you want Medium (Program 2), release the button after
the second ash. The light will remain in Program 2 regardless of it being turned on and off.
The Table below is etched onto the light:
We recommend using your light in DayBright mode during the day for your safety.
To access DayBright mode you need to be in Program 1 for the Trace and TraceR, or High for the
Link and Link+, and then cycle to the Flash mode using the function button.
ReAKT and Peloton mode work in all three of the programs, if you are in Program 2 and you want
to activate ReAKT you would follow the same method as the OMS, but release after the fourth ash.
Your light will then be in Program 2 with ReAKT activated. There is is a break down below:
Flash 1 – Program 1.
Flash 2 – Program 2.
Flash 3 – Program 3.
Flash 4 – ReAKT activated (light remains in the Program is in).
Flash 5 – Peloton Mode activated (light remains in the Program is in).
Flash 6 – Deactivate ReAKT and Peloton (light remains in the Program is in).
LINK/LINK+
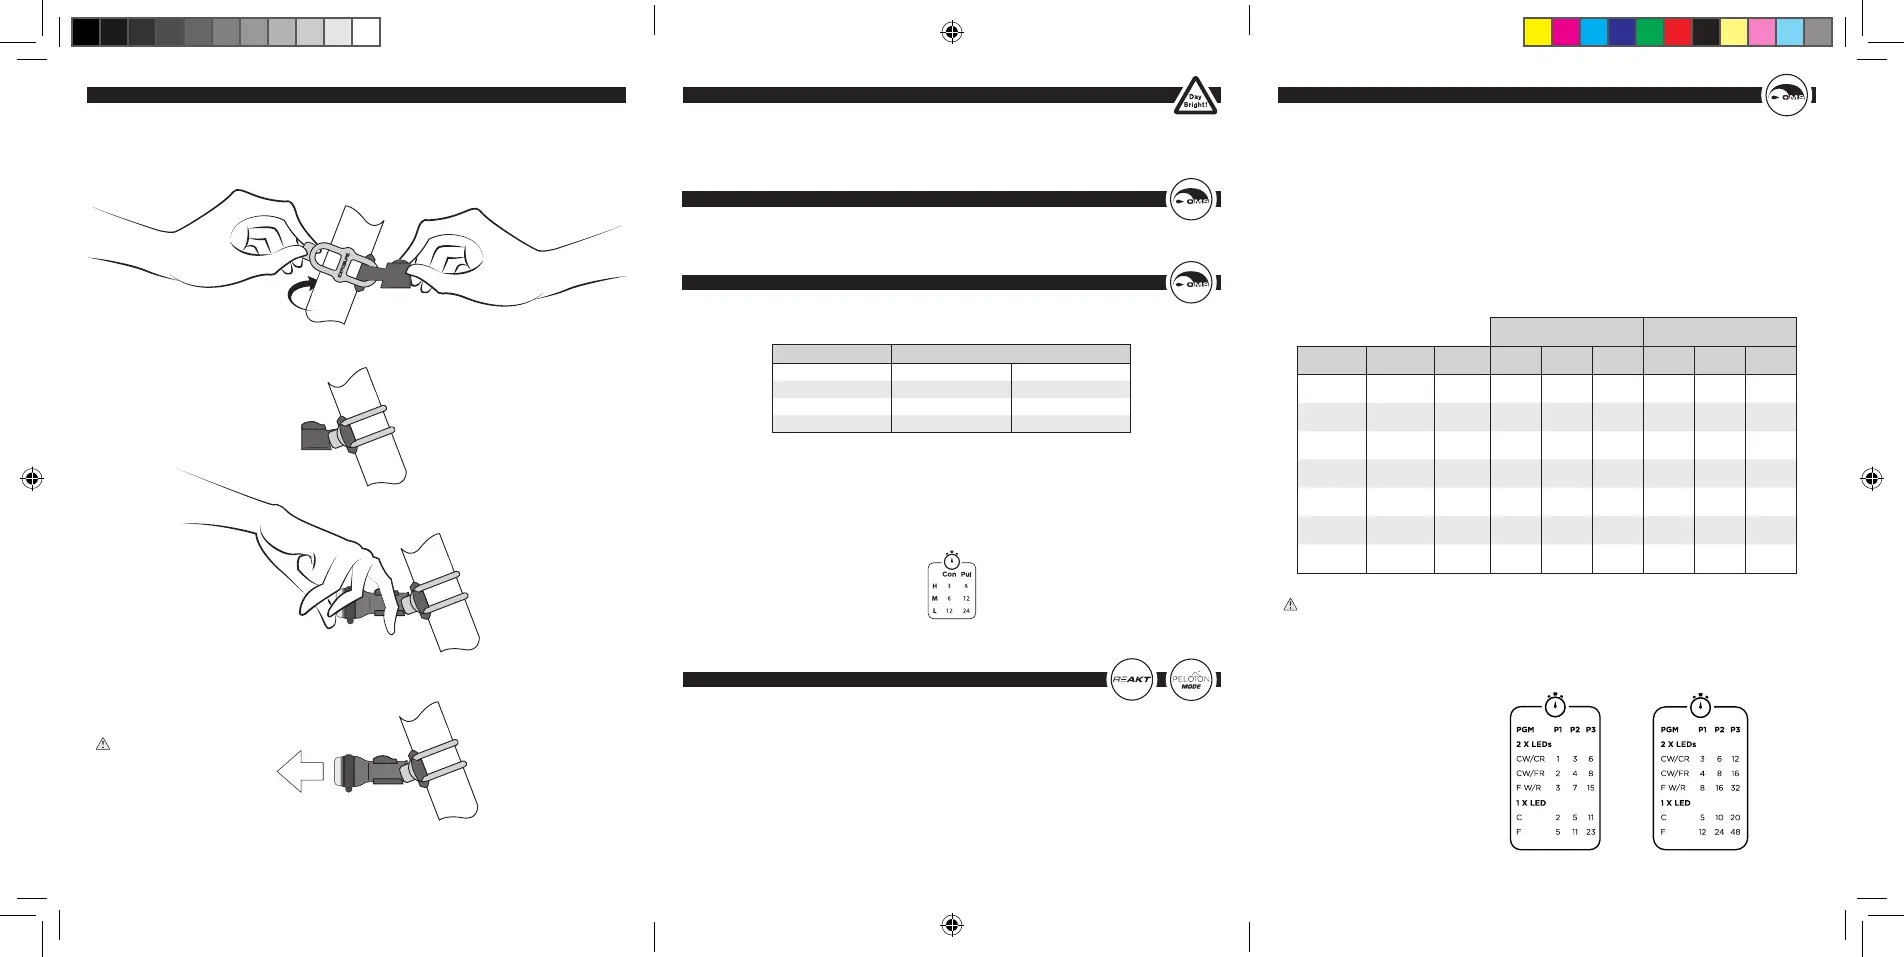
The Link & Link+ have three programs with different intensities and run times, within those
programs are options that use either 1 or 2 LEDs with ash or constant modes, or a combination.
To select a program, start with the light off. Hold the Function Button down and wait for the light to
emit regular ashes.
For example, if you want Program 2, release the button after the second ash. The light will remain
in Program 2 regardless of it being turned on and off.
For a breakdown of runtimes and modes please refer to the table below:
The etch on the underside of the Link and Link+ does not display all modes due to space.
It shows the number of LEDS in use to condense information.
PGM - Program
CW - Constant White LED
CR - Constant Red LED
FW - Flash White LED
FR - Flash Red LED
F W/R - Flash White and Red
C - Constant
F - Flash
Link Link+
LINK LINK+
WHITE LED RED LED MODE 1 HIGH 2 MEDIUM 3 LOW 1 HIGH 2 MEDIUM 3 LOW
CONSTANT CONSTANT 1 1 hrs 3 hrs 6 hrs 3 hrs 6 hrs 12 hrs
CONSTANT PULSE 2 2 hrs 4 hrs 8 hrs 4 hrs 8 hrs 16 hrs
PULSE PULSE 3 3 hrs 7 hrs 15 hrs 8 hrs 16 hrs 32 hrs
CONSTANT OFF 4 2 hrs 5 hrs 11 hrs 5 hrs 10 hrs 20 hrs
OFF CONSTANT 5 2 hrs 5 hrs 11 hrs 5 hrs 10 hrs 20 hrs
PULSE OFF 6 5 hrs 11 hrs 23 hrs 12 hrs 24 hrs 48 hrs
OFF PULSE 7 5 hrs 11 hrs 23 hrs 12 hrs 24 hrs 48 hrs
PROGRAM MODE
CONSTANT PULSE
HIGH (PGM 1) 3 hrs 6 hrs
MEDIUM (PGM 2) 6 hrs 12 hrs
LOW (PGM 3) 12 hrs 24 hrs
SEATPOST MOUNTING - TRACER
Click the TraceR
securely into place.
The tab-end fastens onto the lug.
WARNING: The TraceR
bracket is angled so the light
will shine directly back when
correctly attached, make sure
it is in the correct orientation.
CON - Constant
PUL - Pulse
H - High
M - Medium
L - Low
EXPUG1.4.indd 4-6EXPUG1.4.indd 4-6 13/08/2020 14:5213/08/2020 14:52
 Loading...