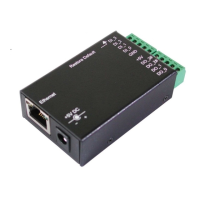
8-line Digital I/O to Ethernet Adapter
3
DC Jack Power Connector: A 5V/2A AC adapter is supplied with
this product.
RJ45 Ethernet Connector: 10/100Mbps Ethernet port. It supports
auto cross-over feature. You can use the same cable to connect
to either a Hub/Switch or a host computer.
LED Indicators: There are 2 LAN LEDs on the rear panel. They are
described as the following table:
LED Name Color LED Function
Link/Activity
Green
Steady on: Linked.
Blinking: Transferring data
10/100Mbps
Amber
Steady on: Linked in 100Mbps mode.
Off: Linked in 10Mbps mode.
1. Use static electricity discharge precautions.
Remove possible static discharge potential from any objects that
the Adapter may come in contact with before installation. This
can be accomplished by touching a bare metal chassis rail after
you have turned off the power.
2. Attached the power adapter. +5V DC power needs to be
connected to either the DC jack or the Terminal Blocks, but not
simultaneously. Once the power is connected to the DC jack,
the +5V power will output to the 10-pin Terminal Blocks
immediately. So it is not allowed to connect any power to the
Terminal Blocks if the DC jack is connected to a 5V AC power
adapter.
3. Connecting LAN cable: Use a standard straight-through Ethernet
cable to connect to a Hub or Switch. If you connect the
Adapter to your computer’s Ethernet port instead, you don’t
need to change to a cross-over type cable since the Adapter
provides auto cross-over feature.
4. Connect the Adapter’s DI and DO pins to your devices.
5. Use the Wall or DIN RAIL mounting Kit (optional) if you want to
place the product on the industrial DIN RAIL.
 Loading...