EasyManua.ls Logo

Faller 130489 User Manual

Faller 130489
12 pages
To Next Page IconTo Next Page
Page #1 background imageLoading...
Page #1 background image
Sa. Nr. 130 489 1
METZGEREI/BÄCKEREI
BUTCHERY/BAKERY
CHARCUTERIE/BOULANGERIE
SLAGERIJ/BAKKERIJ
Art. Nr. 130489
Inhalt Spritzlinge
Contents Sprues
Contenu Moulages
Inhoud Gietstukken
1
1
x
2
1
x
3
1
x
4
1
x
5
1
x
6
1
x
7
1
x
8
1
x
33
1
x
33
1
x
1
1
x
2
1
x
03
1
x
6 A
1
x
6 B
1
x
12
1
x
Machen Sie sich bitte vor Beginn des Bastelns mit dem Bausatzinhalt und der Anleitung vertraut und prüfen Sie die Vollständigkeit.
Im Reklamationsfall gilt die gesetzliche Gewährleistungspflicht. Sollte ein Teil fehlen, übersenden Sie bitte den Teilewunsch und den
Kaufbeleg an: Gebr. FALLER GmbH, Kundendienst, Kreuzstraße 9, D-78148 Gütenbach, kundendienst@faller.de. Sollten Sie einmal
weitere Ersatzteile benötigen, senden wir Ihnen den benötigten Spritzling, bei Verfügbarkeit, gerne kostenpflichtig zu.
Bitte beachten Sie, dass produktionsbedingt Einzelteile übrig bleiben können.
Before building your model, please familiarize yourself with the contents of the kit and the instructions for use, also checking whether
the set of parts is complete. In case of any complaint, the legal guarantee obligation shall apply. Should a part be missing, please
send the designation of the part required and the receipt documenting your purchase to: Gebr. FALLER GmbH, Kundendienst,
Kreuzstraße 9, D-78148 Gütenbach, kundendienst@faller.de.
Should you require further spare parts one day, we shall be pleased to send you, with costs, the required sprue, if it is available.
Please note that, on grounds of the production process, some single injection molded parts may be superfluous.
Avant de commencer votre modèle, veuillez vous familiariser avec le contenu du kit et la notice d’emploi, et contrôlez que le lot de
pièces est complet. En cas de réclamation, il s’appliquera l’obligation de garantie légale. Au cas où une pièce manquerait, veuillez
envoyer la désignation de la pièce souhaitée et le bon d’achat à: Gebr. FALLER GmbH, Kundendienst, Kreuzstraße 9,
D-78148 Gütenbach, kundendienst@faller.de. Au cas où vous auriez besoin un jour d’autres pièces détachées, nous vous enverrons
volontiers la grappe requise, si elle est disponible, contre paiement.
Veuillez noter que, pour des raisons de production, il se peut que des pièces détachées soient superflues.
Maak uzelf vóór het bouwen vertrouwd met de inhoud van het bouwpakket en met de handleiding en controleer de volledigheid.
In geval van reclamatie geldt de wettelijke garantieverplichting. Mocht er een onderdeel ontbreken, stuur het verzoek om he
gewenste onderdeel en het aankoopbewijs dan naar: Gebr. FALLER GmbH, klantenservice, Kreuzstraße 9, D-78148 Gütenbach,
kundendienst@faller.de.
Als u ooit meer reserveonderdelen nodig hebt, sturen wij het benodigde gietstuk, indien beschikbaar, graag tegen betaling naar u op.
Let op: om productieredenen kunnen losse onderdelen overblijven.
D
F
GB
NL
Art. Nr. 170688
SPEZIAL-SEITENSCHNEIDER
zum gratfreien Abtrennen von feinsten
Spritzteilen.
Nur für Polystyrol geeignet.
Special side cutter for cutting off ultra-fine
moulded parts without burrs.
Only suitable for polystyrene.
Pince coupante spéciale pour couper sans bavure
les pièces miniatures moulées par
injection. Convient uniquement au polystyrène.
Speciale zijkniptang voor het braamloos
afknippen van de fijnste gietstukdelen.
Alleen geschikt voor polystyrol.
Für den Zusammenbau des Modells empfehlen wir folgende FALLER-Artikel (sind nicht im Bausatz enthalten):
For the assembly of the kit we recommend following FALLER products (not included in the kit):
Pour l’assemblage du modèle, nous vous recommandons les articles FALLER suivants (non inclus dans le kit):
Om dit model te bouwen adviseren wij de volgende FALLER producten (maken geen deel uit van deze bouwset):
Art. Nr. 170492
FALLER-EXPERT
Flüssigkleber in Plastikflasche mit Spezialkanüle
für feinste Klebstoffdosierung.
Liquid cement in plastic bottle with canule
for very fine dosage.
Colle liquide en bouteille plastique
avec bec verseur pour un dosage précis.
Vloeibare lijm in plastic-flacon met doseerbuisje
om nauwkeurig te lijmen.
Question and Answer IconNeed help?

Do you have a question about the Faller 130489 and is the answer not in the manual?

Faller 130489 Specifications

General IconGeneral
BrandFaller
Model130489
CategoryToy
LanguageEnglish

Summary

Assembly Step 2: Building Facades

Section A: Initial Wall Assembly

Assembling wall sections and decorative elements with references to specific parts.

Section B: Glue Application Guidance

Instructions on using all-purpose glue for model assembly.

Section C: Window and Door Frame Attachment

Attaching window and door frames to the facade components.

Section D: Front Facade Detailing

Applying decorative elements and windows to the front facade.

Section E: Side Facade Detailing

Attaching windows and decorative elements to the side facade.

Section F: Completing Side Facade

Completing the side facade assembly with windows and parts.

Assembly Step 3: Constructing Main Structure

Section G: Window and Door Components

Details of window and door parts for assembly.

Section H: Additional Window Components

More window and door parts for the model.

Section I: Facade Assembly with Openings

Attaching windows and doors to the main facade structure.

Section J: Completing the Main Structure

Adding roof elements and final facade details.

Section K: Side Facade Construction

Assembling and attaching the side facade.

Assembly Step 4: Interior Furnishings

Section L: Interior Shelving Unit

Assembling a multi-tiered shelving unit.

Section M: Shop Counter Assembly

Building a shop counter with displayed goods.

Sections N & O: Decorative Accessories

Assembling small decorative items like bowls and hats.

Section P: Table and Stand Assembly

Constructing small tables or stands.

Section Q: Table with Umbrella

Assembling a table with an umbrella accessory.

Section R: Sign and Banner Assembly

Creating hanging signs or banners.

Section S: Cash Register Counter

Assembling a cash register counter unit.

Section T: Display Cabinet Assembly

Building a cabinet with multiple shelves.

Assembly Step 5: Final Details and Assembly

Sections U & V: Small Decorative Elements

Assembling small decorative elements and accessories for the model.

Section W: Contents and Tools

Showing contents of bags and specific tools required for assembly.

Section X: Small Parts Assembly

Assembly of small, specific parts.

Section Y: Complete Model Overview

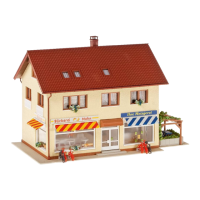
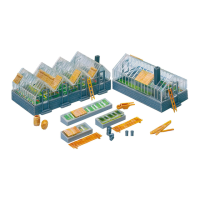
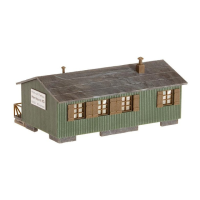
Visual overview of the fully assembled model with labeled parts.

Assembly Step 6: Detailed Components

Section a: Window and Facade Parts

Detailed window and facade parts for assembly.

Section b: Shop Front Assembly

Assembling the main shop front windows and doors.

Section c: Side Wall Assembly

Assembly of the side wall sections.

Section d: Upper Facade Assembly

Assembling the upper facade with windows.

Section e: Lower Facade Details

Attaching lower facade elements and door.

Section f: Gable End Assembly

Assembling the gable end of the building.

Section g: Roof Structure Assembly

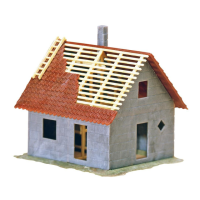
Assembling the internal roof structure.

Assembly Step 7: Interior and Exterior Details

Section g: Gable End Attachment

Attaching the gable end to the structure.

Section e: Facade and Door Assembly

Assembling the facade with door and windows.

Section h: Upper Interior Assembly

Assembling the upper interior sections.

Section c: Detailed Facade Views

Detailed views of facade elements and decorative masks.

Section i: Hanging Fixtures Assembly

Assembling hanging fixtures and measurement guide.

Section Y: Overall Model Assembly

Shows the current stage of the overall model assembly.

Assembly Step 8: Decorative Signage and Final Assembly

Section j: Deco Sign Assembly (Bäckerei)

Assembly of the 'Bäckerei' decorative sign.

Section k: Deco Sign Assembly (Metzgerei)

Assembly of the 'Ihre Metzgerei' decorative sign.

Sections i & k: Building Facades with Signs

Attaching decorative signs to the building facades.

Section l: Ground Floor Attachment

Attaching the ground floor elements.

Section m: Final Structure Assembly

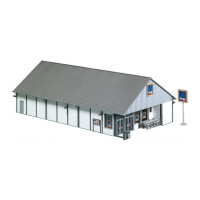
Final assembly of the building structure with details.

Assembly Step 9: Additional Structures

Sections n & o: Wall and Base Elements

Assembly of wall sections and base elements.

Section p: Small Base Assembly

Assembly of a small base structure.

Section q: Raised Platform Assembly

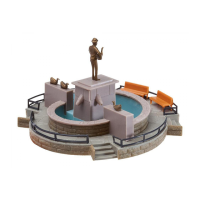
Assembling a raised platform structure.

Section r: Building Assembly - Part 1

Assembly of the building structure, showing lower levels.

Section s: Building Assembly - Part 2

Assembly of the building structure, showing upper levels.

Assembly Step 10: Roof and Interior Details

Sections t & v: Roof Interior Details

Details of interior roof sections with attachment points.

Section u: Roof Structure Interior

Interior view of the roof structure with attachment points.

Section w: Roof Assembly Interior

Interior assembly of the roof structure.

Section x: Roof Section Attachment

Attachment of roof sections.

Section y: Roof Structure Assembly

Assembly of the main roof structure.

Section z: Final Roof Assembly

Final assembly of the roof and its components.

Assembly Step 11: Final Building Assembly

Section A: Chimney and Vent Assembly

Assembly of chimney and ventilation parts.

Section Z: Glue Warning

Instruction not to glue specific parts.

Section B: Building Assembly - Left Side

Assembly of the left side of the building.

Section C: Building Assembly - Right Side

Assembly of the right side of the building.

Assembly Step 12: Final Details and Accessories

Section D: Deco Sign Assembly (Imbiss)

Assembly of the 'Imbiss' decorative sign.

Section E: Deco Sign Assembly (Metzgerei)

Assembly of the 'Ihre Metzgerei' decorative sign.

Section F: Coloring Proposal

Guidance on coloring proposal and pen usage.

Section G: Bicycle Accessories

Assembly and placement of bicycle accessories.

Section H: Final Building Assembly

Final assembly of the building with accessories.

Related product manuals