EasyManua.ls Logo

FEBER Gus Caterpillar - User Manual

FEBER Gus Caterpillar
2 pages
Print Icon
To Next Page IconTo Next Page
Loading...
Feber%Gus’%Caterpillar%Assembly%Instructions%
Tools%for%the%job%
%%%%%%%%%%%%%%%%%%%%%%%%%%%%%%%%% %
%
%
First%pick%your%shape%
%
Next%attach%the%top%
Click%together%
Locate%pin%
Insert%pin%and%tu rn %to%fasten%
%
%
%
There%should%be%5%pins%all%together,%inclu d ing %attaching%the%tail%and%head%pieces%
Next%attach%the%feet%
Between%each%piece%there%are%
2%prongs%
Tip%or%lift%the%caterpillar,%insert%
prongs%into%the%top%of%the%feet%
It’s%the%same%for%th e %h ea d %a n d %
tail%
%
%
%
%
Nuts%
Pins
%
Arch%supports%
End%attachments
%
Question and Answer IconNeed help?

Do you have a question about the FEBER Gus Caterpillar and is the answer not in the manual?

Overview

This document outlines the assembly instructions for the Feber 'Gus' Caterpillar, a children's play tunnel. The instructions are presented in a step-by-step format, accompanied by illustrative images to guide the user through the construction process.

Function Description

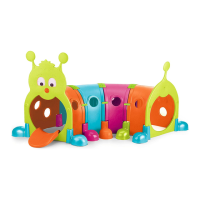
The Feber 'Gus' Caterpillar is a modular play tunnel designed for children. It consists of multiple segments that connect to form a crawl-through structure, providing an engaging and interactive play experience. The final assembled product resembles a caterpillar, complete with a head, tail, and multiple body segments.

Important Technical Specifications

The assembly requires several components, which are categorized as follows:

  • Nuts: These are used for securing various parts together.
  • Tool: A black tool is provided for attaching nuts.
  • Arch Supports: These green components provide structural support for the tunnel segments.
  • End Attachments: These are the head and tail pieces of the caterpillar.
  • Pins: These are integral to connecting the main body segments.

The main body segments are designed to click together, forming a continuous tunnel. Each segment features specific connection points:

  • Top Connection: The top of each segment connects to the next.
  • Pin and Turn Fasteners: These are used to secure the segments together, requiring a specific insertion and turning action.
  • Prongs: Each piece has two prongs that insert into the top of the next piece.

The arch supports are designed to be inserted from the outside and then secured with nuts from the inside using the provided black tool. The end attachments (head and tail) are secured to the main body using nuts. The tongue of the caterpillar's head is also secured with a nut.

Usage Features

The assembly process is designed to be straightforward, with clear visual cues and step-by-step instructions.

Step 1: Pick Your Shape The first step involves identifying the different components, which are visually represented in the "Tools for the job" section. This allows the user to familiarize themselves with the parts before starting assembly.

Step 2: Next Attach the Top This step focuses on connecting the main body segments.

  • Click Together: The segments are designed to click into place.
  • Locate Pin: A pin on one segment aligns with a corresponding hole on the next.
  • Insert Pin and Turn to Fasten: The pin is inserted and then turned to secure the connection. The instructions specify that there should be 5 pins all together, including attaching the tail and head pieces.
  • Between Each Piece There Are 2 Prongs: The prongs on one piece fit into the top of the next piece.
  • Tip or Lift the Caterpillar, Insert Prongs Into the Top of the Feet: This action ensures proper alignment and connection.
  • It's the Same for the Head and Tail: The connection method for the head and tail pieces to the main body segments is identical to that of the intermediate segments.

Step 3: Next Insert Arch Supports This step details the installation of the arch supports.

  • Insert the Green Arch Supports From the Outside: The arch supports are pushed into place from the exterior of the tunnel segments.
  • Inside the Tunnel You Use the Black Tool to Attach Nuts to the Green Arch Supports (In Picture Right Done, Left Not Done): Once the arch supports are in place, nuts are used to secure them from the inside of the tunnel, utilizing the provided black tool. The image clarifies which side has the nut attached.

Step 4: Finally, Secure Head, Tail and Tongue This final step involves attaching the end pieces and the tongue.

  • Use End Attachments to Secure Both Sides of the Head and Tail: The head and tail pieces are attached to the main body segments.
  • Use 2 Nuts Each to Secure in Place: Each end attachment requires two nuts for secure fastening.
  • Use a Nut to Secure the Tongue to the Head: The tongue component of the caterpillar's head is attached using a single nut.

Maintenance Features

While the document does not explicitly detail ongoing maintenance, the modular design suggests that individual segments or components could potentially be replaced if damaged. The use of nuts and a tool for assembly implies that parts can be disassembled and reassembled, which could facilitate cleaning or storage.

Double Check All Fastenings, Then Enjoy Feber Gus! This final instruction emphasizes the importance of ensuring all connections are secure for safe and enjoyable play, serving as a quality control step after assembly.

The overall design of the Feber 'Gus' Caterpillar, with its vibrant colors and engaging shape, aims to provide a fun and stimulating play environment for children. The clear, illustrated instructions make the assembly process accessible for parents or guardians.

FEBER Gus Caterpillar Specifications

General IconGeneral
BrandFEBER
ModelGus Caterpillar
CategoryToy
LanguageEnglish

Related product manuals