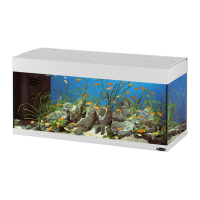
AQUARIUM: DISCOVERING ITS GREAT QUALITIES
1 LED light
2 Lamp switch
3 Hatch
4 Top cover (can be completely removed from the tank, tested for being totally
watertight (IP67)
5 Snap-o plugs
6 Internal integrated lter system, equipped with:
A heater (to adjust it, just re-set the selector on the top of the heater to the required
temperature);
B Pump;
C double water intake;
D adjustable circulation jet.
The lter ensures 3 ltration stages:
E mechanical ltration (two, easily removable, independent baskets containing
two sponges for mechanical ltration);
F biological ltration;
G adsorbent ltration (sponge soaked in active carbon).
POSITIONING THE AQUARIUM
• The aquarium should be placed on a solid at base with a smooth even surface.
• Position the aquarium in a protected area not exposed to direct sunlight (which
could cause overheating and a proliferation of algae), away from sources of heat
(e.g. heating radiators), cold air and drafts.
• Position the aquarium away from electrical equipment that could be wet by
splashes of water.
• Connect the plugs to your electric power supply leaving a loop in the cable below
the electrical socket to prevent drops of water running down the cable and into
the power supply (7).
• We reccomend using a stand especially designed to support the aquarium,
ensuring a solid, smooth even surface (8).
SETTING UP THE AQUARIUM
1 Position the internal lter inside the tank in the preferred position (sideways or
backwards) using the special suckers or some silicone.
2 Ensure that the ring nuts on the LED lights are tightened.
3 Furnish the aquarium according to your taste (your local aquarium shop will be
able to help and advise you).
4 Set the required heater temperature (where tted) according to the type of sh
and plants used (e.g. for freshwater tropical sh the average temperature is about
25-26° C).
5 Put 1 capsules of bacterial activator in the rst lter compartment.
6 Only now connects the plug to the electric power supply and check all the
equipment is working correctly. In case of problems, contact your retailer.
7 If live plants are being used, we recommend laying about 1 cm of fertilized gravel
on the bottom of the tank and 2 cm of gravel. Fill the aquarium by pouring water
onto a at dish placed on the bottom to prevent the material used to create the
base from being moved about.
8 We recommend lighting the aquarium for about 8 hours a day: if there are signs
of excessive algae development, reduce the lighting to 7 hours; if the plants have
diculty growing, increase to 9-10 hours.
9 To care for and protect your sh, it is strongly advised to wait until the lter has
matured: the rst sh should only be introduced 10-12 days after the addition of
lter activator capsules.
10 During the lter maturing period, add a small quantity of dry food each day: this
will help the formation of bacterial ora.
11 When adding the sh, insert the remaining lter activator capsule in the rst lter
compartment.
12 We recommend not putting too many sh into the aquarium all at once, but
building up to the maximum population gradually.
13 Your retailer will be able to advise you on the choice of sh to keep in your
aquarium, the quantity and type of food to use and the feeding frequency.
AQUARIUM MAINTENANCE
The main maintenance procedures we recommend, in addition to the daily provision
of food and regular checking of the temperature and chemical levels, are:
• siphoning the bottom when required using the special aquarium gravel cleaner
on sale at your local retailer;
• adding demineralised water to replace that which is lost by evaporation.
Remember that the internal lter must always be submerged;
• replacing 5-10% of the water with demineralised water at least monthly;
• replacing the LED lamps is not necessary. On the contrary, it is necessary in case
of uorescent ones,
• cleaning the inside of the aquarium using oating magnetic brushes.
FILTER MAINTENANCE
The main maintenance procedures we recommend are:
A Rinsing all the mechanical ltration sponges at least every 2-3 weeks (9);
B Replacing the mechanical ltration sponges at least every 6 months;
C The eect of the adsorbent sponge ceases in about 2-3 weeks; we therefore
advise, if necessary, replacing it with replacement sponge available from leading
retailers or leaving it in the lter to perform a mechanical function. In any case, it
should be changed at least every 6 months (10);
D During periods when the sh are being treated with a solution added to the water
for illness or disease, the adsorbent sponge should be removed from the lter (so
this does not reduce the benecial eects of the treatment). When the treatment
is over, we recommend putting in a new sponge;
E Always keeping the lter intake grilles clean;
F Checking the pump at least every 6 months and cleaning it when necessary in the
following way:
• unscrew the lter top;
• remove the pump unit, adsorbent sponge and return pipe from the lter, pulling
it upwards (10 a);
• remove the pump from the return pipe, remove the front section and remove the
rotor (11);
• remove any lime scale or impurities with the soft brush (never use detergents or
chemical substances);
• re-assemble the unit following these instructions in reverse.
G The biological materials should not be washed. Therefore, we suggest never
removing them from the lter so they retain their active bacterial properties.
GUARANTEE
This product, all its parts and accessories are covered by warranty within the limits
provided for in this paragraph and the legal regulations currently in force. The
guarantee only covers manufacturing defects and includes the repair or replacement
of the product free of charge. The guarantee does not cover damage and/or defects
caused by carelessness, wear, unsuitable usage not complying with the instructions
and warnings in this manual, accidents, tampering, incorrect use, bad repair work or
purchases not accompanied by a scal receipt.
!!
AVVERTENZE PRELIMINARI
• Vericate l’integrità di tutti i componenti (lampade,
termoriscaldatore, vetri e parti in plastica, ecc…)
Nonostante l'uso di imballi sicuri e il controllo di
ogni vasca prodotta, vi consigliamo di vericare
l’assenza di danneggiamenti accidentali avvenuti
durante il trasporto, lo stoccaggio e la vendita,
che potrebbero avere compromesso la tenuta e la
funzionalità dell'acquario.
• Assicuratevi che il voltaggio indicato
Italiano 7
 Loading...