7
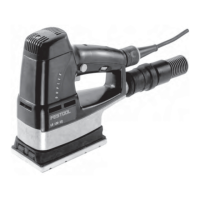
Removing the sanding pad (Fig. 3):
- Push the sanding pad forwards (e.g. by
pressing the rear edge of the sanding pad
against a flat surface),
- keep the sanding pad pressed forwards and
swivel the front edge of the sanding pad away
from the tool,
- release the pressure slightly, remove the
sanding pad from the rear.
The new sanding pad is fitted in the reverse
order.
Make sure that the four lugs (3.1) of the
sanding base catch in the four recesses (3.2)
in the sanding pad.
To ensure a better grip of the sanding pad on
the sanding base of the LS 130 EQ you can
fasten the sanding pad in the four holes in the
corners (1.7) using the enclosed screws.
These screws have to be removed before
exchanging sanding pads.
6 Attaching sanding material
The appropriate Stickfix sanding paper and
Stickfix sanding felt can be fastened quickly and
easily onto the Stickfix sanding base.
Always use original Festool sanding
materials!
The self-adhesive sanding material (1.5) is
simply pressed onto the sanding base (1.6)
and held safely in place by the Stickfix sanding
base velcro surface.
7 Operating instructions
Never overload the tool by using too
much pressure!
The best sanding results are achieved when
applying moderate pressure.
The sanding performance and quality depend
mainly on the choice of the right sanding
material.
Festool offers the appropriate sanding material
for all applications (see Festool catalogue or
on the Internet under www.festool.com).
We recommend the following settings on
the rotary control (1.3) for electronic
machines:
rotary control setting
- sanding work
3 - 6
- sanding old paint
- sanding wood and veneer prior to painting
- interim sanding of paint on surfaces
- Sanding profiled workpieces of natural wood.
- sanding of thinly applied primer
- smoothing primed wooden surfaces.
- sanding full wooden and veneer edges
- sanding in the grooves/rebates of windows
and doors
- interim paint sanding on edges
- rubbing down stained surfaces
1 - 3
- interim paint sanding on stained surfaces
- cleaning natural wood window grooves
- sanding stained edges
8 Maintenance and care
Always remove the plug from the
mains supply socket before
carrying out any work on the
machine!
The cooling air vents on the motor housing
must always be free of blockages and clean to
ensure air circulation.
Any maintenance or repair work requiring the
motor housing to be opened may only be
carried out by an authorised service workshop.
The tool is fitted with special motor brushes
with an automatic cut-out. When the brushes
become worn the power supply is shut off
automatically and the tool comes to a
standstill.
9 Accessories
The accessory order number can be found in
your Festool catalogue or on the Internet under
www.festool.com.
10 Warranty
Our equipment is under warranty for at least
12 months with regard to material or
production faults in accordance with national
legislation.
In the EU countries, the warranty period is 24
months (an invoice or delivery note is required
as proof of purchase).
Damage resulting from, in particular, normal
wear and tear, overloading, improper handling,
or caused by the user or other damage caused
by not following the operating instructions, or
any fault acknowledged at the time of
purchase, is not covered by the warranty.
Complaints will only be acknowledged if the
equipment has not been dismantled before
being sent back to the suppliers or to an
authorised Festool customer support
workshop.
Store the operating instructions, safety notes,
spare parts list and proof of purchase in a safe
place.
In addition, the manufacturers current
warranty conditions apply.
Note
We reserve the right to make changes to the
technical data contained in this information as
a result of ongoing research and development
work.