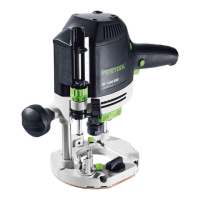
A screwdriver can be used to individually adjust
the height of each fixed stop.
► Push the indicator [1-3] downwards so that
it points to 0 mm on the scale.
If the zero position is incorrect, this can be
corrected using the screw
[1-2] on the in
dicator [1-3].
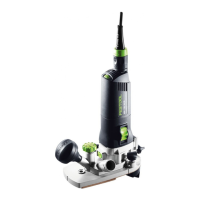
7.6 Specifying the routing depth
The required routing depth can be specified us
ing either quick depth adjustment or fine depth
adjustment.
Quick depth adjustment
► Pull the depth stop [1-7] upwards until the
indicator [1-3]
points to the required rout
ing depth.
► Clamp the depth stop in this position using
the clamp lever [1-6].
Fine depth adjustment
► Clamp the depth stop using the clamp lev
er [1-6]
.
► Set the required routing depth by turning
the adjusting wheel [1-4].
Turning the adjusting wheel by a mark
changes the routing depth by 0.1 mm. A
full rotation changes the routing depth by
1 mm. The maximum adjustment range for
the adjusting wheel is 8 mm.
7.7 Clamping the routing depth
► Open the rotary knob [1-5]
and push the
power tool down until the depth stop touch
es the fixed stop.
► Clamp the power tool in this position by
closing the rotary knob [1-5].
7.8 Dust extraction
WARNING
Heath hazard posed by dust
► Always work with an extractor.
► Comply with national regulations.
► Install the dust extraction attachment on
the router table:
▻ Position the dust-extraction attachment
with the two tenons [3-1] in the recess
es [3-2] on the router table.
▻ Position the dust-extraction attachment
on the router table and pull the lev
er [3-5].
To enable the dust-extraction attachment
to be attached and removed when the
router is fitted, the cut-out [3-3] in the ex
tractor connector can be opened by turn
ing the segment [3-4].
To ensure optimal dust extraction, the cut-
out with the rotatable segment must be
closed while work is carried out.
A Festool dust extractor with an extractor hose
diameter of 36 mm or 27 mm (36 mm recom
mended due to the reduced risk of clogging)
can be connected to the extractor connec
tor [3-6].
CAUTION!
If an anti-static suction hose is not
used, static charge may occur. The user may
receive an electric shock and the electronics of
the power tool may be damaged.
Chip deflector KSF-OF
The chip deflector KSF-OF (available as an ac
cessory depending on the model) can improve
the efficiency of the dust extraction system
when edge routing.
The chip deflector is installed in the same way
as the copying ring, see figure [8]
.
A hacksaw can be used to cut along the grooves
of the guard and therefore make it smaller. The
chip deflector can then be used for inner radii
down to a minimum radius of 40 mm.
8 Working with the electric
power tool
When working on the machine, observe
all of the safety warnings that are listed
at the start as well as the following rules:
– Only guide the power tool towards the
workpiece when it is switched on.
– Always secure the workpiece in such a way
that it cannot move during machining.
– When working, always hold the power tool
with both hands on the handles [1-5] +
[1-11]. This is a prerequisite for precise
work and is essential for plunge-cutting.
Plunge into the workpiece slowly and even
ly.
– When routing, ensure that the power tool's
feed direction is the same as the tool's cut
ting direction, see figure [9]
.
8.1 Freehand routing
Freehand routing is the method normally used
for lettering or shapes, and for routing edges
using cutters with a guide pin or ring.
English
18
 Loading...