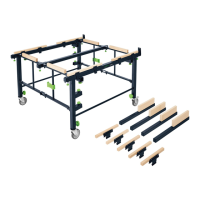
► Insert the attachable tube [8-1] into the
holder opening [8-3] of the folding frame.
► Tighten the rotary knob [8-2].
► Fit the four attachable tubes to the folding
frame in this manner.
Positioning the attachable tubes
► Release the rotary knob [8-5].
► Insert the attachable tube [8-4] into the
required position, making sure that it has at
least passed through the holder
opening [8-6].
► Tighten the rotary knob [8-5].
► Position the four attachable tubes in this
manner.
Positioning the extendable tubes
► Pull out the locking bolts [8-9] and keep
them pulled out.
► Position the extendable tube [8-8].
► Release the locking bolts [8-9].
► Position the two extendable tubes with foot
end caps and the two extendable tubes
without foot end caps in this manner.
Fitting the wooden support incl. clips
► Clamp the wooden support premounted on
clips [8-7] to the extendable tube [8-8].
► Fit the four wooden supports premounted
on clips in this manner.
7.4 Reducing the work surface
The work surface can be adjusted to the
minimum dimensions of 1100 x 1050 mm.
Detaching the attachable tubes
► Release the rotary knob [8-2].
► Pull the attachable tube [8-1] out of the
holder opening [8-3] of the folding frame.
► Tighten the rotary knob [8-2].
► Detach the four attachable tubes in this
manner and store them (see section
8.2 ).
Detaching the wooden supports
► Detach the wooden support premounted on
clips [8-7] from the extendable tube [8-8].
► Detach the four wooden supports
premounted on clips in this manner and
store them (see section
8.2 ).
Inserting the extendable tubes into the folding
frame
► Pull out the locking bolts [8-9] and keep
them pulled out.
► Insert the extendable tubes [8-8] into the
folding frame.
► Release the locking bolts [8-9].
► Insert the four extendable tubes into the
folding frame in this manner.
8 Transportation
8.1 Storing the wooden supports incl. clips
► Clip the wooden supports incl. clips [9-4] to
the attachable tubes [9-1] for storage.
8.2 Storing the attachable tubes
► Release the rotary knob [9-3].
► Insert the attachable tube [9-1] into the
storage holder opening [9-2].
► Tighten the rotary knob [9-3].
► Store the four attachable tubes incl. wooden
supports in this manner.
8.3 Additional transport settings
► Reducing the work surface (see section
7.4 ).
WARNING
Risk of accidents occurring through the
tilting saw table and work bench
► For transportation, slide in the base tubes
all the way to the minimum working height
(see section 7.1 ).
► Release the brakes (see section
7.2 ).
8.4 Folding up the mobile saw table and
work bench
► Pull out the locking bolt [10-3] and push
together the folding frame [10-4] until the
locking bolt [10-3] locks into place.
►
Pull out the opposite locking bolt [10-2]
and push together the folding frame [10-4].
►
Close the transport lock [10-1].
The mobile saw table and work bench is ready
for transportation.
Observe all national safety regulations and
ensure the load is secured when trans
porting it in a vehicle.
9 Working with the mobile saw
table and work bench
The clip-on wooden supports can be
moved as required, so that these are not
damaged when working.
English
12
 Loading...