GASKETS: Each end of the coupler is sealed
by a black rubber gasket. These may become
worn over time due to overtightening or
connecting to damaged male ttings.
1. Use needle nose pliers or a similar tool to unscrew the Schrader
valve depressor from the gasket.
2. Remove and replace the worn gasket.
3. Screw the depressor back into the gasket.
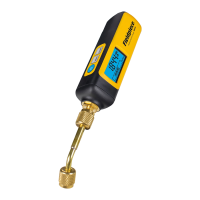
Reversible Coupler
It's best to avoid using a hose to connect
your vacuum gauge to the system. The coupler
makes it easy to connect the gauge directly to a
service port or valve core removal tool.
Each end has a valve depressor and gasket so
you can ip the coupler to best t the system
and your viewing angle. Rotate and tighten
each end independently for optimal viewing
and control.
Quick Start
1. Unscrew the battery cover and install (2) AA
alkaline batteries.
2. Hold
to power on.
Wireless setting is briefly displayed (ON/OFF).
Activate wireless in the menu to send measure-
ments to compatible Job Link® system tools.
3. Connect to the equipment you're evacuating.
Connect directly to an unused service port or to
a Schrader valve core removal tool.
4. View the live measurement on the top line.
5. Press NEXT to change bottom line view.
What's Included
(1) MG44 Wireless Vacuum Gauge
(1) Reversible 1/4" angled (45°) coupler
(2) AA Batteries
(1) Operator's manual
(1) Year limited warranty
Description
Use the MG44 Wireless Vacuum Gauge
to reliably monitor your evacuations in the
eld. Long range wireless technology sends
deep vacuum measurements up to 1000 feet
(305 meters) away. View live on your SMAN
TM
manifold, in the Job Link® mobile app, or directly
on the MG44.
Save time by wirelessly monitoring your
evacuations. Remotely view trending on the
Job Link mobile app so you know when an extra
nitrogen purge is required, a leak is suspected,
or just watch everything pull as planned.
Reduce the misleading nature of dynamic
vacuum measurement during pull down by
connecting MG44 directly to the system. The
reversible angled coupler makes it easy to orient
the gauge so that it's out of the way and easy
to see.
Select one of three unique views, including a
new Rate Meter that provides a great feel and
a Bar Graph that has a range up to atmosphere.
Built for demanding eld use, the overmolded
case resists damage from physical impact and
water ingress.
Maintenance
CLEANING: Clean the exterior with a damp
cloth. Do not use detergents or solvents.
SENSOR: Clean the sensor on a regular basis
to prevent the build up of oils and contaminents.
DO NOT use an object such as a cotton swab to
clean the sensor. This may damage the sensor.
1. Power o MG44.
2. If attached, remove the coupler from MG44 to expose the cavity of
the 1/4" male tting.
3. Fill up about half of the cavity with isopropyl (rubbing) alcohol or
AC system ush.
4. Cover the cavity and gently shake it for about 15-30 seconds.
5. Pour out the dirty solution and let the vacuum sensor dry with the
tting facing down.
BATTERIES: An empty battery icon
indicates batteries need to be replaced. When
power is too low to operate, "LoBatt" is displayed
5 sec before powering o automatically. You can
also monitor battery life in the Job Link app tool
manager.
1. Power o MG44.
2. Unscrew the battery cover (2 screws) and dispose of batteries
according to local law.
3. Install (2) new alkaline AA batteries.
4. Reinstall cover.
Wireless
Vacuum
Gauge
OPERATOR'S
MANUAL
Model MG44
Operation
Buttons
Unless muted, each button press triggers
a beep. An inactive button press triggers a
double beep.
Hold to toggle power.
Toggle backlight.
Silence alarm.
Hold to enter MENU.
Hold to exit MENU without saving.
ENTER selection.
Stop low alarm and start high alarm.
NEXT view.
NEXT menu item or increase value.
Hold to toggle ALARM mode.
Silence alarm.
Display
In standard operating mode, the top line
shows the live measurement. The bottom line
shows one of three selectable views.
: Auto Power O Enabled
: Battery Level
: Low Alarm
: High Alarm
: Muted
: Rate (dierential per minute)
: Wireless Enabled (shown at startup)
: Wireless Disabled (shown at startup)
Views
Press NEXT to change the content of the
bottom line. Each view provides a unique way
to monitor your evacuation.
RATE: The running 10-second average of the
measurement's change per minute. Negative
rates indicate the vacuum is getting deeper.
RATE METER: The graphical representation
of the measurement's real-time change per
minute. The scale is dynamic (i.e. relative to the
measurement) making changes easy to see.
Decreasing
Stable
Increasing
BAR GRAPH: The graphical representation
of the measurement. The scale is static and
nonlinear for increased resolution at deeper
vacuums. Full bars indicates atmospheric
pressure.
~3500 micronHg
Alarm Mode
Every evacuation is dierent. Some require
multiple purges of dry nitrogen, while some take
less time than a phone call. Activate alarm mode
so you can get other things handled without
babysitting your gauge.
Follow recommended evacuation practices
from the equipment manufacturer and training.
Alarm levels can be adjusted in the menu.
1. Hold ALARM to activate* low alarm (L).
Stopwatch starts. APO deactivates.
Turn on your vacuum pump.
2. Once the low alarm level is reached, the back-
light blinks and the alarm sounds.
To silence the alarm, press
or NEXT.
Stopwatch stops.
5. Press ENTER to exit alarm mode.
APO reactivates.
* Hold ALARM to exit alarm mode at any time.
Specifications
Connector Type: 1/4'' SAE male tting. Includes reversible 1/4"
angled (45°) coupler with Schrader depressors.
Max Pressure: 870 psig (60 bar)
Refresh Rate: 0.5 seconds
Accuracy: ±(5% reading + 5 micron) at 77°F (25°C), 50 to 2000 micron
Measurement Range and Units:
50 to 25000 micronHg (mTorr); 0.05 to 25 mmHg (Torr);
6 to 3333 Pascals; 0.06 to 33.33 mBar
Bar Graph Range: ultimate vacuum to atmospheric pressure
Best Resolution:
1 micronHg(mTorr), below 2000; 0.001 mmHg (Torr), below 2.5;
1 Pascal, below 250; 0.001 mBar, below 2.5;
Battery Type: 2 x AA Alkaline, NEDA 15A, JIS UM3, IEC LR6
Battery Life: 50 hours typical alkaline
Auto Power Off: 15 minutes default (APO adjustable)
Wireless Range: 1000 feet (305 meters) line of sight.
Obstructions aect distance.
Radio Frequency: 2.4 GHz
Wireless Device Requirements:
(Latest compatibility and firmware at www.fieldpiece.com)
Job Link® app: BLE 4.0 devices with iOS® 7.0 or Android™ 5.0
SMAN
TM
manifold: Models SM380V/SM480V with latest
rmware installed.
Water Resistance: IP54
Operating Environment: 14°F to 122°F (-10°C to 50°C) at
<75%RH
Storage Temperature: -4°F to 140°F (-20°C to 60°C) at <80%RH
(with batteries removed)
Weight: 0.66 lbs (300 g)
US Patent: www.eldpiece.com/patents