01
06
02
07
03
08
04
09
05
10
Quick Start
1 Power on your SMAN by holding the ON/OFF
button for 1 second.
2 Select desired units (English or Metric) by
pressing the UNITS button (SMAN3) or hold-
ing the ENTER button for 1 second (SMAN2).
3 Calibrate temperature and/or pressure as
needed. See calibration sections for more
details.
4 Connect to the system.
5 Press the circular button to select your desired
function.
Certifi cations
C-Tick (N22675)
CE
RoHS Compliant
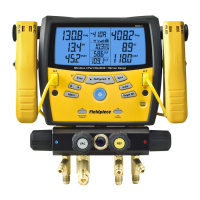
Description
Your SMAN is the state-of-the-art portable
digital refrigerant manifold and vacuum gauge
(SMAN3) for A/C and refrigeration service. Your
SMAN combines high pressure manifold gauges,
a superheat/subcooling calculator, micron
gauge for vacuum (SMAN3), and temperature
measurements into one easy-to-use instrument.
Your SMAN calculates and displays target
superheat and actual superheat to ensure
proper charging of a unit. Use your SMAN as a
dual temperature instrument to simultaneously
display two temperatures using any K-type
thermocouple.
Your SMAN is designed to meet the demands
of the HVAC/R technician with a ruggedized
rubber boot for durability, a metal hanger
for easy storage and a high quality nylon
case. A bright blue backlight and very large,
easily viewable display lets you see your
measurements in any work environment. SMAN
has a very intuitive user interface and extremely
long battery life.
Your SMAN comes pre-programmed with the
most accurate P-T charts for the most common
refrigerants in the field so you are always
prepared for any job.
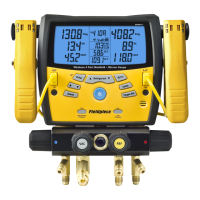
Display
1 Insert K-type thermocouple plugs here.
2 Temperature calibration pots.
3 Press to zero atmospheric pressure.
4 Press to linear adjust pressure curve. (See
Advanced Pressure Calibration section.)
5 Press to engage backlight. Hold when
powering on to toggle Auto Power O .
6 Press/hold to cycle through refrigerants.
7 Hold 1 second to toggle power on/o .
8 Press up or down arrow to adjust values.
9 Press to confirm selection. For the
SMAN2, hold 1 second to adjust units.
10 Hold to enter alarm setup mode. (SMAN3)
11 Press to toggle through temperature tests.
Hold to auto-toggle.
12 Press to adjust units. (SMAN3)
13 Turn clockwise to close Low side port.
14 Turn clockwise to close High side port.
Functions
Standard Pressure
1 Connect your SMAN to the system using EPA approved 1/4in
refrigerant hoses.
2 Read pressures directly from the upper display.
Superheat and Subcooling
1 Press circular button to cycle through temperature modes until
SH and SC are shown. While the SMAN can show superheat and
subcooling simultaneously, most technicians will only measure
one, depending on the system.
2 Choose the appropriate refrigerant using the REFRIGERANT
button.
3 Connect the K-type thermocouple and EPA approved refrigerant
hoses to your SMAN.
4 Connect your SMAN to the system:
Superheat: Hand tighten low side hose to suction line service
port. Place the thermocouple on the suction line between the
evaporator and compressor, no closer than 6 inches to compressor.
Subcooling: Hand tighten high side hose to liquid line service
port. Place the thermocouple on the liquid line between the
condenser and expansion valve (TXV), as close to the service port
as possible.
5 For reliable readings you must let the system run continuously for
15 minutes to stabilize.
6 Add or remove refrigerant using the low and high side valves as
needed. If adding or removing refrigerant, let the system stabilize
again for 15 minutes before reading the measurement.
T1 T2 Direct
1 Press circular button until T1 and T2 are shown.
2 Plug in any K-type thermocouple into T1 and/or T2.
3 Read the temperature directly from the display.
Saturation
Shows vapor (VSAT) and liquid saturation (LSAT) temperatures,
based on the pressures measured and the refrigerant selected.
Target Superheat
1 Press circular button until Target SH is shown.
2 Plug the ATWB1 Wet bulb K-type thermocouple into T1 and ATA1
Dry bulb K-type thermocouple into T2.
3 Use the arrow buttons to select which temperature you want to
measure rst. A blinking value means the SMAN is displaying the
real-time temperature.
4 For IDWB, wet the sock of the ATWB1. Clip it to the front of
the evaporator coil or lter. When the wet bulb temperature
reaches its lowest point and stabilizes. ENTER locks the reading.
"OL" will show if reading outside wet bulb charts. Re-take the
measurement.
5 For ODDB, clip the ATA1 thermocouple to the side of the
condenser. Once reading is stable, press ENTER. "OL" will show if
reading outside dry bulb charts. Re-take the measurement. For
best results, keep the ATA1 away from direct sunlight.
6 Once both IDWB and ODDB are set, the Target Superheat will
display in the lower left corner of the display. If the inputted IDWB
and ODDB temperatures indicate the Target Superheat is negative,
"OL" will display in the lower left corner.
7 To change either IDWB or ODDB, press the UP/DOWN arrow button
until the label (IDWB or ODDB) you wish to change is blinking.
Press ENTER and the value will begin to blink. Re-take the
measurement and press ENTER to lock in the new measurement.
The newly calculated Target Superheat will be displayed in the
lower left corner.
8 To clear both IDWB and ODDB at the same time, press the ENTER
button. This will only work when a Target Superheat or "OL" is
displayed in the lower left corner.
Pulling a Vacuum (model SMAN3)
Follow all manufacturers’ evacuation
procedures over those in this manual.
Note: larger systems may take much longer to
reach a deep vacuum and a di erent evacuation
method or equipment might be preferred.
1 Connect your SMAN3 inline between your vacuum pump and the
system, then power on your SMAN3.
2 Draw a vacuum on the system. The SMAN will automatically
sense the negative pressure and display the vacuum in microns of
mercury. Indicators for increasing or decreasing pressure will be
shown.
3 Press Alarm button to toggle between the High (Hi) alarm, the
Low (Lo) alarm and no alarm. (No display for no alarm.)
(Note: The stopwatch will start when an alarm is selected.
Pressing Alarm will reset the stopwatch.)
4 When the rate of change in pressure is zero or near zero, Stable
will appear in the lower left corner of the display.
Additional Tips:
In order to achieve a deep vacuum as quickly as possible the
following practices are suggested.
1 Use the shortest hoses with the largest diameter available.
2 Remove Schrader cores and core depressors. Core removal tools
like the "MegaFlow Valve Core Removal Tool" can be purchased to
help with this process.
3 Inspect the rubber seals at both ends of your hoses for damage
that may result in leakage.
4 Do not use hoses with low loss ttings when evacuating or
pulling a vacuum on a system.
Set Vacuum Alarms (SMAN3)
1 Hold the Alarm button for one second to enter Alarm Set mode.
2 Press the Alarm button to toggle between Alarm Hi and Lo.
3 Use arrow buttons to adjust each alarm value.
4 Press ENTER to lock both alarms in.
T1 T2
Atmospheric
Pressure
Superheat
Subcooling
T1 T2 Direct
Saturation
Target
Superheat
CAL CAL
CAL CAL
Tes t
Pressure
AUTO
OFF
Refrigerant
ON/OFF
Enter
Units
Alarm
Digital Manifold + Vacuum Gauge
SMAN3
ODDB
HH:MM:SS
Psig
Kpa
inHg
cmHg
Psig
Kpa
inHg
cmHg
SHT1
VSAT
APO
Microns
HiLo
SetStable
Alarm
IDWB
Target SH
R-
°F°C
SCT2
LSAT
°F°C
°F°C
11
22
3
14
4
5
89
1110 12
67
13