Do you have a question about the Filmcity BELLY CRUZER DSLR STEADY CAMERA RIG and is the answer not in the manual?
| Load Capacity | Up to 5 kg |
|---|---|
| Color | Black |
| Material | Aluminum |
| Camera Mounting | 1/4"-20 screw |
| Compatibility | DSLR, Mirrorless Cameras |
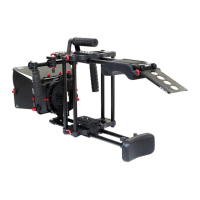
Overview of the FILMCITY BELLY CRUZER DSLR Steady Camera Rig, highlighting its advanced, lightweight, and modular design for mobile filming.
Lists and illustrates the components included in the FILMCITY BELLY CRUZER DSLR Steady Camera Rig package for user inspection.
Securing the French flag and side flags to the MB-600 Matte Box hinges using screws and allen bolts for proper fit.
Installing the filter holders into the MB-600 Matte Box, ensuring proper tightening of the filter tray knob for secure filter placement.
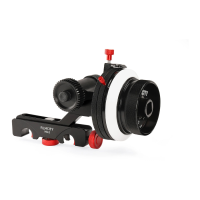
Attaching the knicker onto the conversion ring and screwing the conversion ring into the ring holder for camera lens setup.
Attaching the base plate to a tripod plate using a screwdriver and securing the setup to the tripod stand with a knob.
Detaching the quick release plate from the base plate and attaching it to the camera base, securing with a screwdriver.
Mounting the camera setup onto the tripod and securing it with the provided knobs for a stable connection.
Inserting four 250mm female rods onto the base plate and tightening the knobs to secure them for the rig structure.
Attaching the top plate onto the rods and tightening with provided knobs to complete the main frame structure.
Inserting two 300mm female rods to the back of the base plate and attaching the belly support securely.
Loosening allen bolts on the top plate to insert 300mm male rods, then attaching the top handle to the back of the rails.
Inserting the shoulder pad to the back of the rails and securing it, then attaching the battery mounting plate.
Attaching the rod adapter to the front top rails and side handles to the ends of the 300mm rail for ergonomic control.
Attaching the MB-600 matte box to the front of the rail system and tightening it with an allen key for light control.
Adjusting the knicker to fit the camera lens properly and tightening the knot for secure placement.