Do you have a question about the Finlux 19FLMR182SVD and is the answer not in the manual?
Place the device on a solid even surface for ventilation and to prevent faults.
This device is used to receive and display TV programs, suitable for dry interiors and private domestic use.
Always use the provided AC adaptor and operate only from the specified power source.
Do not expose the TV to direct sunlight or other heat sources, open flames, or intense heat.
Excessive sound pressure can cause hearing loss; take care.
Must be securely attached to the wall according to installation instructions to prevent injury.
Note occasional non-active pixels and take care not to scratch the screen.
Unplug the TV before cleaning; use a soft, dry cloth.
Risk of radiation from laser beams. Do not open. Risk of electric shock; do not repair yourself.
Explains the use of the physical control switch for volume, channel, source, and power.
Function to load a disc.
Plays or pauses the disc; acts as button select in DVD menu.
Stops disc playback or ejects/loads the disc.
How to set and use My Button 1 for custom functions.
Explains the default function and custom setting of My Button 2.
Important notes on using Side AV, YPbPr, SCART, CI modules, and USB devices.
Crucial warning about handling the CI module only when the TV is powered off.
Message displayed when TV enters standby due to no input signal.
Message for auto TV off timeout, prompting to shut down or cancel.
Message displayed when TV enters standby after 4 hours of inactivity.
Instructions on how to turn off the TV using the remote or control switch.
Guide for initial setup, including language and country selection.
Explanation of Home Mode for domestic use and Store Mode for retail display.
Option to choose between Aerial, Cable, or Satellite for digital channel search.
Steps for searching digital terrestrial TV broadcasts via aerial.
Process for automatically scanning and storing available TV channels.
Instructions for network search when selecting Cable installation.
Options for configuring satellite setup: Direct, Unicable, or DiSEqC switch.
How to access and use the Media Browser to play photos, music, and movies from USB.
Details on accessing the menu within the Media Browser.
How to select and organize broadcasts in the channel list.
Accessing quick settings like Power Save, Picture Mode, Sleep Timer.
Controlling CEC-enabled devices via HDMI and managing CEC RC Passthrough.
Details of picture settings: Mode, Contrast, Brightness, Colour, Power Save, Backlight, Noise Reduction, etc.
Includes Dynamic Contrast, Colour Temp, Picture Zoom, HDMI True Black, Film Mode, Skin Tone, Colour Shift, RGB Gain, Reset, Autoposition.
Settings for Volume, Equalizer, Balance, Headphone, Sound Mode, AVL, Dynamic Bass, Surround Sound, Digital Out.
Options for Automatic Channel Scan, Manual Channel Scan, Network Channel Scan, Analogue Fine Tune, First Time Installation, Clear Service List.
Includes Conditional Access, Language, Parental, Timers, Recording Configuration, Date/Time, Sources, Satellite Settings.
Includes Menu Timeout, Scan Encrypted, Blue Background, Software Upgrade, Application Version, Hard of Hearing, Audio Description, Auto TV Off.
Includes Standby Search, Store Mode, Power Up Mode, Biss Key, CEC.
Accessing EPG menu to select channels, record, or set timers.
How to set and cancel programme recordings using the EPG.
Important notes on formatting USB drives and connecting for recording.
Options for playback of recorded programmes: Play from start, Resume, Play from offset.
Instructions on how to handle and clean discs for proper operation.
Guidance on cleaning discs using a cleaning cloth and avoiding solvents.
Lists playback capabilities like DVD, CD, MP3, JPEG, MPEG, NTSC/PAL, Multi-Audio, Multi-Subtitle.
Notes on accessing DVD mode and resuming playback after switching sources.
Option to reset picture and sound settings to factory defaults.
Setting for digital audio output when using TV speakers.
Option to enable or disable surround sound.
Setting for two-channel stereo sound.
Parental control settings to limit playback based on age, with adjustable levels.
Activates teletext mode or mixes teletext with programme.
Selects the teletext index page.
Shows hidden information, like game solutions.
Holds a text page; press again to resume.
Selects subcode pages if available when teletext is activated.
Press to select a teletext page.
Operation of digital teletext using coloured buttons and cursor controls.
Manually checking for and downloading software upgrades through the TV menu.
Automatic background search for critical software upgrades when connected to the internet.
Automatic scanning for software upgrades at 3 AM.
Procedure for updating software via an ethernet connection.
Notes on image persistence and how to mitigate it.
Troubleshooting steps for when the TV has no power.
Common issues affecting picture quality and their solutions.
Troubleshooting steps when there is no image display.
Troubleshooting steps for issues with audio output.
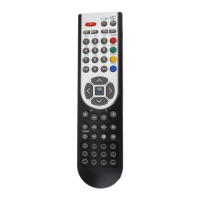
Steps to take if the remote control is unresponsive.
Troubleshooting when input sources cannot be selected.
Supported TV broadcasting standards like PAL/SECAM.
Supported digital reception standards like DVB-T, DVB-C, DVB-S.
Frequency bands for receiving channels: VHF, UHF, HYPERBAND.
Maximum number of channels that can be stored.
On Screen Display for channel information.
Input impedance for RF aerial.
Operating voltage range and frequency.
Audio system and output power.
Display aspect ratio and screen size.
Acknowledgments for Dolby and HDMI trademarks.
Supported video file formats and their specifications.
Supported audio file formats.
Supported image file formats and their limitations.
Supported subtitle file formats.
Supported video file formats for DVD playback.
Supported audio file formats for DVD playback.
Supported image file formats for DVD playback.
Supported external subtitle file formats.
Instructions for powering on the TV using a 12V DC source.
Instructions for powering off the TV and disconnecting power.
| Screen Size | 19 inches |
|---|---|
| Display Technology | LED |
| HDMI Ports | 1 |
| USB Ports | 1 |
| Aspect Ratio | 16:9 |
| Built-in Speakers | Yes |
| Power Consumption | 25 W |
| Resolution | 1366 x 768 pixels |
