321037
60
11.4.21 Replacement of PC Door (Where John Guest Fitting Has Been Fitted)
1. Disconnect the refrigerator from the power supply.
2. Remove the top hinge cover to expose the wiring and water tubing.
3. Disconnect the edge connector.
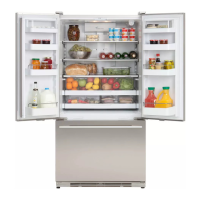
4. Remove the left hand collet locking clip from the John Guest Fitting. (Refer to photo
11.4.21)
Collet locking clips in
position. Remove left
hand clip to remove
door.
Photo
11.4.21
5. Once the clip has been removed, push the collar in to remove the water tube.
6. Remove the top hinge.
7. Remove the water tube and wiring from the guide.
8. Remove the door.
9. Remove the door-dispensing pad, wiring and water tube from the old door and refit all
components to the new door.
10 Reassemble in reverse order.
11.4.22 Block / Edge Connectors
Should a connector need replacement, it is important that the wiring connections be kept in the
correct order to the connector. The wiring harness uses one colour of wire throughout all circuits.
The circuit wiring should be traced with the aid of a multimeter before a connection is made.
To make a connection on a female block connector, cut the wire end square and insert it into the
correct location on the block connector itself. With the wire fully inserted, apply pressure to the
terminal, which will lock the wire and terminal together.
If possible, when replacing a connector the connections should be made one at a time. For
example, first cut the wire in pin 1 of the old connector and insert it into pin 1 on of the new
connector. Push the pin fully home to lock the wire in place, and then move on to pin 2.
Note that the stage 4 cabinets introduce a new series of block connectors. These connectors
contain a wall between the cavities to ‘code’ or polarize the connector. This is especially important
in the case of the 4 and 6 way connectors in the power/control module. Also note that the
replacement connectors are un-coded (to reduce the number of spare parts required) and
therefore care must be taken that the connector is replaced in the correct socket. Check the wiring
diagram and labelling on the power/control module if unsure.
When wiring any DC voltage supply or components, it is important that the correct polarity be
observed.
Also used are a new series of in-line connectors, replacing the Molex connectors. These new JST
plugs and sockets are available as spare parts.
 Loading...