Do you have a question about the Fisher-Price DORA THE EXPLORER T6197 and is the answer not in the manual?
| Brand | Fisher-Price |
|---|---|
| Model | DORA THE EXPLORER T6197 |
| Category | Toy |
| Language | English |
Adult supervision required; avoid hazards like cars, steps, water, and always wear shoes.
Contains small parts when unassembled; adult assembly is required. Save packaging.
Save packaging, clean parts, and follow screw instructions for assembly.
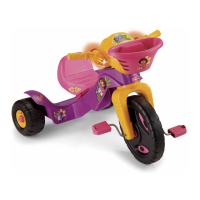
Slide hubcap and rear wheel onto the straight axle, then secure with a cap nut.
Turn frame upside down and insert the straight axle through the rear holes.
Attach second rear wheel, hubcap, and secure with cap nut using assembly tool.
Fit pedal hubs onto the pedal axle tabs, ensuring tabs fit into slots.
Insert pedal axle through front wheel, push pedal hubs flush with the wheel surface.
Turn front wheel assembly over and insert remaining pedal hubs.
Fit pedal onto pedal axle, tap with hammer until secure, and test for stability.
Attach front wheel assembly to fork arms, secure with fork covers and screws.
Insert fork post through frame, attach handlebar to fork post, align holes, and insert screw.
Insert and snap the cap into the hole in the frame.
Fit basket mount to handlebar and secure with four screws.
Fit basket to handlebar tab and secure with two screws.
Position seat upside down and fit seat retainer pegs into seat holes.
Clean surfaces and apply labels as shown for best results. Rub firmly to adhere.
Attach seat in one of three positions for child's fit. Check pedal distance.
Insert seat tabs into frame slots at an angle, lower seat, and snap retainer. Test security.
Loosen and remove two screws in the basket, then remove the basket.
Loosen and remove four screws from the basket mount, then remove the mount.
Loosen screw on compartment door, open, insert three AA batteries, close, and tighten.
If erratic operation, turn power switch off then on to reset electronics.
Avoid leakage by not mixing batteries, inserting correctly, removing during non-use, and safe disposal.
Turn frame on its side, squeeze seat retainer tabs together, and lift seat from frame.
Contact Fisher-Price for help via phone, website, or international offices.
Check parts for damage, tighten fasteners, and clean with mild soap and water.
Equipment complies with Class B digital device limits for radio frequency interference.
Instructions for using the power switch, ignition, turn signals, and sound buttons.