PAGE 3
PAGE 4
longer sides into their notches (you should hear
a click as each tab engages).
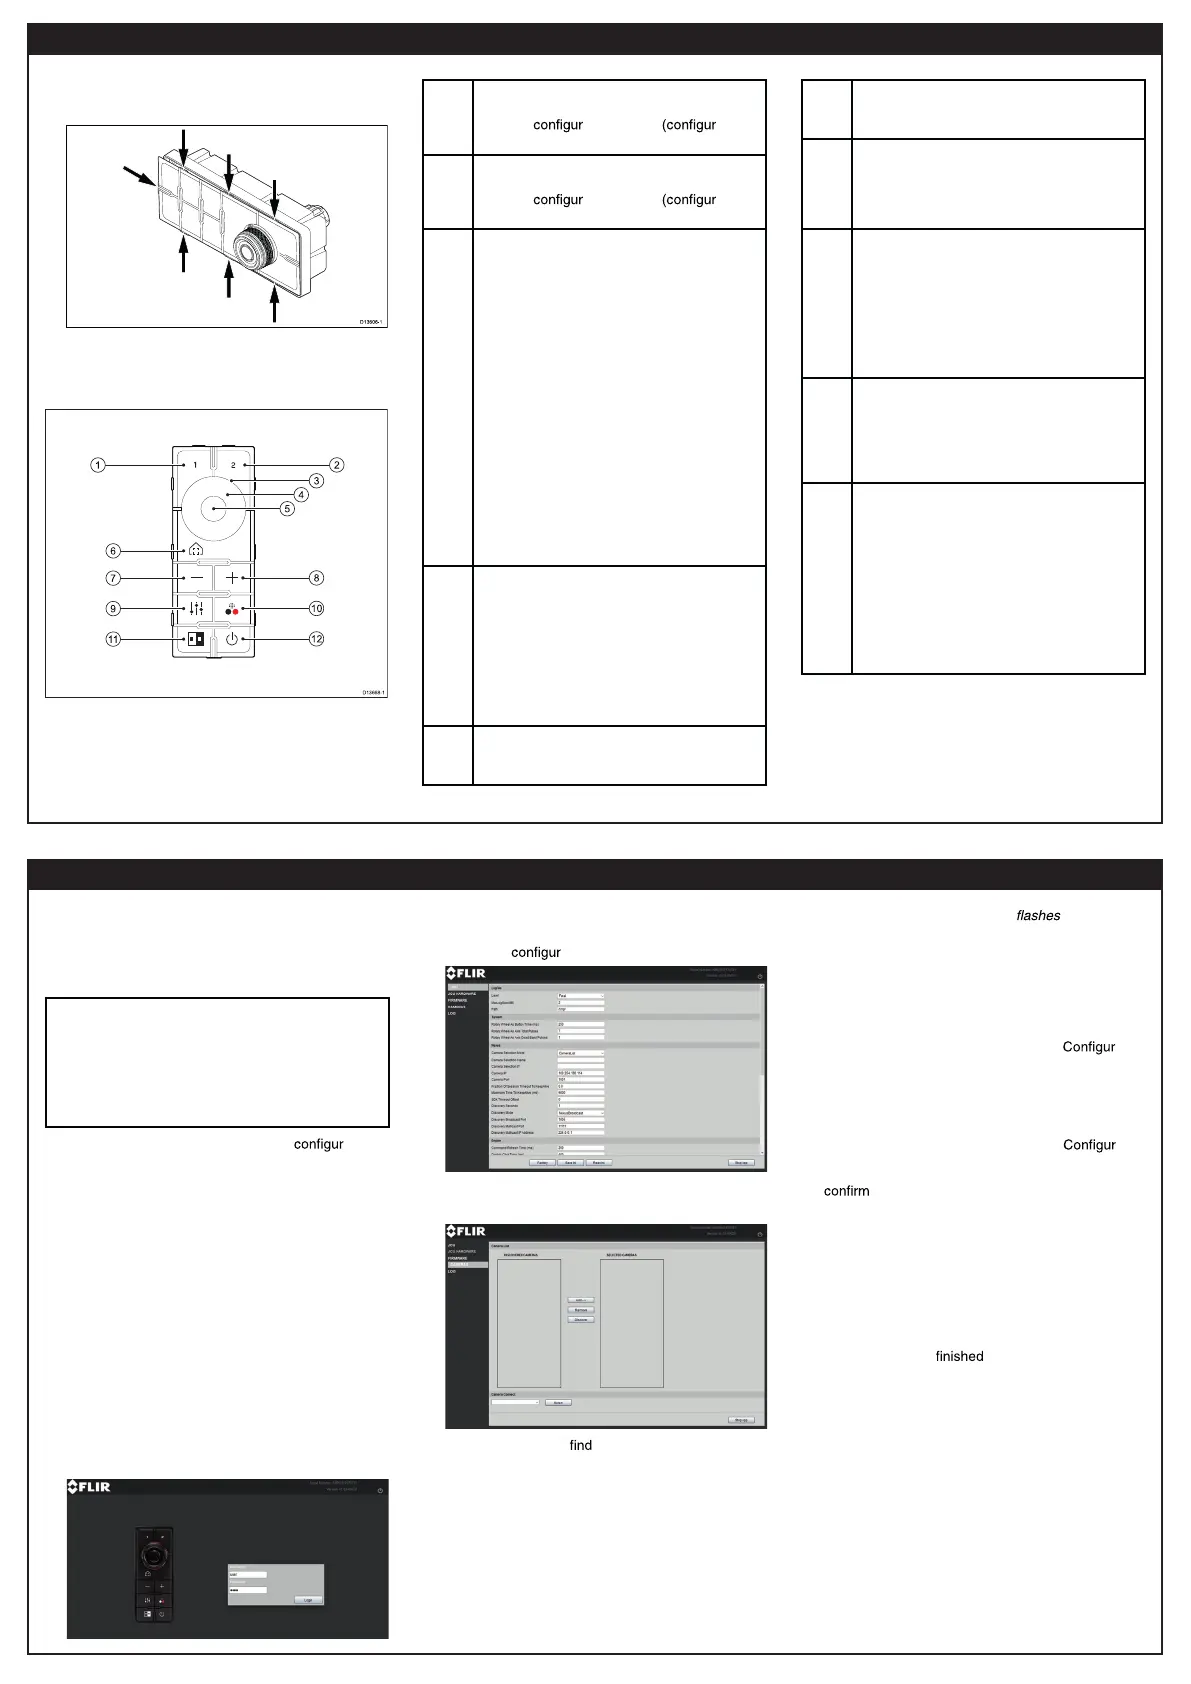
JCU–3 controls overview
1
USER 1
• User
able button ed via
camera web page).
2
USER 2
• User
able button ed via
camera web page).
3, 4,
5
UNI-CONTROLLER – Use the
uni-controller to control the camera:
• Press ring (4) up, down left right –
Pan / Tilt camera (pan available on
M200–Series only).
• Rotate outer ring (3) clockwise or
counter-clockwise to pan the camera
(pan available on M200–Series only).
• Central button (5): long-press to toggle
OSD MENU On/Off; short-press to
select (OK).
Navigate setup menus:
• Move up, down – Scroll through menu
options.
• Press down – Select highlighted menu
option.
6
HOME
• Momentary press – Return camera to
home position.
• Press and hold – Set current position
as camera home.
• 4 x press – Reset the camera (realign
home and stow positions).
7
ZOOM-OUT
• Press to zoom thermal camera out
8
ZOOM-IN
• Press to zoom thermal camera in
9
SCENE
• Press to cycle through image scene
presets (day; night; docking; high
contrast)
10
COLOR
• Short-press to cycle through color
palettes (WhiteHot; RedHot; Fusion;
FireIce)
• Long-press to toggle polarity of selected
color palette (for example: WhiteHot >
BlackHot > WhiteHot)
11
NEXT PAYLOAD
• Short-press to switch to the next
payload on the camera (applicable only
to cameras with multiple payloads; for
example: thermal and visible)
12
POWER
• Short-press to cycle through keypad
backlight brightness settings.
• Long-press to put the camera into
standby mode (parked and stowed);
press any other button to wake the
camera.
• Double-press to switch to the next
available camera in the network.
Pairing the keypad
Each JCU-3 keypad can be paired with multiple
thermal cameras, and each thermal camera can be
paired to multiple keypads.
Note: Pairing the keypad to a thermal camera
requires a PC, laptop – or other IP-network
compatible device that supports a web browser
– to be connected to the same network as the
camera and keypad.
You complete the pairing process using web
pages served by the JCU-3 keypad.
1. Make sure that your PC/laptop is ed to
detect UPnP devices.
For example, in Windows 7, 8, and 10, within
the Network and Sharing Center, you’ll need to
select the option to Turn on network discovery.
2. The keypad is automatically added to the list
of devices on your PC/laptop, and is named
according to the keypad part number, and serial
number (for example: A80510 0123456).
In Windows XP, the keypad is listed in Windows
Explorer under “My Network Places”; in later
versions of Windows, the keypad is listed in
Windows Explorer under “Network”.
3. For Windows computers, double-click the keypad
item to open the keypad’s web page. You
can also right-click the keypad item and select
Properties, to show more information about the
keypad, including its IP address.
The login screen with a picture of the JCU-3
is displayed.
4. Enter user for Username and user for Password,
then click Login.
The JCU
ation page is displayed.
5. In the left-hand menu, click CAMERAS.
The camera pairing page is displayed.
6. Click Discover to all compatible cameras
that are on the same network as the JCU-3.
The left-hand list, DISCOVERED CAMERAS,
shows all compatible thermal cameras that were
discovered.
7. In the DISCOVERED CAMERAS list, select the
camera you wish to pair with the JCU-3, and
click Add–>.
The keypad’s LED backlight
twice to
indicate that pairing was successful. See for
further information on keypad LED status.
The chosen camera is now paired with the
JCU-3 keypad, and moved to the SELECTED
CAMERAS list. Repeat this step for any
additional cameras that you want to pair with the
JCU-3. When you leave the JCU-3
ation
pages the JCU-3 keypad remembers the selected
cameras, and will cycle through the camera list
(if you paired the keypad to more than one
camera) when you click the NEXT CAMERA
button on the keypad.
8. Optionally, before leaving the JCU-3
ation
pages, you can manually connect to one of the
cameras in the SELECTED CAMERAS list, to
that you can control the camera with the
JCU-3 keypad. In the Camera Connect list,
highlight the camera you want to connect to and
click Select
The JCU-3 keypad connects to the camera; you
can now control the camera from the keypad.
The top-right of the CAMERAS page (directly
underneath the Logout button) shows Camera
Connected:, and lists the name of the connected
camera.
9. When you have
pairing cameras and
testing connections, click the Logout button at
the top-right of the page, then close your web
browser.
 Loading...