This document describes a bottom entry flushing kit, including its components, installation, usage, and maintenance. The kit is designed for use in toilet cisterns and includes both a fill valve and a flush valve, along with associated hardware.
Function Description
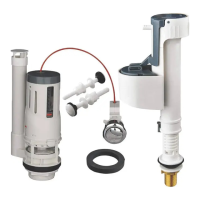
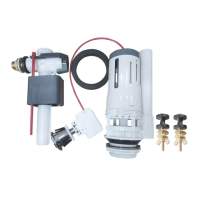
The bottom entry flushing kit is designed to regulate water flow into and out of a toilet cistern. It consists of two main components: a fill valve and a flush valve. The fill valve controls the refilling of the cistern after a flush, ensuring the water level reaches the desired height. The bottom entry design means the water supply connects from the bottom of the cistern. The flush valve, on the other hand, is responsible for releasing water from the cistern into the toilet bowl when activated, initiating the flushing action. This kit supports both full and half flush options, allowing for water conservation.
Important Technical Specifications
The kit includes several components, each with specific dimensions and functions:
- Fill Valve (01. x1): This is the mechanism that controls the water intake into the cistern. It is a bottom entry type, meaning the water supply connects from the bottom. The critical level (CL) of the valve should be around 20 mm above the flush valve overflow or 45 to 52 mm above the water level. Its height is adjustable to accommodate different cistern sizes and desired water levels.
- Flush Valve (02. x1): This valve controls the release of water from the cistern to the toilet bowl. It features adjustable full and half flush settings to optimize water usage. The overflow tube of the flush valve should be positioned between 25 and 32 mm above the water level.
- Flush Button (03. x1): This button is used to activate the flush valve. It typically has two sections for full and half flush options. The larger button section activates the full flush, while the smaller section activates the half flush. The flush volume for both can be adjusted by moving sliders on the flush valve mechanism.
- Water Seal (04. x1): A crucial component for preventing leaks between the cistern and the toilet pan. It is a doughnut-shaped seal that ensures a watertight connection.
- Cistern Screws (05. x2): These screws are used to secure the cistern to the toilet pan or wall.
The fill valve's critical level (CL) must be at least 20 mm above the flush valve overflow or 45-52 mm above the water level. The overflow tube of the flush valve should be adjusted to be 25-32 mm above the water level. The flush pipe connection to the cistern should be a minimum of 50 mm to ensure a proper seal. The button collar can accommodate hole sizes of 19x19 mm or Ø38 mm, depending on the cistern lid.
Usage Features
The kit is designed for ease of installation and adjustment, catering to both new installations and replacements.
Installation:
- Preparation: Before installation, ensure the water supply to the cistern is isolated and the cistern is drained. If replacing existing valves, remove them and clean the cistern thoroughly. Measure the height of the existing overflow pipe (value X) to aid in setting up the new flush valve.
- Fill Valve Adjustment: The fill valve's height can be adjusted by removing a securing clip, rotating the top half to unlock, pulling or pushing the bottom half to the desired height, rotating the top half to lock, and refitting the clip. This adjustment ensures the critical level is correctly positioned relative to the water level and overflow.
- Flush Valve Adjustment: The full and half flush volumes can be adjusted by moving sliders on the flush valve. Lifting a slider reduces water volume, while moving it down increases it. These adjustments can be made before or after installation.
- Flush Valve Installation: The new flush valve is fitted into the cistern hole, ensuring it does not contact the cistern wall or other components. The water seal is then fitted to the underside of the cistern, and the valve is secured with a backing nut, tightened by hand only to prevent damage.
- Cistern Reassembly: The cistern is then reconnected to the toilet pan or wall, ensuring the doughnut seal (04) is in place between the cistern and the pan. Cistern screws are secured by hand.
- Overflow Height Adjustment: The overflow tube of the flush valve is rotated to unlock, adjusted to the desired height (25-32 mm above the water level, or based on value X), and then rotated back to lock.
- Fill Valve Installation: The adjusted fill valve is then fitted to the cistern.
- Button Installation: The new flush button is fitted to the cistern lid, using the appropriate collar for the hole size (19x19 mm or Ø38 mm).
- Water Supply: Once all components are fitted and secured, the water supply can be turned on.
Troubleshooting:
- Continuous water flow into the bowl: First, check if the fill valve is overfilling the cistern, causing water to flow into the flush valve's overflow. If so, reduce the fill valve float height to 25 mm below the overflow height.
- Water not flowing down the overflow: Check if the flush valve seal is closing correctly. Ensure the button is properly fixed to the cable connection and that nothing obstructs the flush valve from closing. The valve can be removed using the quick release method (described in maintenance) to inspect the seal for correct fitting and damage.
- Persistent leakage: If leakage continues after troubleshooting, the valve may be faulty and require replacement.
Maintenance Features
Regular maintenance is crucial for the longevity and optimal performance of the flushing kit.
Fill Valve Maintenance:
It is recommended to clean the diaphragm and filter of the fill valve every 6 months, or more frequently in hard water areas.
- Isolate Water Supply: Turn off the water supply to the cistern.
- Remove Lid: Remove the cistern lid and flush button.
- Access Diaphragm:
- Unscrew the top cap of the fill valve (1).
- Remove the diaphragm (2).
- Clean the diaphragm and the filter (3) under running water.
- Reassemble the diaphragm and top cap.
- Access Filter (Alternative Method):
- Disconnect the water supply pipe from the fill valve (5).
- Unscrew the locking nut (6) from the bottom of the fill valve.
- Remove the fill valve from the cistern.
- Remove the filter (7) from the bottom of the fill valve.
- Clean the filter under running water.
- Reassemble the filter and fill valve, reconnecting the water supply.
Flush Valve Maintenance:
It is recommended to clean the seal of the flush valve every 6 months, or more frequently in hard water areas.
- Isolate Water Supply: Turn off the water supply to the cistern.
- Remove Lid: Remove the cistern lid and flush button.
- Access Seal:
- Disconnect the flush button cable from the flush valve (1).
- Rotate the top half of the flush valve counter-clockwise (2) to unlock it.
- Lift the top half of the flush valve (3) out of the cistern.
- Remove the seal (4) from the bottom of the top half.
- Clean the seal under running water.
- Reassemble the seal and the top half of the flush valve.
- Reinsert the top half into the cistern and rotate clockwise to lock (5).
- Reconnect the flush button cable.
General Safety and Care:
- Do not use sealing compounds during installation, as they can damage plastic components and cause leaks.
- Avoid over-tightening components to prevent damage.
- Do not add chemicals (e.g., disinfectant tablets, bleaches) to the cistern water, as they can damage the product.
- Keep the product and its components out of reach of children.
- If you have limited plumbing experience, consider contacting a professional for guidance.
- Retain all instructions and proof of purchase for future reference and warranty claims. The product comes with a 10-year manufacturer's guarantee against manufacturing defects, provided it is used and maintained according to the instructions. The guarantee excludes diaphragms, flush washers, flush buttons, and seals.