Do you have a question about the Fluke Biomedical ESA612 and is the answer not in the manual?
Instructions for checking the instrument upon receipt for damage.
Contact information for application support and technical questions.
Eligibility criteria and process for product refunds and credits.
Step-by-step guide for returning instruments, including packaging requirements.
Key precautions and warnings for safe use of the analyzer.
Details on the ECG simulation capabilities of the analyzer.
How the analyzer is used to verify patient monitor performance.
Instructions for checking the instrument upon receipt for damage.
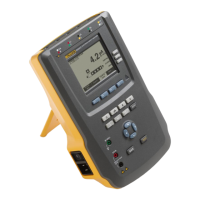
Overview of the analyzer's controls, indicators, and connections.
Diagrams and descriptions of the analyzer's side and top panel connectors.
Instructions on the proper way to hold and carry the ESA612 analyzer.
Guidance on properly connecting the analyzer to a power source for safe operation.
Steps for connecting the Device Under Test (DUT) to the analyzer for testing.
Procedure for powering on the analyzer and initiating self-tests.
Navigating the analyzer's menus to access test and setup functions.
Configuring the Ground Fault Current Interrupter limit for safety tests.
Adjusting the delay for polarity switching to protect internal components.
Methods for adjusting the contrast of the analyzer's LCD display.
Enabling or disabling the audio beeper function on the analyzer.
Accessing and displaying the analyzer's current status and information.
Information on accessing stored measurements and ECG data.
Selecting the appropriate safety standard (e.g., IEC, AAMI) for testing.
Measuring the voltage of the mains input to the analyzer.
Measuring the impedance of the protective earth connection for safety.
Measuring insulation resistance between various points of the DUT and earth.
Measuring the current consumed by the Device Under Test (DUT).
Comprehensive guide to performing various leakage current measurements.
Measuring leakage current flowing in the DUT's protective earth circuit.
Measuring current between the DUT's enclosure and protective earth.
Measuring leakage current between applied parts or lead combinations.
Tests measuring leakage current involving the device's applied parts.
Tests measuring leakage current from the device's enclosure or equipment.
Measuring differential current between live and neutral conductors.
How to use the optional adapter to increase applied part connections.
Performing point-to-point voltage measurements up to 300 volts AC.
Performing point-to-point resistance measurements up to 2.0 Ohms.
Performing point-to-point current measurements up to 10 mA.
Creating Test Record IDs and saving measurements to analyzer memory.
Recalling and viewing previously stored test records from memory.
Removing test records and associated data from the analyzer's memory.
Using Ansur software for automated testing and remote control of the analyzer.
Procedure for checking and replacing internal fuses for electrical protection.
Guidelines for safely cleaning the analyzer and its accessory cables.
Comprehensive technical details including voltage, resistance, and current measurement ranges and accuracy.
| Type | Electrical Safety Analyzer |
|---|---|
| Model | ESA612 |
| Manufacturer | Fluke Biomedical |
| Voltage Range | 0 to 600 V AC/DC |
| Display | LCD |
| Power Supply | AC mains |
| Input Voltage Range | 100-240 VAC |
| Frequency Range | 45 to 65 Hz |
| Current Range | 0 to 20 A |
| Electrical Safety Standards | IEC 60601-1 |