Do you have a question about the Fluke Biomedical medTester 5000C and is the answer not in the manual?
Clarifies warranty voidance if product is serviced by non-Fluke personnel.
Details terms for refunds and credits, including eligibility and conditions.
Emphasizes the importance of reviewing safety markings and instructions before operating the instrument.
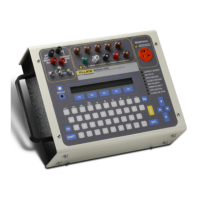
Introduces the medTester 5000C as an automated biomedical equipment test system and data acquisition unit.
Guides users on how to effectively navigate and utilize the operators manual.
Details the default settings configured at the factory for headers, prompts, and other parameters.
Describes the sequence of events and messages displayed when the medTester 5000C is turned on.
Provides step-by-step instructions for installing and enabling software modules from diskettes.
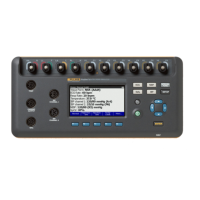
Introduces the main control and interface sections of the medTester 5000C.
Lists and describes the components found on the top panel of the medTester 5000C.
Lists and describes the components found on the rear panel of the medTester 5000C.
Explains how to access and perform manual safety tests via the MANUAL menu.
Explains the process for measuring leakage current using the AAMI load and relevant menu commands.
Details the process for performing lead isolation leakage tests, including safety warnings.
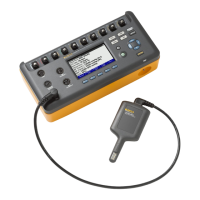
Introduces the toolbox feature and its compatible measurement adapters.
Defines an autosequence as a preprogrammed test sequence for automating testing.
Lists the 10 standard safety autosequences and the order of tests they perform.
Explains the different methods available for selecting an autosequence on the medTester.
Details the prompts that appear before an autosequence to gather device information.
Provides a step-by-step guide to customizing a preprogrammed safety autosequence.
Details the 17 autosequence prompts, including which ones can be renamed, and their descriptions.
Covers configuring the test tag output, including enabling/disabling fields and selecting the printer port.
Explains how to output performance waves to patient monitors if the Waveform/Extended Testing module is installed.
Lists and describes the available waveform groups (PERF, ECG, ARRHY1, ARRHY2, ARRHY3) and their remote commands.
Explains how performance wave tests can be executed at the end of safety autosequences.
Details how to view previously recorded tests directly on the medTester display.
Explains how to access printing options to print records in various ways.
Explains how to search for records using a search string, such as an operator code or device name.
Lists keyboard shortcut commands for direct access to memory functions, bypassing menu navigation.
Explains the capability of using 20 autosequences for testing defibrillators with Fluke analyzers.
Lists the available defibrillator autosequence names, keyboard shortcuts, and menu commands.
Details the connection and initial setup required to run defibrillator autosequence tests.
Guides users on viewing and customizing current defibrillator autosequences.
Introduces the 10 autosequences for testing IV pumps using Fluke Biomedical IV pump analyzers.
Guides users on configuring the medTester for specific IV pump analyzers like IDA 4 Plus or Infutest.
Details the connection and setup for running IV pump autosequence tests with the CuffLink.
Guides users on viewing and customizing current IV pump autosequences.
Defines a checklist as a list of instructions for running tests and prompts for operators.
Guides users on how to access and run checklists from the medTester's CHECK menu.
Categorizes the different types of checkitems that can be included in a checklist.
Explains how the medTester 5000C can control other instruments via serial ports.
Differentiates between local and remote operating modes and their input methods.
Details the two serial ports (COM1, COM2) and their functions for input, output, and communication.
Lists available baud rates and character transmission settings for serial ports.
Explains how to control the medTester via a serial port using remote commands, disabling the keyboard.
Highlights the features of the Wedge adapter, including port expansion and keyboard interface.
Details how the Wedge adapter expands serial communication ports from two to eight for connecting multiple devices.
Provides instructions for installing the Wedge adapter onto the medTester 5000C.
Describes the three primary purposes for configuring Wedge ports: normal I/O, autosequences, and checklists.
Introduces ESU autosequences for testing electrosurgical units using Fluke Biomedical ESU analyzers.
Lists ESU autosequence names, keyboard shortcuts, and menu commands.
Details the connection and setup for running ESU autosequence tests with Fluke ESU analyzers.
Guides users on viewing and customizing current ESU autosequences.
Introduces SPO2 autosequences for testing pulse oximeters with Fluke SPO2 simulators.
Lists SPO2 autosequence names, keyboard shortcuts, and menu commands for the Oxitest PLUS.
Details the connection and setup for running SPO2 autosequence tests with SPO2 simulators.
Explains the SPO2 simulation steps, including parameters like SPO2 level, heart rate, and amplitude.
Introduces Pacer autosequences for testing transcutaneous pacemakers with Fluke analyzers.
Lists Pacer autosequence names, keyboard shortcuts, and menu commands.
Details the connection and setup for running Pacer autosequence tests with the Impulse 4000.
Explains the pulse tests performed by the medTester, controlling the Impulse 4000 for pacing measurements.
Introduces NIBP autosequences for testing non-invasive blood pressure monitors with the Fluke CuffLink.
Lists NIBP autosequence names, keyboard shortcuts, and menu commands.
Details the connection and setup for running NIBP autosequence tests with the CuffLink.
Explains the NIBP tests performed by the medTester, controlling the CuffLink for measurements.
| Category | Medical Equipment |
|---|---|
| Device Name | Fluke Biomedical medTester 5000C |
| Type | Electrical Safety Analyzer |
| Display | LCD |
| Frequency | 50/60 Hz |
| Power Supply | 100 to 240 V AC, 50/60 Hz |
| Operating Temperature | 0°C to 40°C |
| Storage Temperature | -20°C to 60°C |
| Humidity | 10 % to 75 % RH, non-condensing |
| Safety Standards | IEC 60601-1 |
| Current Range | 0 to 20 A |