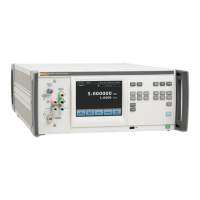
Features
Front Panel Features 3
3-3
Table 3-1. Front Panel Features (cont.)
Ref No. Name Function
Front USB
Port
Insert a USB thumb drive into this port to save Calibration reports and update
the Product firmware.
Range Keys
These keys select a specific range and lock the numeric range (turning off
auto ranging if active). Select the Auto Range or Range Lock softkeys on
the display to return to auto ranging after the range is locked. See Selecting
Auto or Locked Range in Chapter 4.
Power button
Push the lighted power button to turn on or off the Product. See the Master
ON/OFF Switch description below.
Reset key Push to return the Product to its initial power-up state.
Guard Key
(External
Guard)
Opens and closes an internal connection between the GUARD and the
INPUT 1 shell or INPUT 2 LO binding post depending on which input is
selected.
The Product powers up with the internal GUARD connection closed.
Push to open the internal GUARD connection (the Guard ON indicator shows
in the upper corner of the display). Also see GUARD binding post.
AUX key
Selects the AUX and INPUT 2 LO binding posts as the active input. These
binding posts are only for connection through the accessory 5790A-7001
adapter cable to a Fluke A40 or A40A shunt.
Wideband
key
Selects the WIDEBAND 50 Ω Type "N" connector as the active input, but
only if a 5790B/3 or 5790B/5 Wideband Module option is installed. This key
generates a beep if no Wideband Module is installed.
INPUT 1 and
2 keys
INPUT 1 key: Selects the INPUT 1 Type "N" connector as the active input.
INPUT 2 Key: Selects the INPUT 2 binding posts as the active input.
Hazardous
Voltage
indicator
This symbol lights up to show that hazardous voltage ( ≥22 V) is (or may be)
present. This symbol lights up when voltages >22 V are present on the
terminals and is always illuminated when using the high voltage ranges
(220 V, 700 V, and 1K V).
[1] Visual Connection Management Terminals
TM
. The appropriate terminals light up in green to show the
proper connection points depending on the input selected. The lights offer visual guidance for cable
connections for specific functions, protect the user by indicating which terminals are active, and protect the
Product from damage from incorrect connections.
 Loading...