PART 2-1 - General Brake Service
2-5
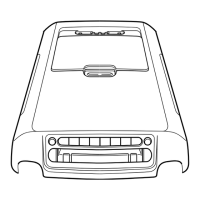
APPROXIMATELY
45°
HI 300-A
FIG. 7—Wrench
for
Bleeding
Brake Hydraulic System
cylinder. Attach
a
rubber drain tube
to
the
bleeder fitting.
The end of the
tube should
fit
snugly around
the
bleeder fitting.
3.
Submerge
the
free
end of the
tube
in a
container partially filled
with clean brake fluid,
and
loosen
the
bleeder fitting approximately
3/4
turn.
4.
Push
the
brake pedal down slow-
ly through
its
full travel. Close
the
bleeder fitting, then return
the
pedal
to
the
fully-released position. Repeat
this operation until
air
bubbles cease
to appear
at the
submerged
end of the
bleeder tube.
5.
When
the
fluid
is
completely free
of
air
bubbles, close
the
bleeder
fit-
ting
and
remove
the
bleeder tube.
6. Repeat this procedure
at the
brake wheel cylinder
on the
opposite
side.
Refill
the
master cylinder reser-
voir after each wheel cylinder
is
bled
and install
the
master cylinder cover
and gasket.
Be
sure
the
diaphragm
type gasket
is
properly positioned
in
the master cylinder cover. When
the
bleeding operation
is
completed,
the
fluid level should
be
filled
to
within
1/4
to 1/2
inch from
the top of the
reservoirs.
7.
If the
primary (front brake)
sys-
tem
is to be
bled. Repeat steps
2
through
6 at the
right front brake
caliper
or
cylinder
and
ending
at the
left front brake caliper
or
cylinder.
8.
Be
sure that
the
front brake
pistons
are
returned
to
their normal
positions
and
that
the
shoe
and
lining
assemblies
are
properly seated
by
depressing
the
brake pedal several
times until normal pedal travel
is
established.
9. Centralize
the
pressure differen-
tial valve. Refer
to the
Centralizing
the Pressure Differential Valve
pro-
cedures which follow.
PRESSURE BLEEDING
Bleed
the
longest lines first.
The
bleeder tank should contain enough
new Rotunda Brake Fluid
to com-
plete
the
bleeding operation.
Use
Rotunda Brake Fluid—Extra Heavy
Duty Part Number C6AZ-19542-A
(ESA-M6C25-A)
or
equivalent
for all
brake applications.
The
brake fluid
is
colored blue
for
identification
pur-
poses.
Do not mix low
temperature
brake fluid with
the
specified brake
fluid during
the
bleeding operations.
Never re-use brake fluid that
has
been
drained from
the
hydraulic system.
The tank should
be
charged with
ap-
proximately
10 to 30
pounds
of air
pressure. Never exceed
50
pounds
pressure.
1.
Clean
all
dirt from
the
master
cylinder reservoir cover.
2.
Remove
the
master cylinder
reservoir cover
and
rubber gasket,
and fill
the
master cylinder reservoir
with
the
specified brake fluid. Install
the pressure bleeder adapter tool
to
the master cylinder,
and
attach
the
bleeder tank hose
to the
fitting
on the
adapter.
Master cylinder pressure bleeder
adapter tools
can be
obtained from
the various manufacturers
of
pressure
bleeding equipment. Follow
the in-
structions
of the
manufacturer when
installing
the
adapter.
3.
If the
master cylinder
is
equipped with
a
bleed screw, loosen
the bleed screw
and
bleed
the
master
cylinder until
the
fluid
is
free
of air
bubbles; then, tighten
the
bleed
screw.
Do not use the
secondary
pis-
ton stop screw, located
on the
bottom
of
the
master cylinder,
to
bleed
the
master cylinder.
Loosen
the
primary
and
secondary
tube nuts
at the
master cylinder
of
those master cylinders without bleed
screws
and
bleed
the
master cylinder
until
the
fluid flow
is
free
of air
bubbles, then tighten
the
tube nuts
to
the specified torque.
Do not
over-
tighten.
4.
If the
rear wheel cylinders
the,
secondary brake system,
are to be
bled, position
a 3/8
inch
box
wrench
(Fig.7)
on the
bleeder fitting
on the
right rear brake wheel cylinder.
At-
tach
a
bleeder tube
to the
bleeder
fitting.
The end of the
tube should
fit snugly around
the
bleeder fitting.
5.
Open
the
valve
on the
bleeder
tank
to
admit pressurized brake fluid
to
the
master cylinder reservoir.
6. Submerge
the
free
end of the
tube
in a
container partially filled
with clean brake fluid,
and
loosen
the
bleeder fitting.
7.
When
air
bubbles cease
to ap-
pear
in the
fluid
at the
submereged
end
of
the
bleeder tube, close
the
bleeder
fitting
and
remove
the
tube.
8. Repeat steps
3
through
7 at the
left rear wheel cylinder.
9.
If the
vehicle
is
equipped with
disc brakes, repeat steps
4
through
7,
starting
at the
right front disc
caliper
and
ending
at the
left front
disc caliper.
10.
If the
vehicle contains drum-
type front brakes
and the
primary
(front) brake system
is to be
bled,
repeat steps
4
through
7,
starting
at
the right front wheel cylinder ending
at
the
left wheel cylinder.
11.
When
the
bleeding operation
is
completed, close
the
bleeder tank
valve
and
remove
the
tank hose from
the adapter fitting.
12.
On
disc brake equipped vehi-
cles,
be
sure that
the
front brake
pistons
are
returned
to
their normal
positions
and
that
the
shoe
and lin-
ing assemblies
are
properly seated
by
depressing
the
brake pedal several
times until normal pedal travel
is
established.
13.
Remove
the
Pressure Bleeder
Adapter Tool. Fill
the
master cylinder
reservoirs
to
within
1/4
inch from
the
top.
Install
the
master cylinder
cover
and
gasket.
Be
sure
the Dia-
phragm type gasket
is
properly posi-
tioned
in the
master cylinder cover.
14.
Centralize
the
pressure differ-
ential valve
as
follows.
CENTRALIZING
THE
PRESSURE DIFFERENTIAL
VALVE
After
a
failure
of the
primary
(front brake)
or
secondary (rear
brake) system
has
been repaired
and
bled,
the
dual-brake warning light
will usually continue
to be
illumi-
nated
due to the
pressure differential
valve remaining
in the
off-center
ps-
sition. Front wheel balancing opera-
tions
on
disc brake equipped vehicles
can also cause
a
pressure differential
in
the
primary (front) brake system,
illuminating
the
brake warning light.
To centralize
the
pressure differen-
tial valve
and
turn
off the
warning
light after
a
repair operation,
a
pres-
sure differential
or
unbalance condi-
tion must
be
created
in the
opposite
brake system from
the one
that
was
repaired
or
bled last.
1.
Turn
the
ignition switch
to the
ACC
or ON
position. Loosen
the dif-
ferential valve assembly brake tube
nut
at the
outlet port
on the
opposite
side
of the
brake system that
was
wheel balanced, repaired and/or bled

 Loading...