Do you have a question about the Forest-Master ULTIMATE Sawhorse and is the answer not in the manual?
Lists all tools necessary for assembly.
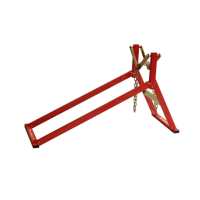
Connects the left upright and v-blades using M12 bolt and nut.
Connects the right upright and v-blades using M12 bolt and nut.
Joins the two upright assemblies using M10 bolts and nuts.
Attaches front legs to the uprights using M6 bolts and nuts.
Connects the brace between the front legs using M6 bolts and nuts.
Secures the front foot to the front legs with M6 bolts and nuts.
Connects back legs to the uprights using M8 bolts and nuts.
Attaches the back foot to the back legs using M6 bolts and nuts.
Completes assembly by fully tightening all nuts and bolts.
Opens legs to maximum and places sawhorse on stable ground.
Inserts locking pins and bolts for cutting heavy logs.
Raises log end and places it in v-blades with specified overhang.
Passes chain ends through tubes, ensuring equal ground distance.
Pushes log end down and checks chain slide through tubes.
Removes pressure, allowing chain to lock the log in tubes.
Guides cutting sequence maintaining specific log length proportions.
| Brand | Forest-Master |
|---|---|
| Model | ULTIMATE Sawhorse |
| Category | Racks & Stands |
| Language | English |