p. 7
AVM Around Vehicle Monitoring System Installation Guide
inView 360 HD Installation Guide
© Safe Fleet | July 2020 | All rights reserved
Document Number: XE-SNB100-C00-INSTALLPM-R0A
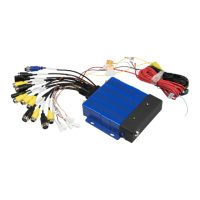
Mounting the ECU
The ECU should be mounted in a location underneath the dashboard or somewhere within the vehicle where it is
protected from water, dirt, and physical contact, and it should have ample ventilation�
Accessibility
Position the ECU so that the front side of the unit is accessible� There are two reasons for accessing the front of the ECU:
• When an operator wants to insert and/or remove an SD card for transferring video�
• When a technician wants to connect a USB drive during system calibration�
Routing Power, Signals, and Buttons
After you have selected an optimal location for the ECU, and mounted it, you can begin routing the power and signal
cables, as well as the push buttons�
Camera Extension Cables
Push Button
View Select Signal Cable Harness
Camera extension cables are labeled and come in 3 different lengths:
• 8m Front
• 12m Left, Right
• 18m Back
Pushbuttons are color-coded:
• Red (Event) button is pressed to create a short video when an event happens�
• Green (View) button is used to cycle through the different camera views�
• Black (Outrigger/Overlay) button gives drivers access to extended overlay views�
Pushbutton extension cables are labeled:
• Event
• Driver
• Outrigger
NOTE: Spacing the Calibration Pads
It is important that you use the correct button and camera extension cables� They are labeled for your convenience�
NOTE: Using the Correct Cables
 Loading...