MAINTENANCE
Bulb Replacement NightMaster
1. Ensure power is OFF and the lamphead is cool to the touch prior to replacing the bulb.
2. Ensure the replacement bulb has the same voltage and wattage rating.
3. Loosen the two screws on each side of the lamphead. Open the glass cover (the gasket may also come off).
4. Slide the bulb sideways into the spring contact and lift it out from the opposite side.
Note: When handling the new bulb avoid touching it except on the flat seal at either end. (Grease or oily fingerprints can cause
damage the quartz bulb.) If the bulb is accidently touched, gently wipe it clean with alcohol.
5. Check both lamp base contacts to be sure they are perfectly clean.
6. Push one end of the bulb into the spring contact until the other end can be placed into the opposite contact. Rotate the lamp
back and forth about its axis to ensure adequate seating of contacts.
Caution: Do not operate the light with the front glass removed.
7. Ensure the gasket is in place. Close the glass cover and tighten the two screws. Do not over tighten the screws.
Note: Bulb life is extended when the lamphead is mounted so the bulb is mounted in a horizontal position.
Bulb Replacement Triple Cluster
Requires a 12 Volt, 100 Watt, PAR 46 Bulb
1. Ensure power is OFF and the lamphead is cool to the touch prior to replacing the bulb.
2. Ensure the replacement bulb has the same voltage and wattage rating.
3. Remove the three screws (newer installations have one screw) and the collar that hold the bulb in place.
4. Remove the three wires one at a time from the bulb and connect them to the same terminal on the new bulb.
5. Put the new bulb in position and set the collar in place.
6. Install and tighten the screw(s).
Bulb Replacement NightMaster
NIGHTMASTER Triple
Cluster PAR 46 Bulb
Black
Wire
White
Wire
Red
Wire
Rear View of
Bulb
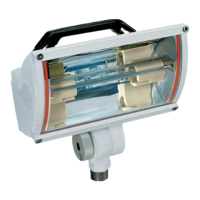
Glass
Cover
Screw
Glass Cover
Hinge
NIGHTMASTER
LAMPHEAD
Smaller NightMaster lampheads
will have two screws on the side.
Larger lampheads will have two
screws on the top.
Wiring
12/24 VDC
Connect the BLACK wire to GROUND.
Connect the WHITE or RED wire to POWER.
120/240 VAC
Connect the GREEN wire to chassis GROUND.
Connect the WHITE wire to RETURN.
Connect the BLACK wire to POWER.
 Loading...