1-800-672-4399
Available exclusively at
1-800-672-4399
Available exclusively at
PART 1 - INSTALL THE GATE
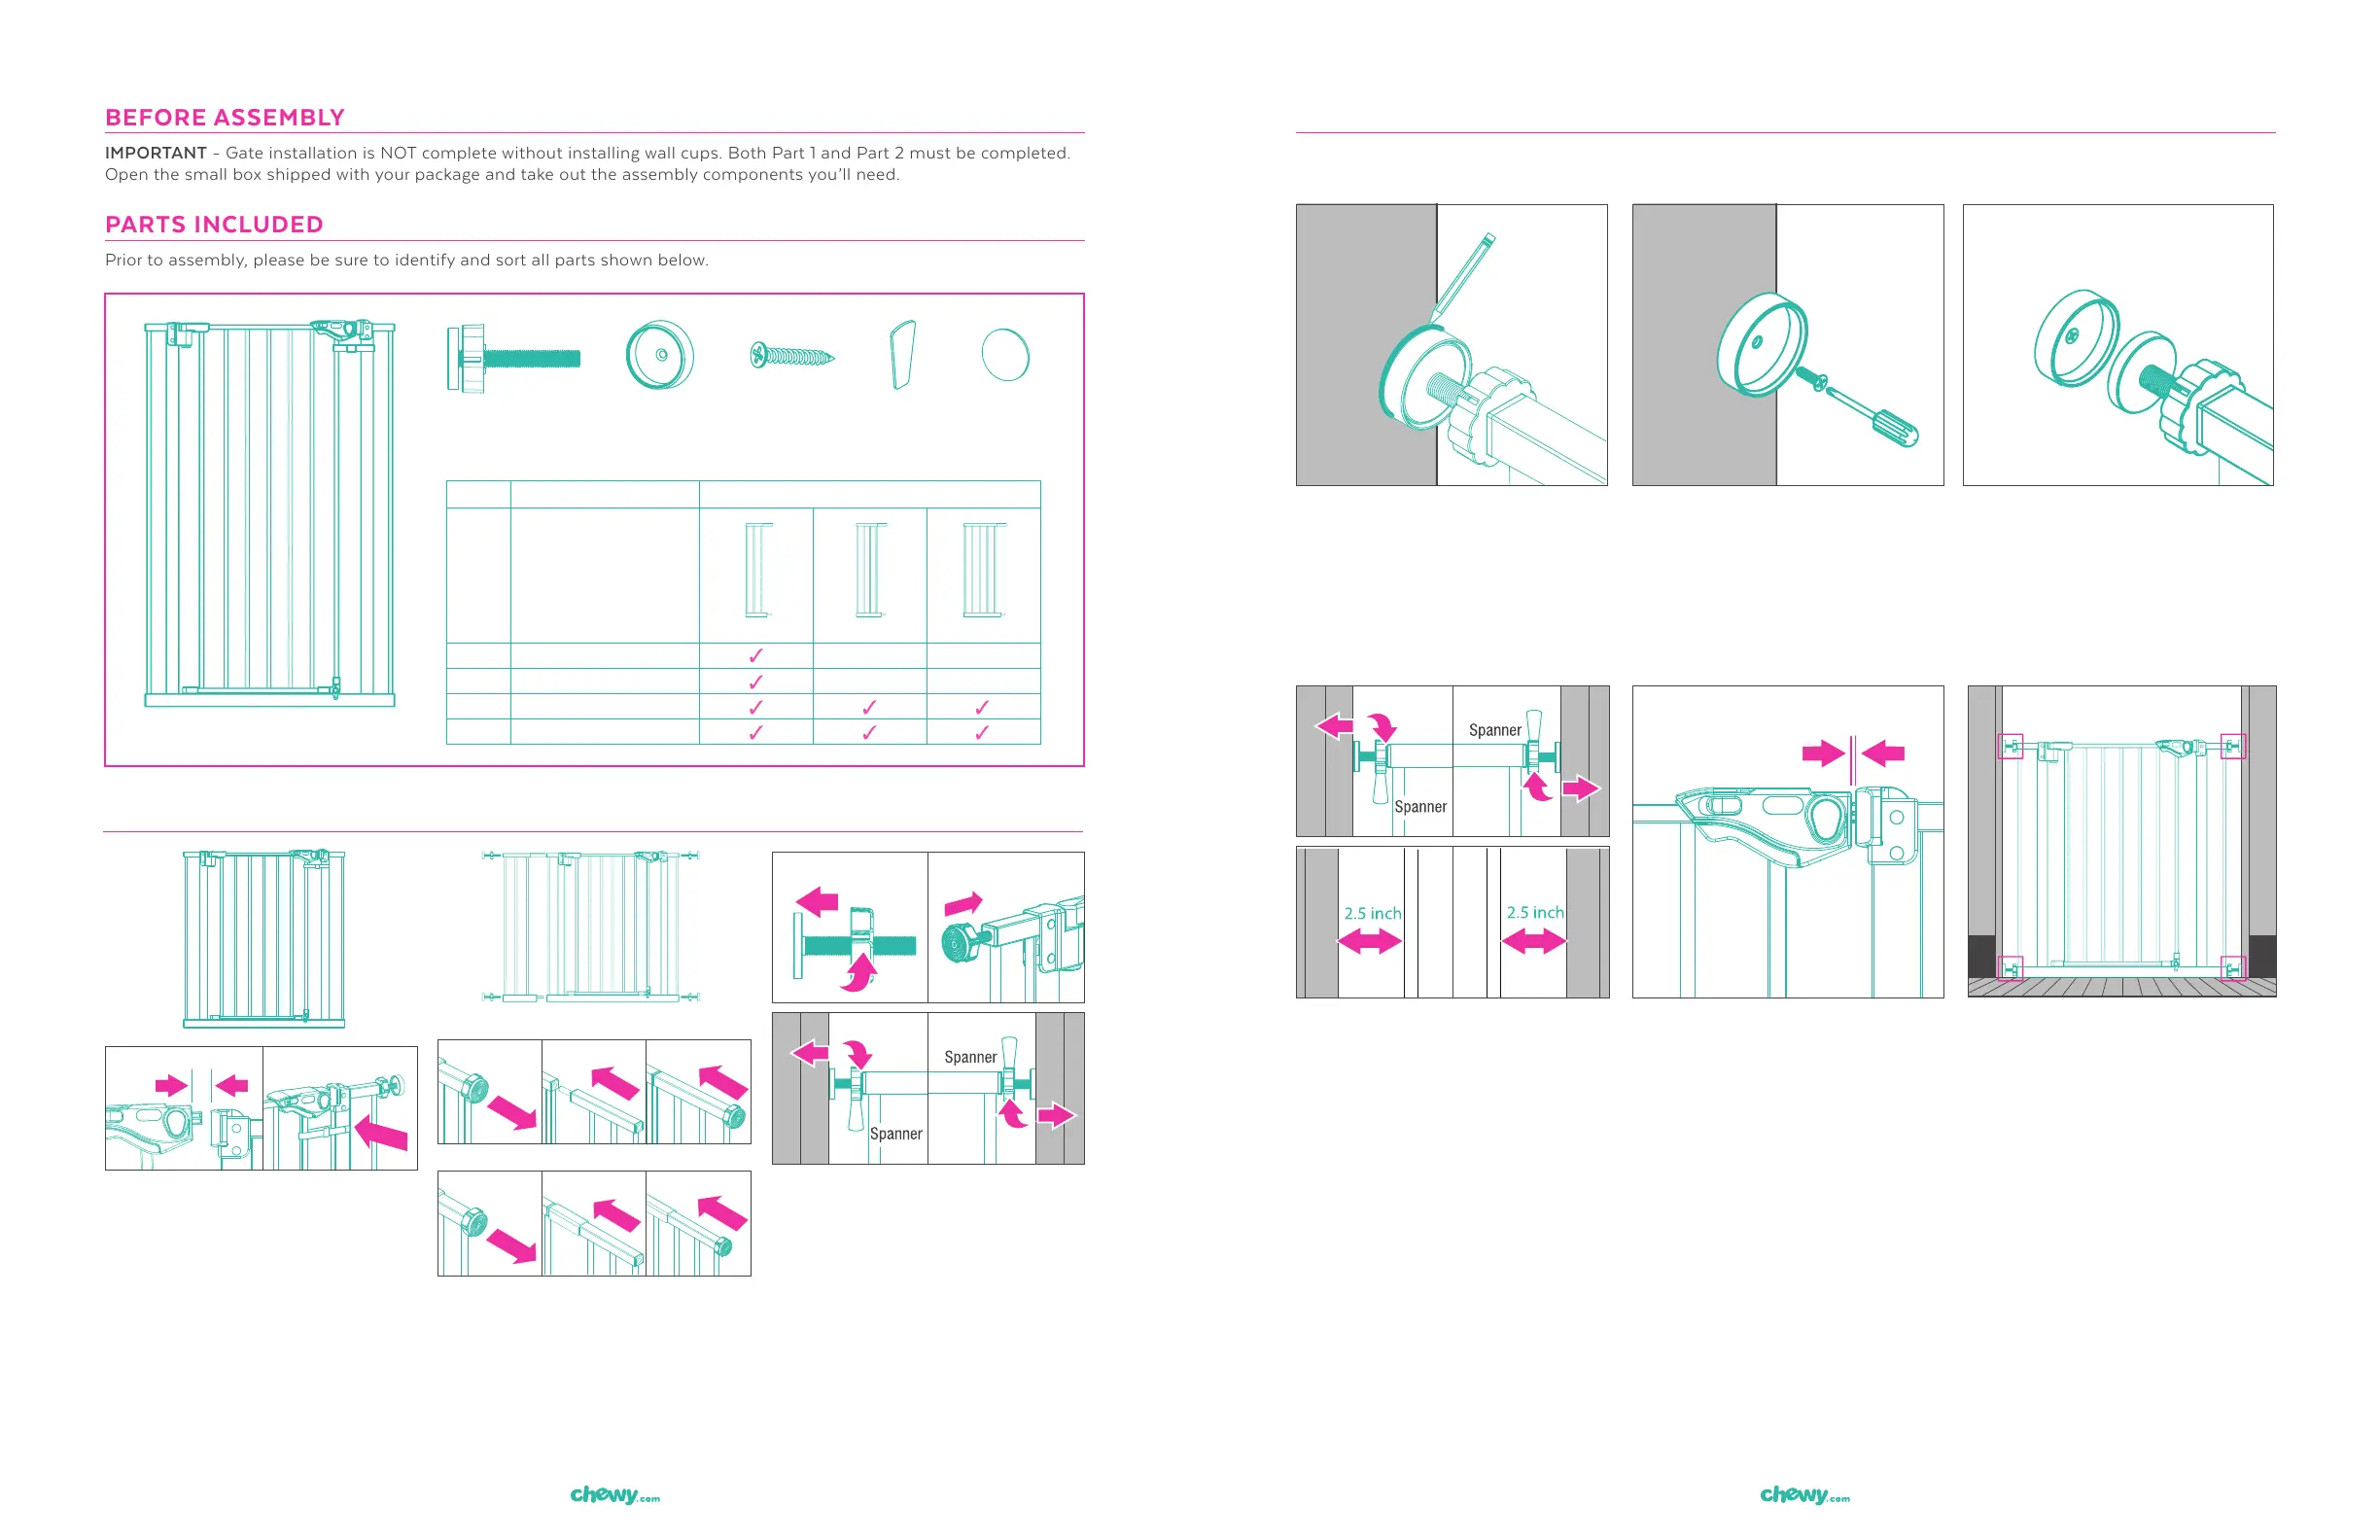
PARTS INCLUDED
Prior to assembly, please be sure to identify and sort all parts shown below.
BEFORE ASSEMBLY
IMPORTANT - Gate installation is NOT complete without installing wall cups. Both Part 1 and Part 2 must be completed.
Open the small box shipped with your package and take out the assembly components you’ll need.
PART 2 - ATTACH THE WALL CUPS
IMPORTANT- Never install this gate without the wall cups! Setting up the wall cups will make it difficult to relocate the
gate. Therefore, it is IMPORTANT to install the wall cups only after you find the perfect spot for your gate.
A Gate Frame (1)
B Threaded
Spindle Rods (4)
D Screws (6)
Requires a
Phillips screwdriver
C Wall Cups (4) E Spanner (1) F Double
Sided Foam
Tape (4)
EXTENSIONS INCLUDED
SKU DESCRIPTION 6 in 8 in 12 in
186820 Frisco Extra Tall Pet Gate, Black
186821 Frisco Extra Tall Pet Gate, White
186823 Frisco Extra Wide Pet Gate, Black
186824 Frisco Extra Wide Pet Gate, White
EXTRA TALL
EXTRA WIDE
Figure 1-11
Figure 1-1
Figure 1-3
Figure 1-6
Figure 1-9
Figure 2-6
Figure 2-1 Figure 2-2
Figure 2-8
Figure 2-3
Figure 2-9
Figure 1-12
Figure 2-4 Figure 2-5
Figure 1-2
Figure 1-4
Figure 1-7
Figure 1-5
Figure 1-8
Figure 1-10
Figure 2-7
STEP 1 Set up the gate in a doorway
opening where you’d like to use it. Make
sure the bottom of the gate is touching the
floor and that the gate is not at an angle,
i.e. tipping forward or backward. Do not
install at top of stairs.
NOTE: You’ll notice a gap between the two
sides of the door latch at this point (Figure
1-1). This is normal and the gap will close once
you tighten the gate in the doorway opening.
Do not remove the zip tie until installation
is complete (Figure 1-2).
ADDING A GATE EXTENSION
(OPTIONAL)
If using a gate extension, install the extension
at this point. Choose the side of the gate to
be extended and with the top and bottom
threaded spindle rods removed, slide the
extension into the gate. Do not use more
than two extensions per side of the gate.
STEP 2 Locate the threaded spindle rods
and twist the adjustment wheels until they
are at the midpoint of the bolt (Figure 1-9).
Place the threaded spindle rods into all (4)
holes at each of the (4) corners on the gate
(Figure 1-10). Rotate the adjustment wheels
using either your hands or the provided
spanner to pressurize the gate against the
doorway opening until the gate is secure
and the gate door latch connects together.
HINT: Spin the spindle rods so they move
toward the gate (Figure 1-11 & 1-12).
STEP 1 First, you’ll need to mark up
where the wall cups should go. Follow
steps for Part 1 to set up the gate. Once
installed and pressurized, use a pencil to
mark the placement of the wall cups by
circling where the threaded spindle rods
touch the wall (Figure 2-1).
TIP: Alternate rotating the adjustment
wheels on all (4) sides to ensure equal
spacing on all (4) threaded spindle rods
(Figure 2-4 & 2-5). The ideal spacing on
each side is about 2.5 inches (Figure 2-6
& 2-7).
NOTE: The ideal placement for the
gate is completely flat on the floor with
a maximum floor clearance of 3/16 of
an inch.
STEP 2 Locate the wall cups. Place them
on the (4) wall markings drawn in Step 1.
STEP 3 Use the included screws and
a Phillips screwdriver to install the wall
cups. You can also use the double-sided
foam tape provided with the assembly
components instead.
STEP 5 Make sure to maintain a gap of
.060 –.080 of an inch (the thickness of a
nickel/penny) between the left and right
parts of the door latch (Figure 2-8).
STEP 6 Check that the gate is properly
installed by giving the frame a light tug
and ensuring all the corners are secure with
the threaded spindle rods and wall cups.
HINT: You should not be able to spin the
spindle rods toward the gate any further.
STEP 4 Now follow directions for Part 1
again to set up the gate. This time ensure
the threaded spindle rods are securely
inserted into the wall cups.
 Loading...