Home
Fronius
Welding System
THP 120 - 300 SH
Page 24
Fronius THP 120 - 300 SH - Page 24
64 pages
Manual
To Next Page
To Next Page
To Previous Page
To Previous Page
Loading...
(2)
(1)
(1)
(1)
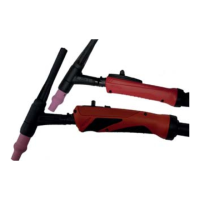
1
Close the hand grip, connect the user
interface and secure with three TX 8
screws (1)
T
ightening torque: 0.6 Nm
2
Slide on the union nut (2) and close
3
Attach torch body according to the
“Attaching the torch body” chapter
24
23
25
Table of Contents
Main Page
Table of Contents
3
Foreword and Safety Instructions
5
Safety
5
National Fronius Technical Support Team (TSN)
5
General
6
Tools and Measurement Devices
6
Function Overview
6
Troubleshooting
6
Replacing Components
6
Testing Following Repairs
6
Tools and Measurement Devices
7
General
7
Required Tools
7
Tool Adapters
7
Measuring and Inspection Equipment
7
Auxiliary Materials
7
Function Overview
9
Torch Body
9
Hosepack
9
F++ Connection
9
Troubleshooting
10
General
10
Troubleshooting Table
10
Replacing Components
12
Safety
12
ESD Guidelines
12
Tightening Torques
12
THP 160 - 500I
13
Changing the Torch Body
13
Replacing the User Interface
14
Replacing the Slide
14
Opening the Hand Grip
15
Replacing the Socket Housing
15
Retrofitting Tigi LED Insulation(I Version Only)
17
Replacing the LED (I Version Only)
17
Replacing the Coupling Housing
18
Opening the F++ Connection
20
Replacing Hose Components
20
Closing the F++ Connection
23
Closing the Hand Grip
23
THP 160 - 500D
25
Changing the Torch Body
25
Replacing the User Interface
26
Replacing the Slide
26
Opening the Hand Grip
27
Replacing the Socket Housing
27
Replacing the Coupling Housing
29
Opening the F++ Connection
30
Replacing Hose Components
31
Closing the F++ Connection
34
Closing the Hand Grip
34
THP 120 - 300 SH, Without 150 SH
36
Changing the Torch Body
36
Opening the Hand Grip
37
Replacing the User Interface
37
Replacing the Slide
38
Replacing the Socket Housing
39
Replacing the Coupling Housing
41
Opening the F++ Connection
42
Replacing Hose Components
43
Closing the F++ Connection
45
Closing the Hand Grip
46
HPT 220I and HPT 400I
48
Preparing Components for Replacement
48
Removing, Replacing, and Fitting the Hosepack
50
Replacing the Protective Hose
52
Fitting Components after Replacement
53
Testing Following Repairs
56
Test Process
56
Mechanical Inspection/Pp-SER-2010
56
Insulation Test/Pp-SER-2010
56
Gas Flow Rate and Leak Test/Pp-SER-2001
57
Water Flow Rate and Leak Test/Pp-SER-2001
58
Electrical Testing of Operating Elements and Displays
59
Current Load Test/Voltage Drop Measurement
61
Related product manuals
Fronius TPS/i
88 pages
Fronius TS 4000
116 pages
Fronius TPS 320i
228 pages
Fronius TPS 600i
228 pages
Fronius TPS 500i
228 pages
Fronius TPS 400i
228 pages
Fronius TTB 160 G
304 pages
Fronius TPS/i Push
152 pages
Fronius TPS 2700 MV
92 pages
Fronius TPS 5000 MV
92 pages
Fronius TransTig 170
100 pages
Fronius TRANSTIG 330
89 pages