Specification
Item Number / Model Name CK-8090 / Energy BB86 Crankset
Item Number / Model Name CK-C8090 / Energy compact BB86 Crankset
Item Number / Model Name CK-8090 / Energy Triple BB86 Crankset
Item Number / Model Name CK-C6030 / TriMax TT Compact BB86 Crankset
Item Number / Model Name CK-6020 / Gossamer BB86 Crankset
Item Number / Model Name CK-C6020 / Gossamer Compact BB86 Crankset
Item Number / Model Name CK-6020 / Gossamer Triple BB86 Crankset
Item Number / Model Name CK-6021 / Gossamer Pro BB86 Crankset
Item Number / Model Name CK-C6021 / Gossamer Pro Compact BB86 Crankset
Item Number / Model Name CK-6021 / Gossamer Pro Triple BB86 Crankset
Item Number / Model Name CK-C9186 / Afterburner compact 386 BB92 Crankset
Item Number / Model Name CK-C7186 / Comet compact 386 BB92 Crankset
Item Number / Model Name CK-9180 / Afterburner BB92 Crankset
Item Number / Model Name CK-7080 / V-Drive BB92 Crankset
Item Number / Model Name CK-7152 / Comet BB92 Crankset
Item Number / Model Name CK-9162 / Gravity Light BB92 Crankset
Type
BB BB Shell Width Item Number
ROAD
BB-AL86/SLE 86.5mm
CK-8090、CK-C8090、CK-C6030、CK-
6020、CK-C6020、CK-6021、CK-C6021
MTB
BB-ALM92/SLE
92mm
89.5 mm★
CK-C9186、CK-C7186、CK-9180、CK-
7080、 K-7152、CK-9162
★2.5mm spacer is needed between drive side crank and bottom bracket bearing shield; not included
with FSA BB92 Kit.
Components
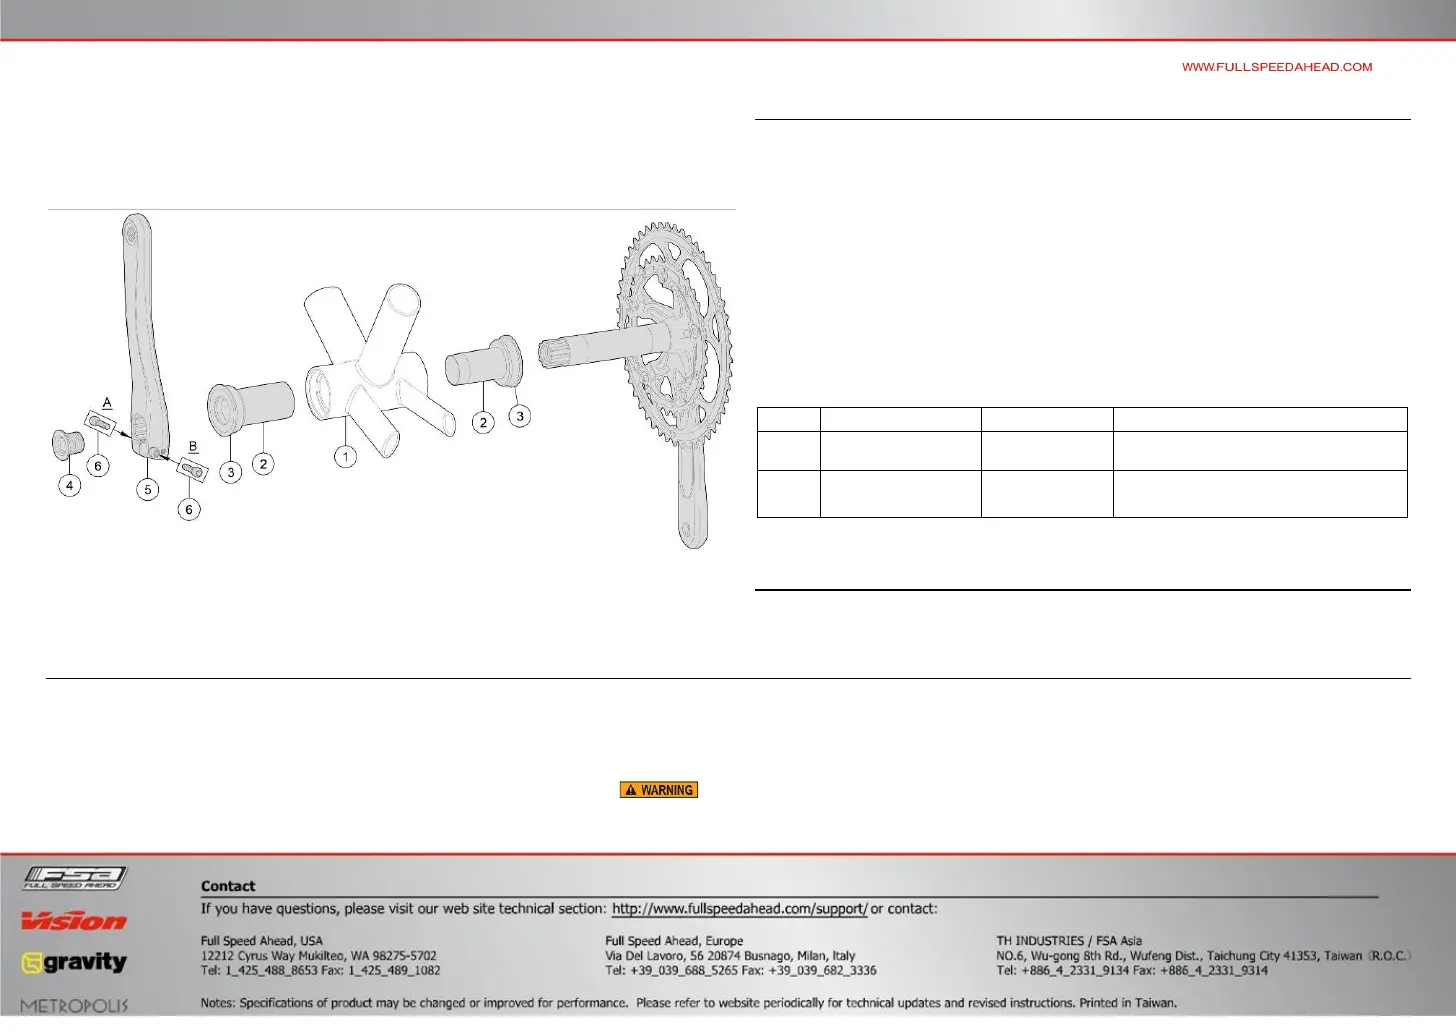
Follow the assembly order in the illustration:
① Bottom Bracket Shell
② BB Sleeve x2
③ Bearing Cup x2
M18 Endbolt x1④
Left Cra⑤ nk x1
M6 Pinch Bolt x2⑥
Crankset Installation
1. Ensure the Bottom Bracket Shell ① is BB86 (for Road) and BB92 (for MTB) compatible and has an overall width of 86.5mm (for Road) and 92mm (for MTB).
2. Follow assembly order as pictured above. (Note: bottom bracket should be already installed as instructed earlier in instruction).
3. Apply a thin layer of grease on the spindle surfaces which contact bearing. Insert the drive crank into the right side of BB shell. Take great care not to damage the plastic covers of the bearing cups.
4. Apply a thin layer of grease on the engagement teeth the left spindle. (Note: Engagement teeth should be fully exposed on the left, non-drive side of the bottom bracket. Alloy cranksets do not require a wave spring
washer).
5. Install the non-drive crankarm ⑤. Make sure engagement teeth of spindle and left arm insert are seated correctly before tightening crankbolts ④ & ⑥. Make sure spindle engages the non-drive arm fully. The spindle
must be inserted passed the center of the outermost pinch bolt for proper engagement. If spindle engagement is not sufficient, the crankarm can loosen while riding causing loss of control of bicycle
and potential injury.
6. Tighten M18 endbolt ④ to a torque of 7.1-15 kgf.cm / 0.7-1.5 Nm / 6.2-13 in.lbs. Always use a calibrated torque wrench to tighten the endbolt.
7. The M6 pinch bolts ⑥ must be tightened by turning each bolt 1 / 2 turn at a time so both bolts tighten evenly to a torque of 110-150 kgf.cm / 10.8-14.7 Nm / 95-130 in.lbs.
 Loading...