4-2. Duct installation
When there is obstacles at rear, and the side walls protruding front ward, install a duct as shown in
figure below.
Installation of the unit without duct may lead capacity degradation caused by short circuit, operation
stop by high pressure protection, or other malfunction.
a
b
a: Protruding distance of side walls
b
: Length of the duct
a ≤ b
¢
About the duct
The duct needs to be purchased locally. When installing the duct, be careful of the followings:
• Do not cover the service panel. If covered, the panel cannot be opened for servicing.
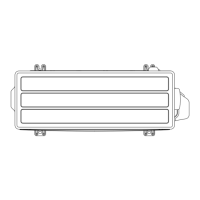
• Screw holes for installing the duct are placed on the front panel. Fix the duct by using a Ø5 mm
tapping screw. (Refer to following diagram for the location.)
Models: AOU72RLAVL, AOU96RLAVL, and AOU120RLAVL
Unit: in (mm)
Front panel
Top panel
Service panel
X1
X1
X1
X2 X2
X2
60-1/2 (1,536)
59-1/16 (1,500)
44-5/16 (1,125)
29-1/2 (750)
14-3/4 (375)
2-15/16 (74.5)
20-5/16 (516)
10-9/16
(268)
11-1/16
(281)
1-5/16
(33.5)
23-3/4 (603.5)
26-7/16 (672)
1-5/16
(33.5)
NOTES:
•
X1: Remove the screw securing the top panel, and reuse it for fixing the duct.
• X2: Remove the screw securing the front panel, and reuse it for fixing the duct.
4-2. Duct installation - (03-11) - 4. Installation space
OUTDOOR
UNITS
OUTDOOR
UNITS
 Loading...