Online documentation for reverse installation (cable exit at the left
rear side support upride) can be found on:
http://manuals.ts.fujitsu.com/index.php?id=5406-5605-15408
Online-Dokumentation für den spiegelbildlichen Einbau (Kabelauslass
am hinteren linken Montageholm) finden Sie unter:
http://manuals.ts.fujitsu.com/index.php?id=5406-5605-15408
本製品は左右反転させて取り付けることができます。作業手
順、及び各装置でのケーブル取り付け手順につきまして、
下記ページをあわせてご参照ください。
http://jp.fujitsu.com/platform/server/primergy/
Schließen Sie die Netzkabel an und
►
fixieren Sie sie mit Kabelklammern
a. Formen Sie eine Kabelschlaufe,
wenn es für den PSU-Typ sinnvoll ist.
Schließen Sie die anderen Kabel an
►
den Server an.
Legen Sie die Kabel in den Kabel-
►
arm. Fixieren Sie die Kabel mit einem
Kabelbinder (Kabel sollten noch ein
bisschen beweglich sein) an Kreis
b, so dass sie annähernd in einer
Linie mit der blauen Linie sind.
Schieben Sie den Server so weit wie
►
möglich aus dem Rack. Justieren Sie
die Kabellänge so, dass der Server
bequem in das Rack geschoben und
herausgezogen werden kann. Achten
Sie darauf, dass die Kabel von Kreis
b bis zum Server zugentlastet sind!
Fixieren Sie alle Kabel außer Glas-
►
faserkabel mit Kabelbindern wie
durch die Kreise c gezeigt.
Fixieren Sie VGA-Adapter mit Kabel-
►
bindern wie durch die Kreise d
gekennzeichnet.
Connect the power cables and fix
►
them with cable brackets a. Form a
cable loop if useful for the PSU type.
Connect the other cables to the
►
server.
Place the cables in the cable arm.
►
Fix the cables with a cable tie (cables
should be able to move slightly) at
circle b such that they are nearly in
line with the blue line.
Slide the server out of the rack to
►
extend the CMA arm as far as pos-
sible. Adjust the cable length so that
the server can easily slide in and out
of the rack. Make sure that cables are
free of traction between circle b and
the server!
Fix all cables except fibre cables with
►
cable ties as indicated by the circles
c.
Fix VGA adapters with cable ties as
►
indicated by the circles d.
電源ケーブルを接続しケーブル
►
タイで固定します。PSUによりケ
ーブルをループさせてフォーミン
グします。
他のケーブルをサーバに接続し
►
ます。
ケーブルを青色ラインに添うよう
►
に這わせ、CMAアームにフォー
ミングし、ケーブルタイで仮固定
します② 。
サーバをラックから引き出しCMA
►
アームを開きます。その際、コネ
クタ、ケーブルに負荷がかから
ないようケーブルフォーミング状
態・長さを調整します② 。
ファイバーケーブルを除いた他
►
のケーブルをケーブルタイで丸
印のそばで固定します③ 。
VGAアダプタを短いケーブルタイ
►
で丸印の辺りで図のように固定
します④ 。
v
Beachten Sie den Biegeradius
für
Glasfaserkabel. Verwen-
den
Sie die Kabelbinder wie
in e gezeigt.
v
Observe the bend radius for
fibre cables. Use the cable
ties as indicated by e.
v
Fixing with cable ties at b
is very important for a proper
function of the CMA.
v
②の位置は必ずケーブル
タイで固定してください。
v
Die Befestigung der Kabel
mit Kabelbindern bei b ist
wichtig für eine einwandfreie
Funktion des CMA.
v
ファイバーケーブルの曲
げ半径を守り、図⑤のよ
うにケーブルタイでフォー
ミングします。
a
b
c
c
c
b
d
d
e
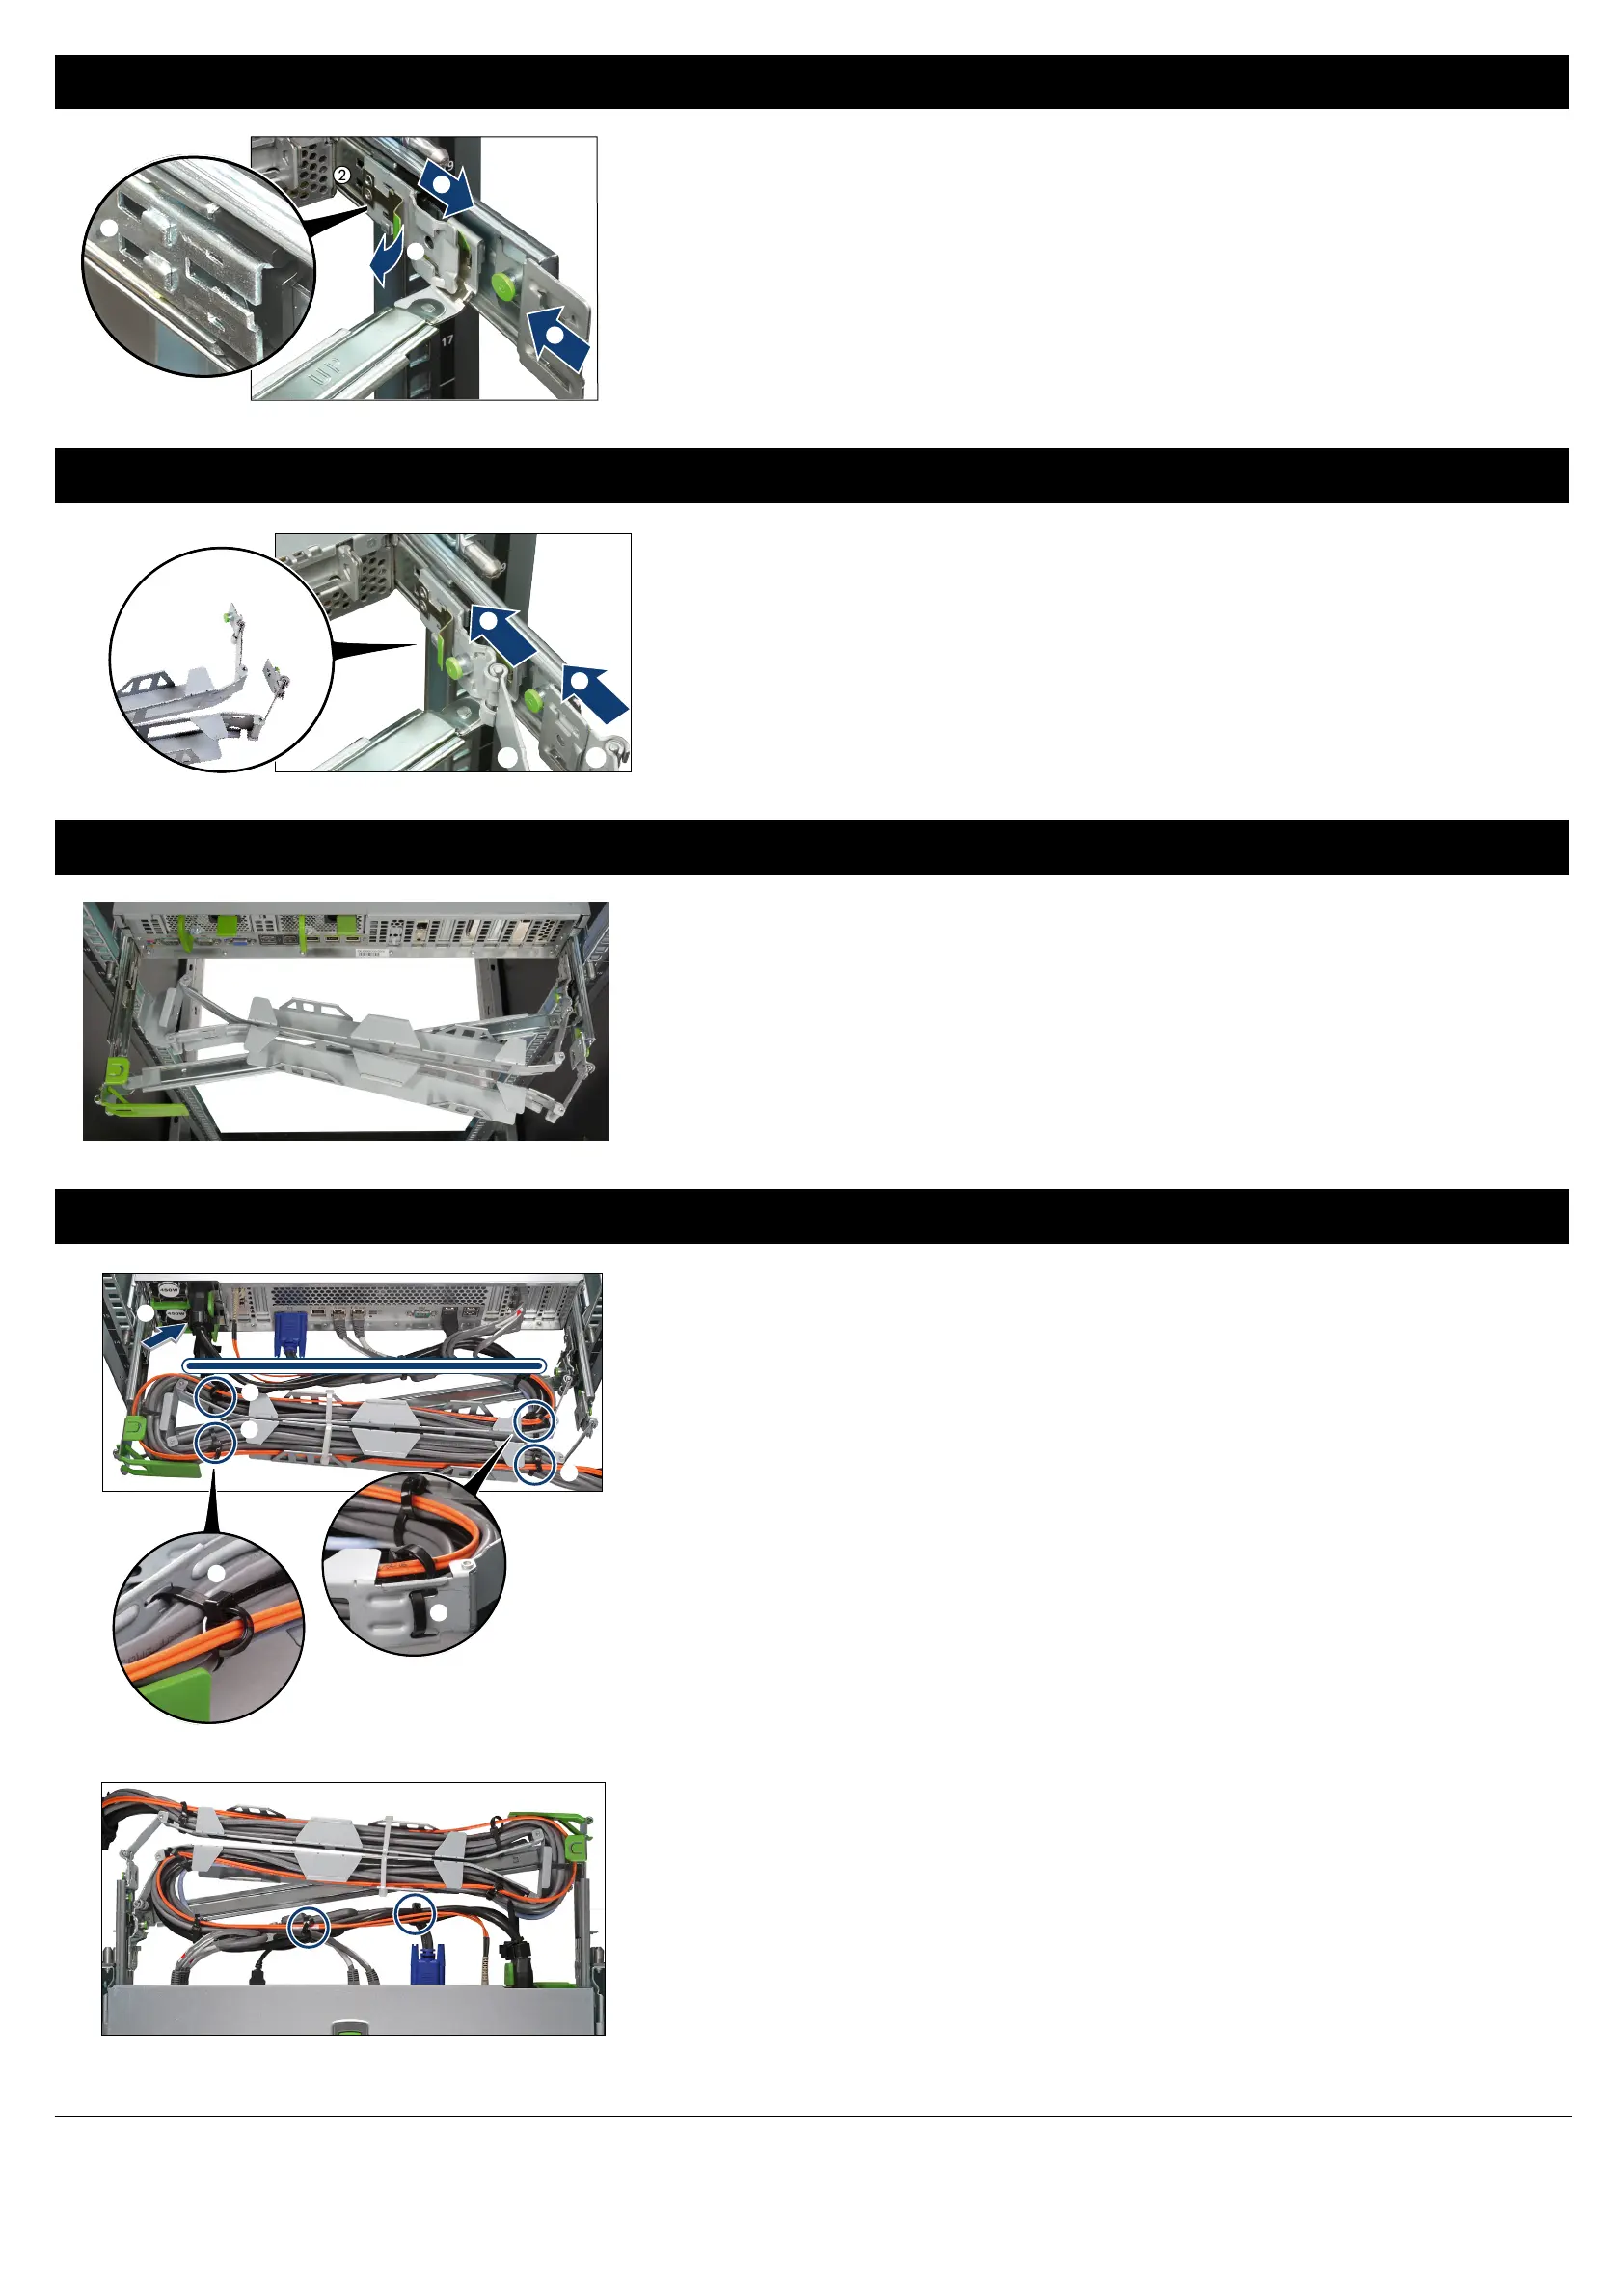
After installation, the CMA should lay on
the crossbar, as shown in the picture.
Nach der Installation sollte der CMA wie
im Bild gezeigt auf der Querschiene
liegen.
CMAアームの取付後、CMAアー
ムをクロスバーの上に載せてくだ
さい。
図は取付後のCMAアーム搭載位
置を示します。 ククク
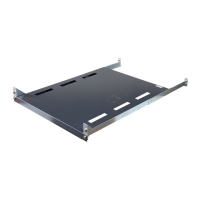
Schieben Sie den Verbinder A des
►
CMAs in die Aussparungen des
CMA-Verbinders innere Schiene a.
Schieben Sie den Verbinder B des
►
CMAs in die Aussparungen des
CMA-Verbinders äußere Schiene b,
bis er einrastet.
Slide the connector A of the CMA
►
into the notches of the CMA connec-
tor inner rail until it clicks into place
a.
Slide the connector B of the CMA
►
into the notches of the CMA connec-
tor outer rail until it clicks into place
b.
CMAアームのA部をインナー用
►
CMAコネクタの固定用ガイドに
差し込み、①の方向へカチっと
音がする位置までスライドさせ固
定させます。
CMAアームのB部をアウター用
►
CMAコネクタの固定用ガイドに
差し込み、②の方向へカチっと
音がする位置までスライドさせ固
定させます。
a
b
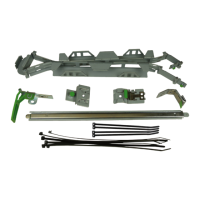
Slide the CMA connector outer rail
►
into the notches at the end of the
telescopic rail until it clicks into place
a.
Place the CMA connector inner rail in
►
the notches b.
Pull the spring
►
c while sliding the
CMA connector in direction of the
arrow d until it clicks into place.
Schieben Sie den CMA-Verbinder
►
äußere Schiene in die Aussparungen
am Ende der
Teleskopschiene
bis er
einrastet a.
Platzieren Sie den CMA-Verbinder
►
innere Schiene in den Aussparungen
b.
Ziehen Sie die Feder
►
c, während
Sie den CMA-Verbinder in Pfeilrich-
tung d schieben, bis sie einrastet.
アウター用CMAコネクタをレール
►
の後端から固定用ガイドに差し
込みカチッと音がするまでスライ
ドさせ組み付けます。①
インナー用CMAコネクタを固定
►
用ガイドに合わせます。②
バネを引き上げながら③、インナ
►
ー用CMAコネクタを④の方向へ
カチっと音がする位置までスライ
ドさせます。
a
b
c
d
b
Connecting the CMA / CMA anschließen / CMAアームの取り付け
Mounted position of the CMA / Montageposition des CMAs / CMAアームの搭載位置
Connecting the cables / Kabel anschließen / ケーブルの取り付け
Mounting the CMA connectors / CMA-Verbinder anbringen / CMAコネクタの取り付け
 Loading...