EasyManua.ls Logo

fully Haven - User Manual

fully Haven
20 pages
Print Icon
To Next Page IconTo Next Page
Loading...
Haven booth
Assembly instructions
For assembly assistance,
please visit fully.com/instructions,
contact us at 888-508-3725
or email support@fully.com
For assistance in Europe,
visit fully.com/contact
Question and Answer IconNeed help?

Do you have a question about the fully Haven and is the answer not in the manual?

Summary

Important Safety Instructions

General Cautions

Covers reading the manual, routing cords, keeping children away, and avoiding modifications.

Electrical Shock Precautions

Details on unplugging before cleaning and specific warnings related to electrical hazards.

General Safety Warnings

Includes supervision, intended use, cord care, avoiding openings, outdoor use, and electrical compatibility.

Use & Liability

Product Usage Guidelines

Specifies the booth is for dry interior environments and disclaims liability for improper use.

Tools Required for Assembly

Lists included Hex Wrench and not-included Phillips Screwdriver for assembly.

Customer Support Contact

Provides contact details for North America and Europe, including phone, email, and website.

Parts Identification

Assembly Steps

Step 1: Base Preparation

Attaches feet to the base unit, preparing it for further assembly.

Step 2: First Side Panel Attachment

Secures the first side panel to the base using screws.

Step 3: Wiring Connections

Details how to make the necessary electrical connections within the base.

Step 4: Rear Panel Installation

Attaches the rear panel to the booth structure with screws.

Step 5: Second Side Panel Installation

Secures the second side panel to the booth structure.

Step 6: Top Panel Placement

Positions the top panel and routes cables for the booth.

Step 7: Securing Top Panel

Fastens the top panel to the booth structure using screws.

Step 8: Hinge Plate Mounting

Attaches the hinge plates to the booth for door installation.

Step 9: Shelf Installation

Installs the interior shelf using brackets and screws.

Step 10: Door Handle Attachment

Attaches the door handle to the door panel with screws.

Step 11: Door Mounting

Attaches the assembled door to the main booth structure.

Step 12: Door Hinge Adjustment

Provides instructions for adjusting the door hinges for proper closure.

Step 13: Final Power Connection

Connects the power cord and adapter to the booth and outlet.

Overview

This document provides assembly instructions and important safety information for the Fully HAV Series Haven booth.

Function Description:

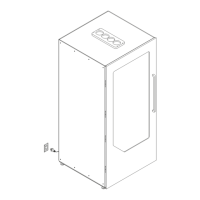
The Haven booth is a personal workspace designed for use in dry interior environments. It provides a semi-enclosed space, likely for focused work or privacy within an open-plan office or similar setting. The booth includes an electrical furnishing, suggesting it offers power outlets for devices. It features a door, a shelf, and internal power distribution.

Important Technical Specifications:

  • Product Type: Haven booth (Fully HAV Series)
  • Electrical Requirements: Nominal 120-volt circuit with a grounding plug.
  • Environmental Use: Designed for dry interior environments only.
  • Included Tools: Hex Wrench.
  • Required Tools (not included): Phillips Screwdriver.
  • Parts List:
    • A: Top panel (1 unit)
    • B: Power strip assembly (1 unit)
    • C: Shelf (1 unit)
    • D: Leveling feet (4 units)
    • E: Power cord and adapter (1 unit)
    • F: Door handle (1 unit)
    • G: Door handle bracket (1 unit)
    • H: Shelf supports (4 units)
    • I: Screws (44 units for various assembly steps)
    • J: Door handle screws (4 units)
    • K: Shelf brackets (2 units)
    • L: Shelf bracket screws (2 units)
    • M: Side panel with power outlet (1 unit)
    • N: Plain side panels (2 units)
    • O: Back panel (1 unit)
    • P: Door panel (1 unit)

Usage Features:

  • Personal Workspace: Provides a dedicated, semi-private area for work.
  • Integrated Power: Includes an electrical furnishing with internal power outlets (indicated by part M and the power strip B) for charging devices or powering equipment.
  • Adjustable Door Hinges: The manual provides instructions for adjusting the door hinges if the door does not close easily or completely, ensuring proper functionality and fit. This feature allows for fine-tuning the door's operation after assembly.
  • Internal Shelf: A shelf (part C) is included, providing a surface for personal items, devices, or work materials within the booth.
  • Leveling Feet: The booth is equipped with leveling feet (part D) to ensure stability on uneven surfaces.

Maintenance Features:

  • Cleaning: The manual explicitly states to always unplug the furnishing from the electrical outlet before cleaning. This is a critical safety instruction for maintenance.
  • No User Serviceable Parts (Internal Components): Users are warned not to open or modify any of the components, as doing so risks electric shock and voids any warranty claims. This implies that internal electrical or structural components are not designed for user maintenance or repair.
  • Hinge Adjustment: The ability to adjust door hinges (step 12) can be considered a maintenance feature, allowing users to correct minor alignment issues that may arise over time, ensuring the door continues to operate smoothly.

Safety Instructions (Important for Usage and Maintenance):

  • Read Manual Carefully: Users must read the manual thoroughly.
  • Manual Transfer: If the booth changes owners, the manual must be provided to the new owners.
  • Cord Routing: All cords must be routed appropriately to avoid tripping hazards.
  • Child Safety: Keep children away from the booth due to risk of injury and electric shock. Children should not sit or stand on the booth.
  • No Modification: Do not open or modify any components to avoid electric shock and warranty voidance.
  • Unplug Before Parts Installation/Removal: Always unplug from the outlet before putting on or taking off parts.
  • Supervision with Children: Close supervision is necessary when the product is used by or near children.
  • Intended Use Only: Use the product only for its intended purpose as described in the instructions. Do not use unrecommended attachments.
  • Damaged Product: Never operate if the cord or plug is damaged, if it's not working properly, if it's been damaged, or exposed to water.
  • Cord Away from Heat: Keep the cord away from heated surfaces.
  • No Objects in Openings: Never drop or insert any object into any opening.
  • Indoor Use Only: Do not use outdoors.
  • Avoid Flammable Environments: Do not operate where aerosol (spray) products are being used or oxygen is being administered.
  • Grounding Plug: The product uses a grounding plug and must be connected to an outlet with the same configuration. No adapter should be used.

Contact Information for Support:

  • North America:
    • Phone: 888-508-3725
    • Email: support@fully.com
    • Website (instructions): fully.com/instructions
    • Website: fully.com
  • Europe:
    • Email: help@fully.com
    • Website (contact): fully.eu/contact
    • Website: fully.eu

fully Haven Specifications

General IconGeneral
Brandfully
ModelHaven
CategoryOffice Equipment
LanguageEnglish