The Geochron Digital 4K Atlas is a modern interpretation of the classic Geochron world clock, designed to display real-time global information on a 4K display. It functions as a geographical chronometer, showing the event of the sun's horizon on Earth in real time, along with all 24 time zones simultaneously. This digital version builds upon the legacy of the original mechanical Geochron, invented in 1964, and is manufactured in the foothills of Mt. Hood in Oregon.
Function Description:
The core function of the Geochron Digital 4K Atlas is to provide a dynamic, real-time visual representation of the Earth's day and night cycle, along with various geographical and meteorological data layers. It connects to a 4K display via an HDMI cable, transforming the screen into an interactive world map.
Key functionalities include:
- Real-time Sun Horizon: Displays the current position of the sun's horizon across the globe, illustrating day and night boundaries as they shift throughout the day.
- Time Zone Display: Simultaneously shows all 24 time zones, making it easy to understand global time differences at a glance.
- Layered Information: The Atlas supports various customizable layers that can be added and adjusted for transparency. These layers include:
- Geopolitical Map: A standard world map showing country borders and major geographical features.
- Population Density: Visualizes areas of higher and lower population.
- Air Routes: Displays global flight paths.
- Live Precipitation & Cloud Cover: Provides real-time weather information, showing areas of rain, snow, and cloud formations.
- NOAA Satellites: Tracks the positions of NOAA satellites.
- Occurrence of Sunset: Highlights areas experiencing sunset.
- Customization: Users can adjust the transparency of individual layers to prioritize certain information or create a desired visual aesthetic.
- Remote Control Operation: The device is controlled via an included remote, allowing users to navigate menus, select layers, adjust settings, and power the device on/off.
Important Technical Specifications:
While specific processor or memory details are not provided, the manual highlights several crucial technical aspects:
- 4K HDMI Output: The device is designed to connect to a display's 4K HDMI port, ensuring high-resolution output. HDMI port #1 is recommended for optimal performance.
- Power Supply: Requires an included power supply. It's explicitly stated that less than 3A USB power will damage the Atlas and the TV's USB port, indicating a specific power requirement.
- Wireless Connectivity: Features a WIFI 2.4/5g Antenna, suggesting support for both common Wi-Fi bands for internet connectivity, which is likely used for updating live data layers.
- Ethernet Port: Includes an Ethernet port for a wired internet connection, offering an alternative to Wi-Fi.
- USB Port: A USB port is available for the remote control dongle.
- Audio Jack: An audio jack is present, though its specific function (e.g., for external speakers or headphones) is not detailed.
- Kensington Lock: A Kensington Lock slot is included for physical security.
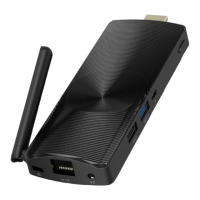
- Compact Design: The Atlas unit itself is a small, black device with a textured surface, designed to hang from the HDMI cable rather than being mounted or taped to the TV to prevent overheating.
Usage Features:
The Geochron Digital 4K Atlas is designed for ease of use, with a straightforward setup and intuitive remote control.
- Quick Start Guide: The manual provides a step-by-step guide for initial setup:
- Remote Setup: Open the remote, remove the dongle, and insert it into the Geochron's USB port. Install batteries in the remote.
- HDMI Connection: Connect the included HDMI cable to the display's 4K HDMI port (HDMI port #1 recommended).
- Physical Placement: Allow the Atlas to hang from the HDMI cable. Avoid mounting or taping it to the TV to prevent overheating.
- Power Connection: Plug in the included power supply.
- TV On First: Turn on the TV before powering on the Atlas to ensure proper display resolution communication.
- Power On Atlas: Press the black button on the Atlas to power it on. The indicator light will change from RED to BLUE.
- Initial Boot & Settings: The Atlas will boot to an active mapset. Use the MENU button on the remote to access settings like Time Zone (Menu >Time) and Wi-Fi (Menu > Internet).
- Remote Control Functions: The remote is central to interacting with the Atlas:
- ARROW keys: Navigate menus.
- OK button: Confirm selections.
- MENU button: Access settings and setup.
- POWER button: Open the POWER menu, which includes options like SLEEP and SHUTDOWN.
- BACK/RETURN button: Go back in menus.
- Cursor Mode: The remote may enter Cursor Mode; pressing the button again will exit this mode.
- Power Management:
- To turn off the display, use the power button on the remote and select "SLEEP."
- If "SHUTDOWN" is selected, the Atlas must be turned back on using the physical POWER button on the device.
- Layer Management: Layers can be added and adjusted for transparency through the menu system.
Maintenance Features:
The manual includes a "Common Troubleshooting" section and a "Warranty Statement" to guide users on maintenance and support.
- Troubleshooting:
- Remote not working:
- Ensure the USB dongle is installed in the Geochron's USB port (common issue).
- Check battery orientation.
- If in Cursor Mode, press the button again.
- If unpaired, contact support for directions.
- Picture flickering/Map missing:
- Re-seat the HDMI cable fully in both the TV and Geochron.
- Try a different HDMI cable.
- Live Layers not updating:
- Go to Menu > Live > Satellites and press the REFRESH ALL button.
- Alternatively, select RELOAD DEVICE from the remote's power button menu.
- Other Issues: Reboot the device.
- Support:
- Email support@geochron.com for assistance.
- Phone support is available at 800-342-1661 before 4 pm PST on weekdays.
- Warranty:
- Limited Warranty: Covers physical goods purchased from Geochron LLC or authorized distributors for defects in material or workmanship under normal use.
- Warranty Period: One year from the date of purchase.
- Remedy: Geochron LLC will repair or replace defective products or parts at no charge during the warranty period.
- Exclusions: Does not cover shipping, abuse, or modifications to the GD programming, hardware, layers, or configuration. The warranty ends at the HDMI port, meaning it does not cover the display device itself.
- Voiding Warranty: Requisitioning the computer for any other purpose will void the warranty.
The Geochron Digital 4K Atlas is presented as a sophisticated yet user-friendly device that brings the unique real-time global display of the original Geochron into the digital age, offering a rich, customizable visual experience for any 4K display.