Home
GeoVision
Security Camera
GV-MFD320
GeoVision GV-MFD320 Quick Start Guide
4
of 1
of 1 rating
282 pages
Give review
Manual
Specs
To Next Page
To Next Page
To Previous Page
To Previous Page
Loading...
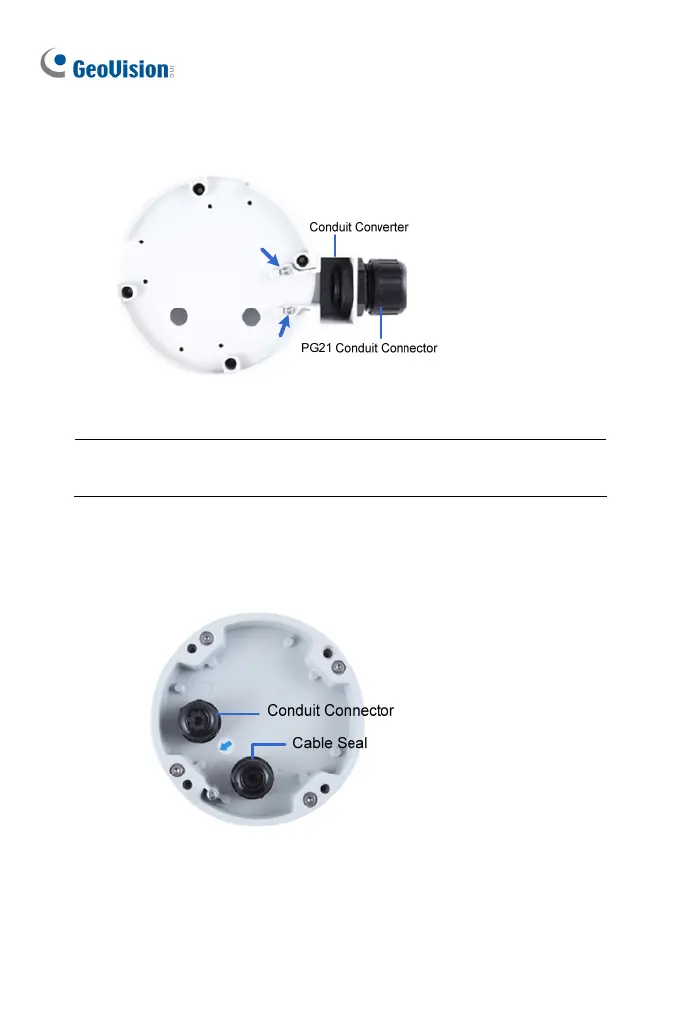
6.
To use a pipe (
optional), install the conduit converter using the
supplied M3 screws.
IMPORTANT:
For GV-BL2511
-E / 5311-E connected with a power
adapter, only install the conduit converter to the indicated exit.
7.
Install the Ethernet cable.
A.
Twist off and remove the cabl
e seal and the conduit connector.
88
122
124
Table of Contents
Safety Notice
3
Table of Contents
4
Introduction
11
Options
25
Note for Connecting to GV-System / GV-VMS
27
Note for Recording
28
Note for GV-BX2600
29
Note for Adjusting Focus and Zoom
30
Note for Installing Camera Outdoor
31
Note for Closing the Bullet Camera Cover
33
Note for Bullet Camera Waterproof
34
Note for USB Storage and Wifi Adapter
35
Box Camera
36
Packing List
36
Overview
37
GV-BX120D / 130D Series / 140DW / 220D Series / 320D Series / 520D
37
GV-BX1200 Series / 1300 Series / 1500 Series / 2400 Series / 2500 Series / 2600 / 3400 Series / 5300 Series / 12201
39
Accessory Installation
42
C-Mount Lenses
42
Infrared Illuminators (Optional)
43
Connecting the Camera
44
GV-BX120D / 130D Series / 140DW / 220D Series / 320D Series / 520D
44
GV-BX1200 Series / 1300 Series / 1500 Series / 2400 Series / 2500 Series / 2600 / 3400 Series / 5300 Series/ 12201
46
Ultra Box Camera
48
Packing List
48
Overview
49
Installation
50
Connecting the Camera
52
Target Box Camera
53
Packing List
53
Overview
54
Installation
55
Connecting the Camera
57
IR Arctic Box Camera
58
Packing List
58
Overview
60
Installation
62
Connecting the Camera
67
Mini Fixed Dome & Mini Fixed Rugged Dome
71
Packing List
71
Overview
73
Gv-Mfd120 / 130 / 320
73
GV-MFD1501 Series / 2401 Series / 2501 Series / 3401 Series / 5301 Series
75
Gv-Mdr
77
Installation
80
GV-MFD Series
80
GV-MDR Series
82
Connecting the Camera
86
Wire Definition
86
Power and Network Connection
87
Vehicle Installation
88
Target Mini Fixed Dome
89
Packing List
89
Overview
90
Installation
91
Connecting the Camera
93
Target Mini Fixed Rugged Dome
94
Packing List
94
Overview
96
Installation
97
Connecting the Camera
103
Bullet Camera (Part I)
104
Packing List
104
Overview
105
Installation
106
Adjusting the Angles
108
Adjusting Lens and Inserting a Memory Card
111
Inserting the Sun-Shield Cover
114
Connecting the Camera
115
Wire Definition
115
Connecting the Power Cable
117
Bullet Camera (Part II)
118
Packing List
118
Overview
119
Installation
121
Connecting the Camera
128
Ultra Bullet Camera
130
Packing List
130
Overview
131
Installation
133
Connecting the Camera
137
Waterproofing the Cable
137
Wire Definition
139
Power Connection
140
Target Bullet Camera
141
Packing List
141
Overview
142
Installation
144
Connecting the Camera
147
Wire Definition
147
Power Connection
148
Vandal Proof IP Dome (Part I)
149
Packing List
149
Overview
151
Installation
153
Hard-Ceiling Mount
154
In-Ceiling Mount
159
Connecting the Camera
162
Wire Definition
162
Connecting the Power Cable
164
Vandal Proof IP Dome (Part II)
165
Packing List
165
Overview
168
Installation
170
Connecting the Camera
181
Connecting the Power Cable
181
Connecting the I/O Device
182
Target Vandal Proof IP Dome
183
Packing List
183
Overview
186
Installation
188
Connecting the Camera
197
Fixed IP Dome
198
Packing List
198
Packing List for Hard-Ceiling Mount
198
Packing List for In-Ceiling Mount
199
Overview
200
Installation
202
Hard-Ceiling Mount
202
In-Ceiling Mount
206
Wall-Surface Mount
210
Connecting the Camera
212
Target Fixed IP Dome
213
Packing List
213
Overview
214
Installation
216
Connecting the Camera
218
Cube Camera
219
Packing List
219
Overview
220
Installation
221
Connecting the Camera
223
Advanced Cube Camera
224
Packing List
224
Overview
225
Installation
227
Connecting the Camera
229
Camera
230
Packing List
230
Overview
232
Installation
234
Ceiling Mount
234
L-Shaped Wall Mount
236
Connecting the Camera
239
Pinhole Camera
240
Packing List
240
Overview
242
Installation
244
Connecting the Camera
248
Accessing the Camera
249
System Requirement
249
Accessing the Live View
250
Checking the Dynamic IP Address
251
Configuring the IP Address
253
Configuring the Wireless Connection
255
Adjusting Image Clarity
259
Using Focus Adjustment Cap
262
The Web Interface
263
Upgrading System Firmware
266
Restoring to Default Settings
268
Using the Web Interface
268
Directly on the Camera
269
Box Camera
269
Ultra Box Camera and Target Box Camera
270
Mini Fixed Dome
271
Mini Fixed Rugged Dome
272
IR Arctic Box Camera
272
Target Mini Fixed Target Mini Fixed Rugged Dome
273
Bullet Camera
274
Ultra Bullet Camera
275
Target Bullet Camera
275
Vandal Proof IP Dome
276
Target Vandal Proof IP Dome
277
Fixed IP Dome
278
Target Fixed IP Dome
279
Cube Camera
280
Advanced Cube Camera
280
Camera
281
Other manuals for GeoVision GV-MFD320
User Manual
697 pages
Hardware Manual
92 pages
4
Based on 1 rating
Ask a question
Give review
Questions and Answers:
Need help?
Do you have a question about the GeoVision GV-MFD320 and is the answer not in the manual?
Ask a question
GeoVision GV-MFD320 Specifications
General
Brand
GeoVision
Model
GV-MFD320
Category
Security Camera
Language
English
Related product manuals
GeoVision GV-MFD110
484 pages
GeoVision GV-MFD130
697 pages
GeoVision GV-MFD120
697 pages
GeoVision GV-IPCam
306 pages
GeoVision GV-VR360
55 pages
GeoVision GV-SD200
147 pages
GeoVision GV-CA120
697 pages
GeoVision GV Series
143 pages
GeoVision GV-VD220D
697 pages
GeoVision GV-BL1200
697 pages
GeoVision GV-CAW220
723 pages
GeoVision GV-FD120D
654 pages
 Loading...