- 21 -
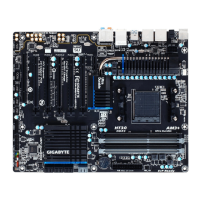
Theaudiojackscanbereconguredtoperformdifferentfunctionsviatheaudiosoftware(supported
functionsforeachjackmayvarybasedonhardwarespecication).OnlymicrophonesstillMUSTbe
connected to the default Mic in jack. Refer to the instructions on setting up a 2/4/5.1/7.1-channel audio
congurationinChapter6,"Conguring2/4/5.1/7.1-ChannelAudio."
• Whenremovingthecableconnectedtoabackpanelconnector,rstremovethecablefromyour
device and then remove it from the motherboard.
• When removing the cable, pull it straight out from the connector. Do not rock it side to side to prevent
an electrical short inside the cable connector.
Line Out Jack (Green)
The line out jack. This jack supports audio amplifying function. For better sound quality, it is recommended
that you connect your headphone/speaker to this jack. Use this audio jack for a headphone or 2-channel
speaker.Thisjackcanbeusedtoconnectfrontspeakersina4/5.1/7.1-channelaudioconguration.
Mic In Jack (Pink)
The Mic in jack. Microphones must be connected to this jack.
 Loading...