Do you have a question about the Glow Bricks Lego Home Alone 21330 and is the answer not in the manual?
Start assembling lights for the van and replace the grey plate with lighting parts.
Assemble clear parts, restore front light, and route remaining lights to the back of the van.
Replace the rear plate with a lighting plate and connect internal cables to the battery case.
Prepare lighting parts for the tree house and assemble a 1x3 white plate inside.
Assemble lighting round plates randomly onto the tree house leaves.
Separate the back door part and assemble it with the provided lighting components.
Replace yellow bricks with lighting parts and install lights for lamps and the fireplace.
Install a 1x8 lighting plate as a ceiling light and the bottom lighting plate.
Gather the specific lighting parts required for the front door illumination.
Replace yellow round plates with lighting ones and assemble light bulbs into the designated heads.
Install the prepared lighting components onto the front door of the house.
Take lighting parts for the Christmas tree and begin assembly from the bottom.
Replace round plates on the tree with lighting parts layer by layer, securing top layer.
Install tan lighting plates underneath the second floor of the main house.
Connect the Christmas tree lighting and combine the first and second floors of the house.
Prepare roof lighting parts and route cables for upper floors and the house rear.
Assemble roof lighting components and connect them to the second floor of the house.
Combine the entire Lego building and connect all lighting connectors to the USB cable.
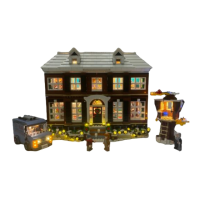
This document provides an installation guide for a lighting kit designed for the Lego 21330 Home Alone set. The kit, produced by Glow Bricks, enhances the Lego model with various lighting elements, bringing the iconic house and its accessories to life. The installation process is broken down into several steps, focusing on different sections of the Lego set.
The primary function of this device is to add illumination to the Lego Home Alone set, transforming it from a static model into a dynamic display piece. It allows enthusiasts to recreate the festive and sometimes chaotic atmosphere of the movie with realistic lighting effects. The kit includes a variety of lighting components, such as individual LED lights, lighting plates, and connecting cables, all designed to integrate seamlessly with the existing Lego structure.
The installation begins with the van, a key accessory in the Home Alone set. Users are instructed to replace a grey plate with specific lighting parts, which include a series of small LEDs. After assembling clear parts, the front light of the van is restored, and the remaining lights are pulled to the back. These lights are then assembled onto the top of the van, illuminating its interior and exterior. The guide further details replacing a 1x6 plate on the back of the van with a lighting plate and connecting the internal connectors to a battery case. This step ensures that the van's lights are powered and functional, adding a touch of realism to the vehicle.
Next, the guide moves to the tree house, another distinct part of the Lego set. The installation for the tree house involves assembling a 1x3 white plate inside the structure and then attaching lighting round plates randomly onto the leaves. This creates a scattered, natural lighting effect, mimicking the appearance of fairy lights or glowing foliage. The back door part of the tree house is separated, and lighting parts are assembled onto it, further enhancing the illumination of this section.
The main house structure is addressed in subsequent steps. The installation process for the house is more intricate, involving multiple layers and various types of lighting. Users are guided to separate the house by layers, detach specific parts, and replace clear yellow round bricks with lighting parts. This suggests that the kit is designed to integrate directly into the existing Lego brick system, replacing certain pieces with illuminated versions. The lamps of the house are restored, and a fire element is replaced, indicating that the kit includes specialized lights for these features, likely to simulate a warm, flickering glow.
Ceiling lights are installed using a 1x8 lighting plate, which is assembled as a ceiling light. The remaining black lighting plate is pulled to the bottom and assembled, suggesting a method for routing cables discreetly within the structure. For the front door, specific lighting parts are provided. Yellow round plates are replaced by lighting round plates, and a light bulb at the end is assembled inside a head-like structure, likely for a decorative element or a character's head. These steps ensure that the entrance of the house is brightly lit, creating an inviting and festive look.
The Christmas tree, a central decorative element, also receives special attention. Users are instructed to take specific lighting parts for the tree and start assembling them from the lights next to the connector, working from the bottom of the tree upwards. Round plates on the tree are replaced by lighting parts layer by layer. The guide emphasizes that this can be done randomly, but the last four round plates should be assembled on the top layer, ensuring a consistent and aesthetically pleasing distribution of lights.
The installation continues with the second floor of the house. Tan lighting plates are assembled underneath the second floor, providing ambient lighting for this section. These lights are then connected with the Christmas tree via a connector on the left side. The tree is restored and combined with the second floor, indicating an integrated power and lighting system. A crucial detail is the management of cables: the connector with a shorter cable is pulled to the upper floor, while the other one is pulled to the back of the house. This suggests a design that aims to minimize visible wiring and maintain the aesthetic integrity of the Lego model.
Finally, the roof of the house is addressed. The last lighting parts for the roof are taken, and white lighting plates and a round plate are assembled to the lamp. The remaining lights are pulled to the bottom, and these are then assembled to the bottom as shown. The cables are connected with the second floor, completing the circuit for the roof lights. The entire building is then combined, and all four connectors are connected to a USB cable, which serves as the main power source for the entire lighting system. This USB connection offers flexibility, allowing the model to be powered by various USB-compatible sources, such as power banks, wall adapters, or computers.
While the manual primarily focuses on installation, some aspects imply ease of maintenance. The modular nature of the Lego bricks, combined with the design of the lighting kit, suggests that individual lighting elements or sections could potentially be replaced if they malfunction. The use of connectors for different sections (van, tree house, house layers, roof) means that troubleshooting could be localized to specific parts of the model rather than requiring a complete disassembly. The USB power source is a common and easily replaceable component, ensuring that power supply issues can be resolved without specialized tools. The instructions for pulling cables discreetly within the structure also contribute to long-term maintenance by protecting the wires from accidental damage during handling or display. The clear, step-by-step instructions with accompanying images make it easier for users to retrace their steps for repairs or modifications. However, specific maintenance instructions like cleaning or bulb replacement are not explicitly detailed in this installation guide.
| Set Name | Home Alone |
|---|---|
| Set Number | 21330 |
| Pieces | 3955 |
| Minifigures | 5 |
| Recommended Age | 18+ |
| Release Year | 2021 |
| Model Number | 21330 |
| Theme | Home Alone |