Do you have a question about the GMC REDEYE LS250TS2000W and is the answer not in the manual?
Laser visibility may be reduced; remove batteries during storage to prevent leakage.
Explanation of safety symbols for eye, hearing, breathing protection, and EMC compliance.
Understand laser hazards, safe operation, aiming restrictions, and avoid reflections.
Maintain a clean work area, ensure good lighting, and keep visitors clear.
Proper tool storage, handling, and pre-operation checks to prevent accidents.
Prioritize personal safety with attire/accessories; care for tools and cords.
Ensure readiness via checks, proper connections, and alertness.
Perform safety checks, inform others, verify voltage/cords before operation.
Avoid firewood cutting, be aware of blade hazards, and do not use in wet conditions.
Handle workpieces securely, use sharp blades, avoid distractions.
Follow operating procedures, avoid overloading, and perform regular maintenance.
Ensure safe machine operation, electrical connections, and adhere to repair standards.
Remove all loose parts from the carton and check for completeness.
Prepare the saw by removing packaging and gathering required tools.
Place the saw, attach extension table, and fold the stand assembly.
Secure extension table and adjust foot leveling for stability.
Assemble the wheel axle, wheels, and hubcaps using provided hardware.
Attach rear extension table and height adjustment handle.
Fit the riving knife and laser assembly, securing with screws and inserts.
Install riving knife, adjust its height, and fit the blade guard securely.
Insert and use the mitre gauge holder and push stick holder.
Secure cord, fold stand legs, and ensure locking levers are engaged.
Lower blade, fold stand, and use legs to transport the saw.
Calibrate laser line using a test piece, aligning it with blade and workpiece marks.
Use green button to turn on, red button to turn off. Note electromagnetic switch behavior.
Loosen blade lock, use handle to set depth; turn wheel anti-clockwise to increase.
Loosen blade lock, turn angle wheel to set desired angle using pointer and scale.
Set rip fence for longitudinal cuts, adjust width using scale, and secure with lever.
Slide mitre gauge into slot, loosen knob, select angle, and re-tighten.
Use push sticks for narrow workpieces; ensure hands stay clear of the blade.
Kickback occurs when blade stalls/binds; avoid incorrect depth, knots, twisting wood.
Avoid forcing cuts, wet lumber, dull blades, and improper procedures.
Use correct blade depth, sharp blades, support workpiece, and maintain balance.
Align workpiece with rip fence, ensure blade guard is on, and feed workpiece smoothly.
Use push stick when hands are near blade; leave off-cuts until blade stops.
Use push blocks for narrow cuts, fence for bevels, and mitre gauge for cross cuts.
Disconnect power, remove guards/inserts, loosen blade bolt, and replace blade.
Clean flanges, insert blade correctly, re-fit guards, and perform no-load test.
Switch off saw, remove guard, access battery cover, replace batteries, and re-adjust laser.
Keep vents clear, remove dust regularly, lubricate moving parts, clean plastic with mild detergent.
Ensure power cord is maintained and inspected for safety.
Contact Customer Assist Line for service, log requests online at www.gmcservice.com.au.
Refer to website for warranty terms; keep purchase receipt for future reference.
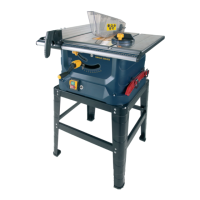
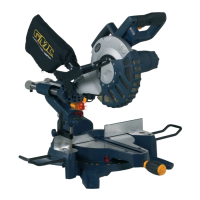
| Model | REDEYE LS250TS2000W |
|---|---|
| Category | Saw |
| Power Source | Corded Electric |
| Power | 2000W |
| Blade Diameter | 250 mm |
| No Load Speed | 5000 rpm |
| Max Cutting Depth at 90° | 85 mm |
| Max Cutting Depth at 45° | 60 mm |
| Weight | 15 kg |