EasyManua.ls Logo

Gmini TUTUS 123 IsoFix - User Manual

Gmini TUTUS 123 IsoFix
103 pages
Go to English
Print Icon
To Next Page IconTo Next Page
Loading...
Uživatelská příručka
Autosedačka TUTUS 123 IsoFix
Model / Modell / Modèle : GM1709
Užívateľská príručka
Autosedačka TUTUS 123 IsoFix
Owner's Manual
Child safety seat TUTUS 123 IsoFix
Benutzerhandbuch
Kindersitz Tutus 123 IsoFix
Podręcznik użytkownika
Fotelik samochodowy TUTUS 123 IsoFix
Manual de utilizare
Scaun auto TUTUS 123 IsoFix
Használati utasítás
TUTUS 123 IsoFix autós gyermekülés
Notice d´utilisation
Siège auto TUTUS 123 IsoFix
Question and Answer IconNeed help?

Do you have a question about the Gmini TUTUS 123 IsoFix and is the answer not in the manual?

Overview

This document is an owner's manual for the TUTUS 123 IsoFix child safety seat, model GM1709, approved for groups I, II, and III, for children weighing 9-36 kg. It complies with European Safety Standard ECE R44/04.

Function Description:

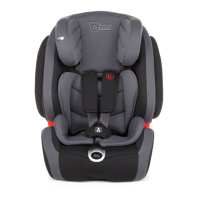
The TUTUS 123 IsoFix child safety seat is designed to transport children weighing 9-36 kg (approximately 9/12 months to 12 years old) in a vehicle. It can be installed using a 3-point seat belt (for Groups I, II, and III) or the Isofix system with a Top Tether (for Group I). The seat features an adjustable headrest with eight height positions and a two-position tilting system (for Group I only). It includes a 5-point harness system for securing the child, which can be removed for Groups II and III.

Important Technical Specifications:

  • Model: GM1709
  • Approval Standard: ECE R44/04
  • Groups: I, II, III
  • Child Weight Range: 9-36 kg
  • Installation Methods:
    • Group I (9-18 kg): ISOFIX anchorage system + Top Tether, or 3-point vehicle seat belt.
    • Group II/III (15-36 kg): 3-point vehicle seat belt.
  • Headrest: Eight height adjustment positions.
  • Tilting System: Two seated positions (Group I only).
  • Harness System: 5-point harness (for Group I).
  • Anchoring Points: ISOFIX attachments (R), Top Tether strap (O) with hook (P), Red Waist Belt Guide (Q).
  • Harness Components: Harness slots (B), Harness strap (C), Shoulder harness guide (D), Shoulder pads (F), Harness buckle (G), Buckle pads (H), Adjustment device (I), Harness Adjustment Strap (J).
  • Headrest Components: Headrest (A), Headrest Adjustment Handle (K), Top Tether Release button (L).
  • Other Components: Baby insert (E), Cover (M), Side Protection Technology (N), Snap Button (S), ISOFIX Release Button (T).

Usage Features:

  • Installation:
    • Always read the vehicle's owner's manual to identify compatible seats and ISOFIX anchorage points.
    • For ISOFIX + Top Tether installation (Group I): Extend ISOFIX connectors (R) by pressing the release button (T), then push them into the vehicle's ISOFIX anchors until a click is heard (Fig. 13-15). Ensure the seat is firmly attached (Fig. 16). Pull out the Top Tether strap (O) by pressing its release button (L) and hook it to the vehicle's anchoring point (Fig. 17-19). Tighten the Top Tether strap until the green guide mark appears (Fig. 21-22). The Top Tether should pass between the top of the vehicle backrest and the headrest, never over the headrest (Fig. 20).
    • For 3-point seat belt installation (Group I): Place the child seat forward-facing (Fig. 23). Route the vehicle's 3-point seat belt through the front side opening of the seat cover, over the back of the child seat, and out through the side opening in the seat cover (Fig. 23-24). Buckle the seat belt until a click is heard (Fig. 25). Ensure the seat belt is routed through the red guide at the top edge and is not twisted. Tighten the seat belt (Fig. 26).
    • For 3-point seat belt installation (Groups II/III): Remove the 5-point harness system (Fig. 29). Adjust the headrest height (Fig. 30). Route the shoulder belt through the shoulder harness guide under the headrest (Fig. 31). Place the child in the seat and route the lap belt over the red waist belt guide. Buckle the vehicle seat belt (Fig. 32). Ensure the lap belt is at the child's hip level and the shoulder belt passes through the center of the child's shoulder (Fig. 33).
  • Child Securing (Group I with 5-point harness): Loosen harness straps (C) by pressing the release button (I) and pulling the adjustment strap (J) (Fig. 4). Press the central buckle (G) and place the harness straps on the sides of the seat (Fig. 9-10). Attach buckle latches together and insert them into the central buckle until a click is heard (Fig. 11). Tighten the harness firmly using the adjustment strap (J) (Fig. 12).
  • Headrest Adjustment: Press and pull the handle (K) behind the headrest (A) to adjust its height (Fig. 5-6).
  • Tilting System: Pull the control plate under the seat's base to tilt the seat into two positions (Fig. 7-8).
  • Safety Checks: Always ensure the child safety seat is properly mounted, seat belts are not twisted, and all buckle latches are correctly inserted. Never leave a child unattended in the car seat. Do not use on front passenger seats with active airbags. Do not use on seats with only a 2-point lap belt.

Maintenance Features:

  • Disassembly of 5-point harness and cover: Push the harness regulator and pull the harness strap to maximum length (Fig. 4). Loosen and pull the harness strap from the belt pins (Fig. 35-36). Pull shoulder harness straps from the cover opening (Fig. 37), remove pads, and pull strap ends through metal buckles. Pull the entire belt from the bottom of the seat (Fig. 39-40). Rotate the central buckle clamp (Fig. 38) and pull it upwards from the seat base (Fig. 41). Disconnect the 5-point harness system by releasing the stud clip at the back of the seat (Fig. 34). Remove headrest and inner padding covers (Fig. 42).
  • Reassembly of 5-point harness and cover: After washing, place the cover back on the seat. Route the central buckle through the opening and secure it (Fig. 44). Replace protective buckle pads (Fig. 41). Route harness straps with protection through backrest openings (Fig. 47) and secure with metal split pins (Fig. 49). Secure main belt ends (Fig. 48) and route through backrest opening, harness pads, and buckle openings. Route the belt under the seat (Fig. 46) and out the other side, then through the other metal buckle, harness pads, and cover opening, securing with the split pin (Fig. 48).
  • Cleaning:
    • Use only the original child safety seat cover.
    • The cover can be removed and machine washed at 30°C on a gentle cycle with mild detergents and water. Follow care label instructions. Do not wash above 30°C to prevent fading. Do not spin or tumble dry.
    • Plastic parts can be cleaned with soap water. Do not use cream cleaners or thinners.
    • Moving parts should not be greased.
    • Do not use aggressive cleaning products.
    • Harness straps can be cleaned in mild soap water.
    • Never remove buckle latches from the belts.
  • Storage: Store in a dry place away from heat sources, dust, moisture, and direct sunlight when not in use.
  • Disposal: Dispose of individual parts into recyclable waste according to local regulations at the end of the product's lifespan.
  • Warranty: The warranty period starts from the purchase date and covers defects in product compliance under normal use. It does not cover damages from improper use, wear and tear, or accidents. The warranty is non-transferable and applies only to products not altered by the user.

Gmini TUTUS 123 IsoFix Specifications

General IconGeneral
BrandGmini
ModelTUTUS 123 IsoFix
CategoryCar Seat
LanguageEnglish