EasyManua.ls Logo

Goalzero Yeti 150 - User Manual

Goalzero Yeti 150
8 pages
Print Icon
To Next Page IconTo Next Page
Loading...
Question and Answer IconNeed help?

Do you have a question about the Goalzero Yeti 150 and is the answer not in the manual?

Summary

Get To Know Your Gear

Unpacking Your YETI

Details the components included with the Goal Zero Yeti 150 Portable Power Station.

What it Powers

Illustrates how long the Yeti 150 can power various devices and their estimated runtimes.

Charging Your YETI

LCD Battery Display

Explains the battery charge level indicator and its segments for monitoring.

Charging from the Wall

Instructions for recharging the YETI using a standard wall outlet.

Charging from Solar

Guide on recharging the YETI using solar panels and sunlight.

Charging from your Car

Information on how to charge the YETI from a 12V car source.

Using Your YETI

What to Power

Lists compatible devices that can be powered by the YETI 150.

How to Use

Step-by-step guide on operating the YETI 150 ports and buttons.

Best-Use Strategy

Tips for optimizing YETI performance based on device power draw.

Cold Weather Usage

Recommendations for maintaining battery capacity in cold temperatures.

Storage and Downtime Maintenance

Guidelines for preserving battery health during periods of non-use.

Technical Specifications

Frequently Asked Questions

YETI Battery Type

Details about the 12V sealed lead-acid (AGM) battery used in the YETI.

Checking YETI Charge Level

How to interpret the LCD Battery Display to know the charge status.

YETI Beeping Alert

Explains the meaning of beeping sounds and the required action.

YETI Battery Replacement

Step-by-step instructions for replacing the internal YETI battery.

Output Port LED Red Light

Explains what a red LED light on an output port signifies and how to reset it.

Device Compatibility Check

How to determine if a device is compatible with the YETI's output ports.

YETI Run Time Estimation

Guidance on estimating how long the YETI can power specific devices.

Troubleshooting

Resetting the YETI Battery

Procedure for resetting the YETI by disconnecting and reconnecting battery terminals.

Education

Batteries 101

Basic information and tips for maintaining Goal Zero batteries.

Solar 101

Key principles and best practices for recharging with solar power.

Overview

The Goal Zero Yeti 150 Portable Power Station is a plug-and-play generator designed to provide power for emergencies, camping, or any situation where you need portable electricity. It's built to keep your devices charged and running, whether you're in remote locations or just need a backup power source at home. With 150 watt-hours of power, it can sustain laptops, smartphones, lights, and other small electronics for extended periods.

Function Description:

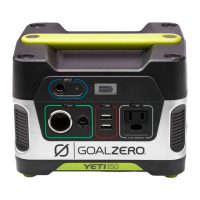
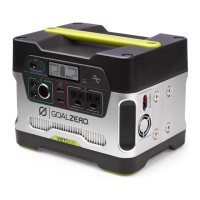
The Yeti 150 serves as a portable power station, capable of storing electrical energy and delivering it through various output ports. It can be charged from multiple sources, including solar panels, a wall outlet, or a car's 12V source, making it versatile for different environments. Once charged, it acts as a central hub to power and recharge a wide range of electronic devices. The device is designed to be user-friendly, with clear indicators for battery status and individual port controls. Its primary function is to provide reliable, off-grid power, ensuring that essential devices remain operational when traditional power sources are unavailable.

Usage Features:

The Yeti 150 is designed for ease of use. To get started, it's recommended to plug the Yeti into a wall outlet immediately upon receiving it to ensure the battery is fully charged and healthy. The device features an LCD Battery Display that shows the current charge level through five segments, each representing approximately 20% of the capacity. When charging, these segments will blink, and they will remain solid once fully charged.

Powering devices is straightforward:

  1. Activate Ports: Press the power button located above each output port you intend to use. A green LED light will illuminate, indicating that the port is active.
  2. Connect Devices: Plug your electronic gear into the appropriate output port (USB, 12V 6mm, 12V Car Port, or AC Outlet).
  3. Monitor Usage: Keep an eye on the LCD Battery Display. Devices with high power requirements, like gaming laptops, will drain the battery more quickly than low-power devices like tablets. If you experience shorter runtimes than expected, check your device's power requirements.

The Yeti 150 offers multiple output options:

  • USB Outputs: Ideal for charging smartphones, MP3 players, digital cameras, e-readers, and tablets.
  • 12V 6mm Port and 12V Car Port: Suitable for Goal Zero lights, car adapters, and other 12V devices.
  • AC Outlet (modified-sine wave): Designed for laptops, cameras, CPAP machines, and display monitors. It's important to note that some devices, particularly those with motors or complex electronics (e.g., fluorescent lights with dimming, power tools with variable speed control, digital clocks with radios, sewing machines with speed control), may not be suitable for use with a modified-sine wave inverter and should be avoided to prevent damage.

Charging the Yeti 150 is also flexible:

  • Wall Charging: Use the included AC Wall Charger. The blue LED light next to the INPUT port will turn on, and battery segments will blink on the LCD display. A full charge from a wall outlet typically takes about 6 hours.
  • Solar Charging: Connect a compatible Goal Zero solar panel (e.g., Nomad 20, Boulder 15) to the INPUT port. Place the solar panel in direct sunlight for optimal charging. The Yeti 150 can accept up to 60W of solar power. Charging times vary depending on the panel and sunlight conditions (e.g., Nomad 20 takes 17-34 hours of full sun). For older Nomad and Boulder panels, a Legacy-Nomad Adapter Cable may be needed.
  • Car Charging: While not recommended for fast charging due to slower speeds, the Yeti can be charged from any 12V source, like a car, using an optional 8.0 mm to 12V charger from Goal Zero.

For optimal performance in cold weather, especially below freezing, it's advised to keep the Yeti 150 in an insulated cooler and connected to a power source like solar panels. The natural heat generated by the unit, combined with insulation, helps maintain battery capacity.

Maintenance Features:

Proper maintenance is crucial for prolonging the life of your Yeti 150's battery and ensuring its readiness for use. The Yeti 150 uses a 12V sealed lead-acid (AGM) battery.

  • Keep Charged: The most important maintenance tip is to keep the Yeti 150 plugged into a power source (wall outlet or solar panel) at all times, even when in storage. This keeps the battery healthy and fully charged, preventing damage from deep discharge and ensuring it's always ready for use.
  • Regular Charging (if stored unplugged): If you cannot keep the Yeti plugged in during storage, fully charge it every 3 months and store it in a cool, dry place. Failure to do so can lead to battery damage and void the product warranty.
  • Avoid Deep Cycling: Unlike older battery types, AGM batteries do not benefit from being completely drained before recharging. In fact, deep cycling can harm them. It's best to recharge the Yeti whenever possible.
  • Battery Replacement: The battery inside the Yeti 150 is replaceable. If the battery eventually reaches the end of its life, you can replace it by following these steps:
    1. Disconnect all cables and cords.
    2. Unscrew the four bolts on top and lift off the cover.
    3. Locate and gently pull back the RED and BLACK battery connections.
    4. Carefully set the new battery inside.
    5. Reattach the RED and BLACK battery connections (a small spark upon reconnection is normal).
    6. Reattach the top cover to the base. After replacement, dispose of the old battery properly at a local recycling center.
  • Troubleshooting Overcurrent: If a green LED light on an Output Port button turns red, it indicates that the overcurrent protection has been tripped, usually because the connected device is drawing too much power. To reset, push the Output Port button twice. If this persists, verify the device's compatibility with the Yeti's power capacity or contact customer support.
  • Troubleshooting No Charging: If devices aren't charging, ensure the Output Port is turned on (green LED), check if the Yeti's battery display is above 20%, and confirm device compatibility. If issues persist, try resetting the Yeti battery by disconnecting all cables, unscrewing the top, disconnecting and reconnecting the RED and BLACK battery cables (wait 5 seconds between), then reassembling. Do not charge the Yeti or attempt to recharge devices during this reset process.
  • Audible Alerts: If the Yeti starts beeping, it's a warning that the battery is low and needs to be charged immediately to prevent damage. Plug it into a power source as soon as possible.

By following these usage and maintenance guidelines, you can maximize the performance and lifespan of your Goal Zero Yeti 150 Portable Power Station.

Goalzero Yeti 150 Specifications

General IconGeneral
Charge Time (Wall Charger)6 hours
Weight5.4 kg (12 lbs)
USB Port2 x 5V, up to 2.1A (10W max), regulated
12V Output12V port, up to 10A (120W max)
Charging OptionsWall outlet, solar panel, car charger
Battery Capacity168Wh (14Ah, 12V)

Related product manuals