Do you have a question about the GoodHome teesta 3663602300168 and is the answer not in the manual?
| Brand | GoodHome |
|---|---|
| Model | teesta 3663602300168 |
| Category | Bathroom Fixtures |
| Language | English |
Crucial warning to read all safety instructions carefully before handling the product.
Key safety points including frost prevention, hose handling, and installation precautions.
Preparation steps before installation, including checking parts, tools, and water system suitability.
Details on recommended water temperature, pressure limits, and system compatibility.
Specific advice related to the installation and use of pull-out and spring neck taps.
Instructions for cleaning and maintaining the product's surface and checking connections.
First assembly step involving connecting specific parts using a wrench.
Second assembly step showing how to attach two components.
Third assembly step detailing the connection of parts with washers.
Fourth assembly step showing a partially assembled unit.
Fifth assembly step illustrating the attachment of shower arm and rail.
Sixth assembly step demonstrating the connection of a component to the main unit.
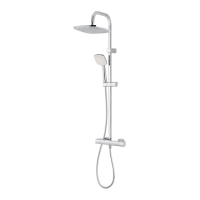
Seventh assembly step showing the overall height of the installed shower system.
Eighth assembly step depicting a final check or adjustment.
Ninth assembly step detailing wall mounting procedures with screws.
Tenth assembly step showing final connections of hoses and shower head.
Eleventh assembly step showing the completed installation of the shower system.