Do you have a question about the Grace Cutie Breeze and is the answer not in the manual?
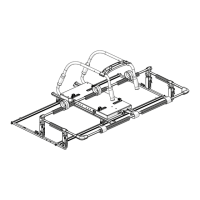
Connect the frame tracks to the side walls using the provided hardware.
Ensure the bottom carriage moves smoothly and is properly aligned on the frame tracks.
Securely attach the ergonomic handles to the frame's top plate for comfortable operation.
Mount your sewing machine onto the frame's top plate or bottom carriage.
Adjust rail holders to the correct length for your specific sewing machine model.
Install the front rail onto the frame's side wall towers.
Properly install and adjust the take-up rail for smooth fabric movement during quilting.
Route the foot pedal cable to ensure unrestricted movement of the sewing machine.
Reposition carriage stop clips to define the machine's safe movement range.
Set carriage stops to prevent the take-up rail from hitting the sewing machine.
Configure your sewing machine settings and components for quilting.
Prepare quilt top, backing, and batting layers for attachment to the frame.
Securely fasten the prepared quilt layers onto the frame's rails.
Stitch quilt edges to prevent shrinking and stabilize fabric layers.
Outline the machine's reachable quilting area on the quilt.
Techniques for starting and finishing quilting stitches securely and neatly.
Install optional encoders for enhanced quilting functionality and control.
Reposition the quilt on the frame to access and quilt different sections.
| Brand | Grace |
|---|---|
| Model | Cutie Breeze |
| Category | Service Equipment |
| Language | English |