Do you have a question about the Grace Q-Zone Hoop-Grame and is the answer not in the manual?
Instructions for adjusting the Q-Zone Hoop Frame to the correct ergonomic height for comfortable use.
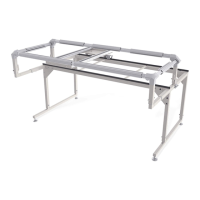
Detailed steps for attaching the corner brackets to the frame legs, ensuring structural integrity.
Instructions for installing the table support assemblies (frame tracks) onto the corner brackets.
Guidance on installing the single-wheel channel lock onto the bottom carriage for precise movement control.
Steps to ensure proper alignment of the frame tracks for smooth machine movement.
Checkpoint to ensure all necessary preceding steps for Part Two are completed.
Instructions for installing the dual-wheel channel lock onto the machine's wheels.
Checkpoint to ensure all necessary preceding steps for Part Three are completed.
Guide to installing the front and back rails that hold the quilt fabric onto the frame.
Instructions for adjusting the height of the frame rails relative to the sewing machine.
Steps to install the bungee mounts and cables for maintaining quilt tension.
Instructions on how to adjust the frame's leveling feet to ensure stability on uneven floors.
Steps for attaching the fabric clips to the front, back, and side rails of the frame.
Checkpoint to ensure all necessary preceding steps for Part Four are completed.
Instructions for preparing the quilt backing, batting, and quilt top for framing.
Steps to correctly place and secure the prepared quilt onto the frame rails.
Instructions on how to attach and use the fabric bungees to maintain quilt tension.
Guidance on tacking down the edges and sides of the quilt for secure stitching.
Instructions on how to reposition the quilt on the frame to access new quilting zones.
Explanation of how to use the channel locks to create straight lines during quilting.
Guidance on handling quilts that exceed the standard frame size or shape.
General tips to consider after attaching the quilt, including frame leveling and area cleanliness.
Step-by-step guide on how to correctly pull up the bobbin thread before starting to quilt.
Instructions for properly pulling up the bobbin thread at the end of a quilting session.