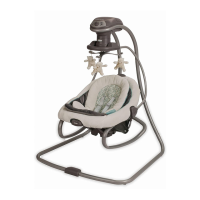
Do you have a question about the Graco Baby Walker and is the answer not in the manual?
Covers reading instructions, adult assembly, flat surfaces, burn hazards, child slip prevention, and proper product handling.
Details on blocking stairs, using friction strips, avoiding falls, and ensuring constant supervision.
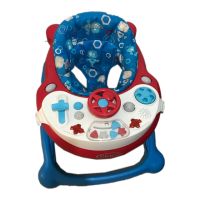
Emphasizes constant supervision of the baby while using the activity center.
Instructions to remove or guard against potential hazards in the play area.
Criteria for safe use, including baby's sitting ability, foot contact, and caregiver supervision.
Conditions to avoid use, such as child walking, exceeding weight/height limits, or product damage.
Key warnings against lifting, adjusting with baby inside, or using on elevated surfaces.
Visual diagram showing all product parts, intended to aid in understanding the overall assembly.
Instruction to confirm all listed parts are present before starting the assembly process.
Statement confirming that the product assembly must be performed by an adult.
Identifies the specific tool needed for assembly: a screwdriver.
Illustrations of parts that may be included or vary depending on the specific product model.
Indicates that some components may have separate, specific assembly instructions.
Assemble the base by turning it over, checking castor attachment, and securing wheel pins with plastic tabs.
Continue base assembly by turning it over, checking leg notches, and ensuring leg height consistency.
Attach the eight metal seat rings in numerical order to the seat for proper assembly.
Secure the tray window to the tray, ensuring no gap and not overtightening screws.
Attach the tray, following safety placement guidelines and checking bolt security.
Lower parking stands to prevent rolling and learn how to raise and lower them.
Adjust seat height so all four legs are even and the tray is level.
Attach the spoiler component to the activity center by snapping it into place.
Attach the toys and bead track to the activity center as shown.
Note that toy styles may vary depending on the specific product model.
Check that all attached toys are firmly secured by pulling on them.
Instructions for cleaning the base's friction strips using water only.
Advise checking for loose screws, worn parts, torn material, or stitching, and replacing as needed.
Guidelines for cleaning plastic components using mild soap and warm water, avoiding bleach.
Instructions for washing the removable cloth seat cover on a delicate cycle.
Warning about potential fading or warping of parts due to excessive exposure to sun or heat.
Details the warranty period, what is covered, and common exclusions like misuse or normal wear.
Outlines the customer's primary recourse (repair/replacement) and legal rights under the warranty.
Provides contact numbers and addresses for obtaining warranty service or replacement parts.
Instructions for ordering replacement parts in the USA, including required model number and payment.
Instructions for ordering replacement parts in Canada, including contact information for Elfe.
Guides users to circle the specific part needed from the catalog.
Lists various replacement parts with their corresponding identification numbers and prices.
Details necessary information like model and serial numbers for processing replacement part orders.
Instructions for submitting payment and providing shipping address and contact information.
Information on how to register the Graco product within the USA via the website.
| Product Type | Baby Walker |
|---|---|
| Brand | Graco |
| Foldable | Yes |
| Adjustable Height | Yes |
| Activity Tray | Yes |
| Removable Seat Pad | Yes |
| Washable Seat Pad | Yes |
| Type | Walker |
| Weight Limit | 26 lbs |
| Features | activity tray |